5. CRSP clients
Depending on your laptop there are a few clients that can be installed.
Please note that RCIC does not provide Windows OS or macOS support for the campus. If there is an operating system related issue, RCIC will refer you to you get support to address your systems issue first before installing CRSP Desktop.
Supported Protocols for Accessing CRSP
The following underlying data transfer protocols are supported for clients accessing CRSP:
Protocol
Description
SFTP
The secure shell file transfer protocol, it is the only protocol available to desktop clients.
NFSv4
Network File System. This is only supported on HPC3 through the path /share/crsp.
HTTPS
It provides very simple, browser-based access to CRSP. This is a fallback access method.
5.1. Client Authentication
In July 2024, Campus DUO multifactor authentication became mandatory for all CRSP desktop clients. The push response of DUO can become very tiresome. On some clients, DUO can make CRSP unusable because every file transfer requires another DUO push. RCIC cannot “turn off DUO”.
However, ssh keys with strong passwords is a secure method to to provide a different second factor of authentication. SSH keys managed properly do not require DUO after initial setup but still maintain strong security.
- Quick Start
You should follow the guide to Generate SSH keys for different platforms. Remember:
Never copy an ssh private key file!
All ssh keys that you generate MUST have a strong password. Passwordless keys are a security violation.
DO NOT COPY ssh keys from one laptop to another. Every different physical device should have a different ssh key pair.
We highly recommend that your private key file is in PEM format and has a .pem file extension. The CRSP desktop clients recognize PEM-formatted keys more reliably.
Make sure you uploaded your public keys to CRSP per Managing Public SSH Keys on CRSP.
Learn how to use SSH Agent on your desktop/laptop. On Windows, you can also use Putty’s pageant. SSH agents securely store a private key in memory so that you only have to type the key’s passphrase once.
5.2. macOS CRSP Desktop App
The CRSP Desktop for macOS is a licensed and branded version of the generic Mountain Duck product. It allows you to map one or more CRSP drives or file paths to a folder on your Mac.
System Requirements
Supported Operating System |
Minimum Hardware Requirements |
|---|---|
Monterey / Mojave / Catalina / Big Sur / Ventura |
Intel or ARM (Apple Silicon) Processor 8 GB of memory 1 GB of disk space |
- The following sections explain how to install and use CRSP Desktop app on macOS:
- macOS Download Desktop App
Important
You must either be on the campus network or connected to the UCI campus VPN to download the installers.
UCI pays a per-seat license for CRSP Desktop. Please do not share your downloaded copy of CRSP Desktop Installer with anyone.
If you have a different (previous or newer) version of the CRSP Desktop (or Mountain Duck), you need to uninstall it.
- Download Step 1:
Using your choice of the web browser open URL CRSP File Browser and login using your UCInetID and password (left image below). Once you see a request for a Duo push (right image below) respond to it with your phone’s Duo app.
Logging in
Duo authentication
Fig. 5.1 Login using your UCI credentials
Fig. 5.2 Request for a DUO push
- Download Step 2:
- After a successful authentication the window will look similar to the one shown below.Click on the CRSP-Desktop-Downloads tab, then click on the CONNECT:
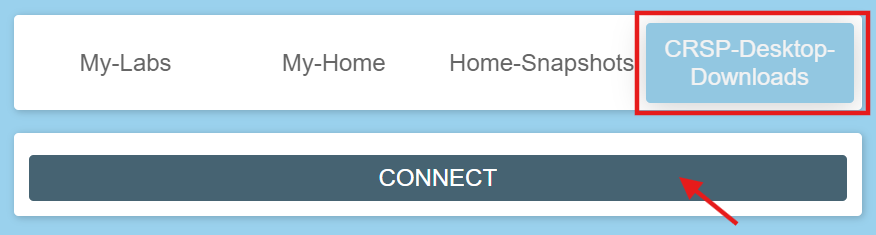
Fig. 5.3 CRSP web browser top level
- Download Step 3:
You should see three items on screen: a .pkg file for Mac clients, a .exe file for Windows, and older-versions folder. To toggle the between list and icon view click on the Layout icon outlined in green.
For the Mac, simply click on the file with .pkg ending:

Fig. 5.4 Select file to download
You should then see a screen with a download button on it and the full name of the file that will be downloaded to your local computer. Click Download:

Fig. 5.5 Download
You may see a popup window asking if you want to allow downloads from this site, click on Allow button and save the file to your local computer:
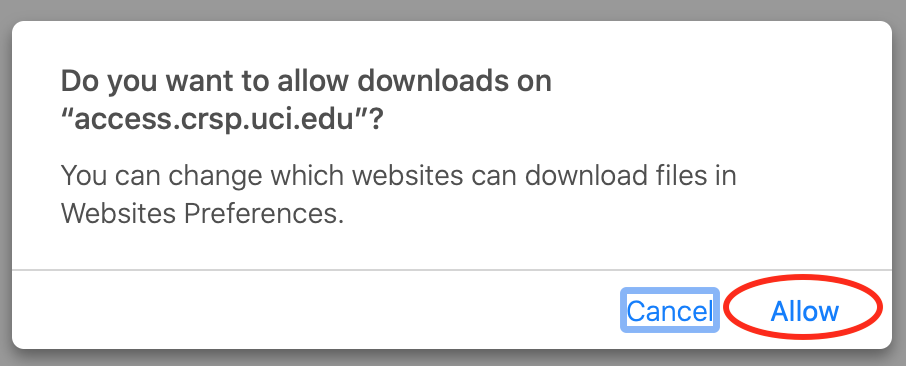
Fig. 5.6 Confirm download
- macOS: Install Desktop App
- Install Step 1:
Find the downloaded file, depending on your Mac configuration, the file is in your Downloads folder or in your Desktop:

Fig. 5.7 Downloaded CRSP Desktop app
- Install Step 2:
Double-click on the downloaded file name to launch the installation. You will see a confirmation window, click Open:
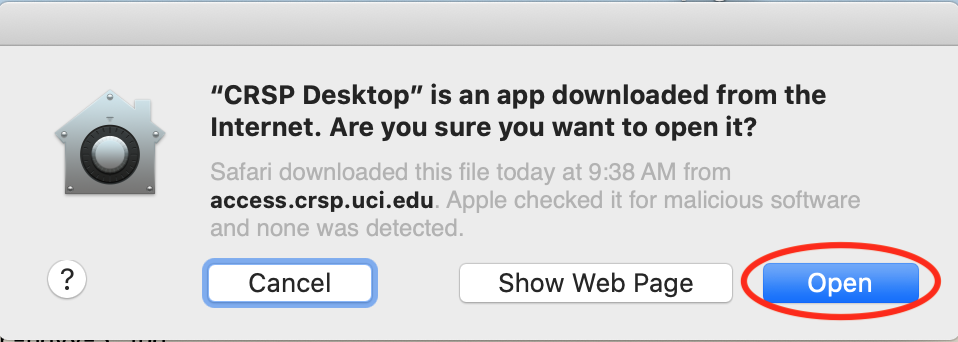
Fig. 5.8 Confirm opening of CRSP Desktop app
Congratulations! CRSP Desktop is now installed in your system!
- macOS: Configure Lab Share
This will configure Map CRSP Lab Share as a folder on your laptop.
- Configure Step 1
Once the CRSP Desktop application is opened, there will be a small icon in the top toolbar:

Fig. 5.9 CRSP Desktop app in the top toolbar
First time the application is started, it will automatically open a template window where you can configure your connection. The template bookmark is labeled panteater. You will edit this bookmark with your specific information.
- Configure Step 2
The most common share to access is a lab share, owned by a UCI’s PI.
Information needed to connect to CRSP:
Your UCInetID
- The UCInetID of the CRSP lab owner:It is our UCInetID if you own CRSP LabIt is the UCInetID of your PI, If you are a graduate student/post-doctoral researcher.
In the following example configuration, we are going to use the information for user npw to access the ppapadop lab:
UCInetID - npw
UCInetID of the CRSP lab owner - ppapadop
You will edit 5 fields in the default bookmark (left image below):
Nickname - we recommend to change it to something like: CRSP LAB - <pi> lab
Username - your UCInetID
SSH Private Key - use an SSH key name that you generated when following the Quick Start procedure for working effectively with DUO. The corresponding public key should have also been copied to CRSP into ~/.ssh/authorized_keys file.
Path - only the last part (highlighted below) that represents CRSP Lab Owner’s UCInetID should be edited. The /mmfs1/crsp/lab must remain unchanged.
Connect Mode - change to Online. This keeps all files on CRSP and reduces local cache space. If you use CRSP from multiple clients, this the most reliable mechanism for keeping all data in sync.
The URL is created automatically from the information you type in other fields, you don’t directly change it. This URL is for using the SFTP protocol to access CRSP and is an end-to-end encrypted connection.
After editing the bookmark, your screen should look similar to the one below (right image) but with your specific information in place. Click Connect to save the updated bookmark and to connect to the share.
Default bookmark
Edited bookmark
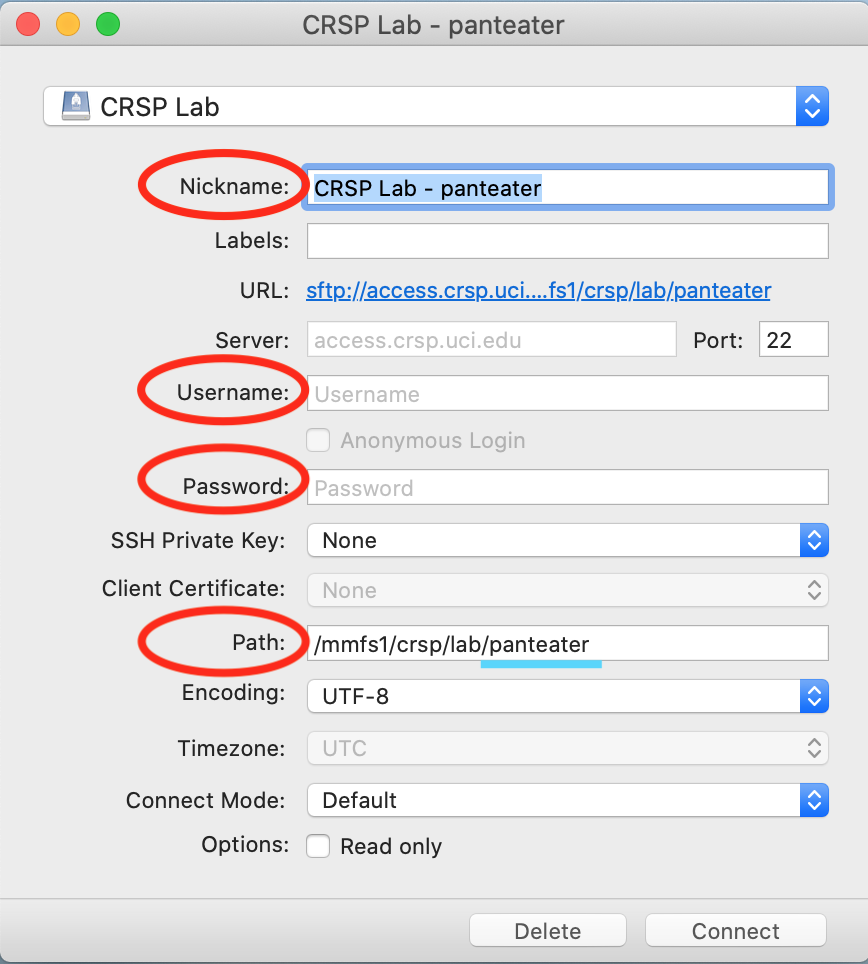
Fig. 5.10 Default template bookmark

Fig. 5.11 Edited bookmark
- macOS: Connect to Lab Share
After editing, if you click on the CRSP Desktop Notification Icon (top bar), you should see your bookmarks. Click on the bookmark of your choice (there may be one or a few), then click on Connect:
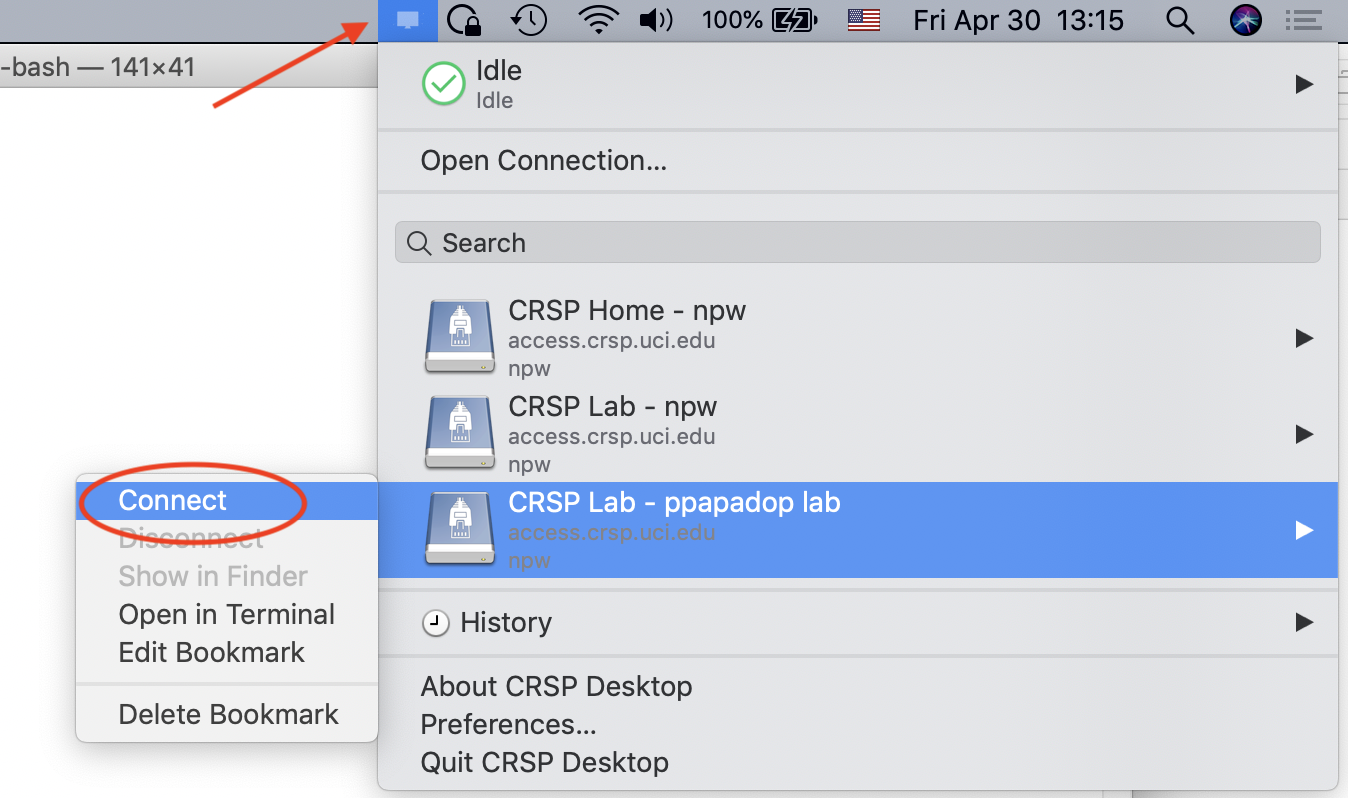
Fig. 5.12 Connect to Lab Share
At this point, your lab share is connected and you can use it just like a folder or network drive on your laptop:

Fig. 5.13 Lab Share in file browser
The snapshots folder is hidden. To view hidden files/folders in Finder window press Command + Shift + . (period) to make the hidden files appear (they will have a slightly translucent in appearance).
- macOS: Password+DUO vs. Passphrase
You have two authentication options when connecting to CRSP:
- Option 1: SSH Key with Passphrase
We highly recommend that you use ssh keys with a passphrase as described in the Quick Start guide. Assuming you did that, when you click connect in the macOS Connect to Lab Share section, you should see a pop-up window similar to the following (with your ssh key info):
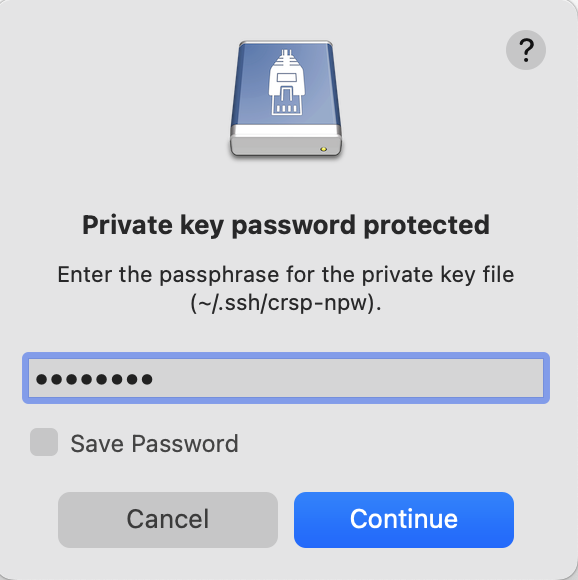
Fig. 5.14 Enter the ssh key passphrase
Notice that a passphrase for the ssh private key (a local file ~/.ssh/crsp-npw) is requested. You can optionally save the passphrase in your Keychain Access app.
Assuming that the public key for the private key has been properly installed on CRSP, you should be connected without a DUO prompt.
- Option 2: UCInetID + password + DUO Push
If you do not install an ssh key, you will be prompted for your UCInetID password and a DUO push. Even if you have the CRSP Desktop remember your password, the DUO Push will be required each and every time the desktop reconnects to CRSP.
Step 1 Enter your password, similar to the following:

Fig. 5.15 Enter the password associated with YOUR UCInetID
Step 2 Respond to the DUO push
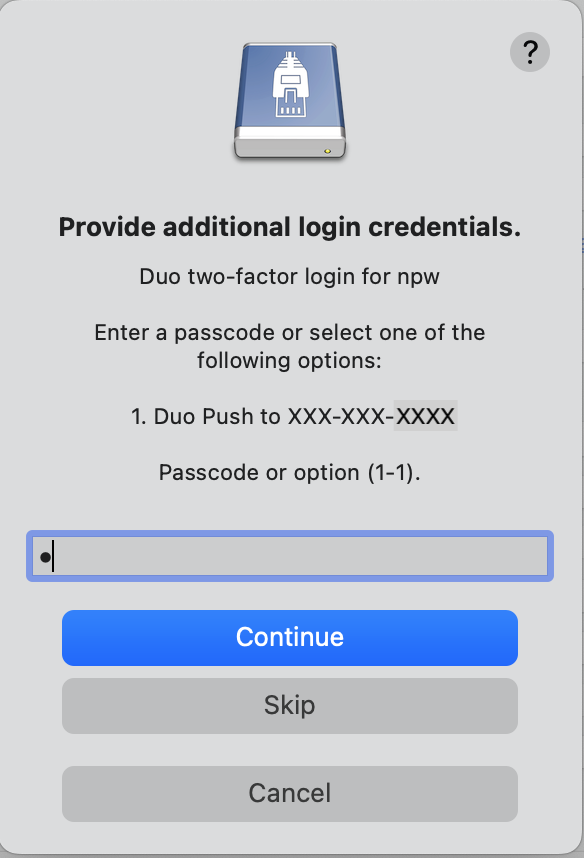
Fig. 5.16 Respond to DUO
Usually, you would enter 1 in the box, click on Continue and you will receive a DUO push on your phone. If your phone isn’t available, then you can enter one of your DUO backup codes that you set up when you enrolled in DUO through the UCI Office of Information Technology.
- macOS: Add New Shares
You are not limited to just a single, mapped, space. To create a new share, click Open Connection to create a new template and edit it per the directions in macOS Configure Lab Share.
The following figure shows 3 configured shares:
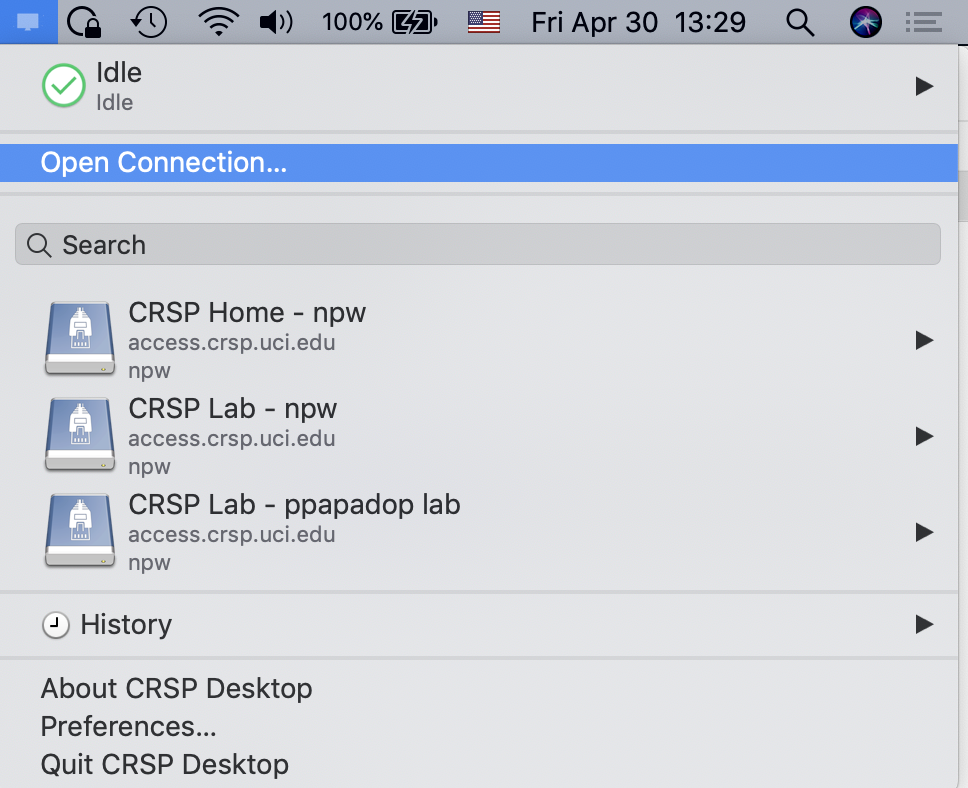
Fig. 5.17 Multiple Shares configured
5.3. Windows CRSP Desktop App
The CRSP Desktop for Windows is a licensed and branded version of the generic Mountain Duck product. It allows you to map one or more CRSP drives or file paths to a folder on your PC.
Supported Operating System |
Minimum Hardware Requirements |
|---|---|
Windows 10 / Windows 11 |
Pentium Class Processor 4 GB of memory (8 GB recommended) 1 GB of disk space |
- The following sections explain how to install and use CRSP Desktop app on macOS:
- Windows: Download Desktop App
Important
You must either be on the campus network or connected to the UCI campus VPN to download the installers.
UCI pays a per-seat license for CRSP Desktop. Please do not share your downloaded copy of CRSP Desktop Installer with anyone.
If you have a different (previous or newer) version of the CRSP Desktop (or Mountain Duck), you need to uninstall it.
- Download Step 1:
Using your choice of the web browser open URL CRSP File Browser and login using your UCInetID and password (left image below). Once you see a request for a Duo push (right image below) respond to it with your phone’s Duo app.
Logging in
Duo authentication
Fig. 5.18 Login using your UCI credentials
Fig. 5.19 Request for a DUO push
- Download Step 2:
- After a successful authentication the window will look similar to the one shown below.Click on the CRSP-Desktop-Downloads tab, then click on the CONNECT:
Fig. 5.20 CRSP web browser top level
- Download Step 3:
You should see three items on screen: a .pkg file for Mac clients, a .exe file for Windows, and older-versions folder. To toggle the between list and icon view click on the Layout icon outlined in green.
For the Windows, simply click on the file with .exe ending.
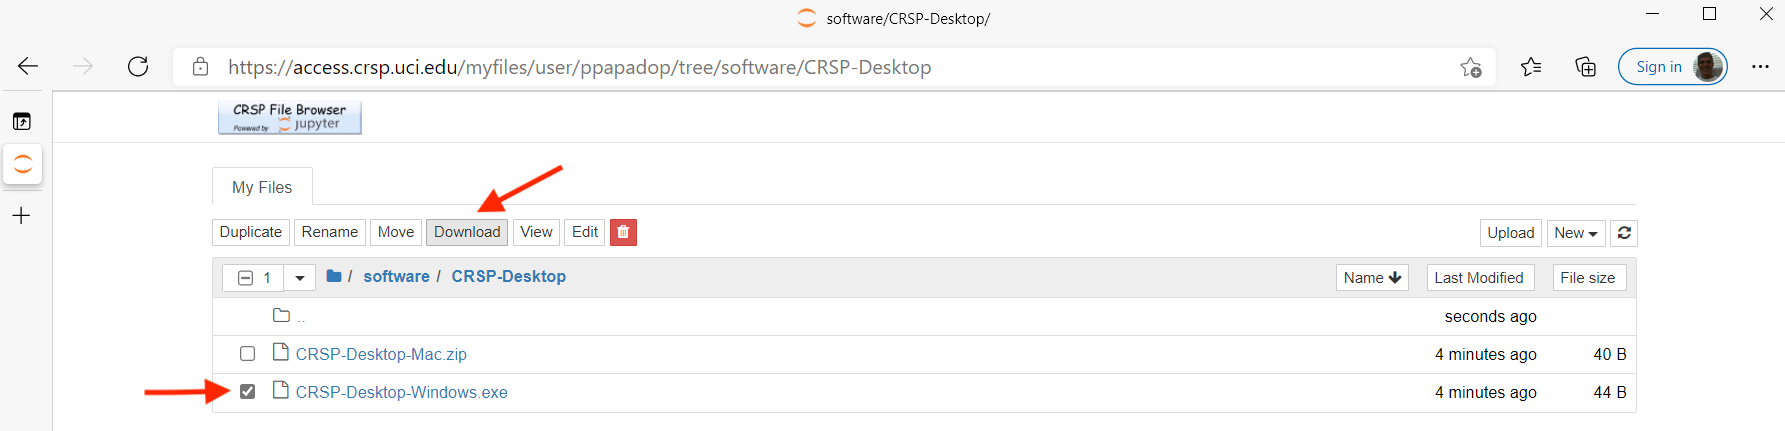
Fig. 5.21 Select file to download
You should then see a screen with a download button on it and the full name of the file that will be downloaded to your local computer. Click Download and save the file to your local computer:
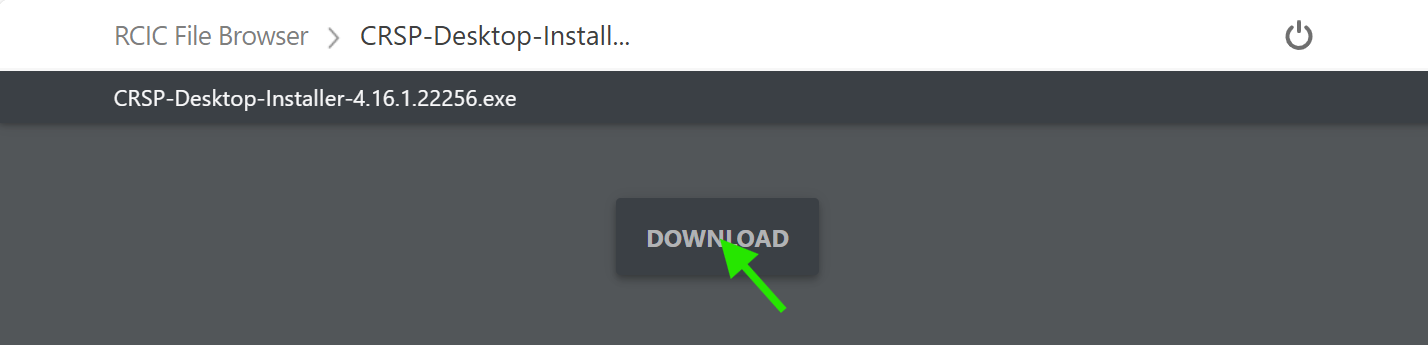
Fig. 5.22 Download
- Windows: Install Desktop App
- Install Step 1
By default, the file is downloaded in your Downloads folder. Find the downloaded file, double-click on it to launch the installation of the licensed version of CRSP Desktop.
- Install Step 2
In the opened window click Install to Install the CRSP Desktop on your laptop.
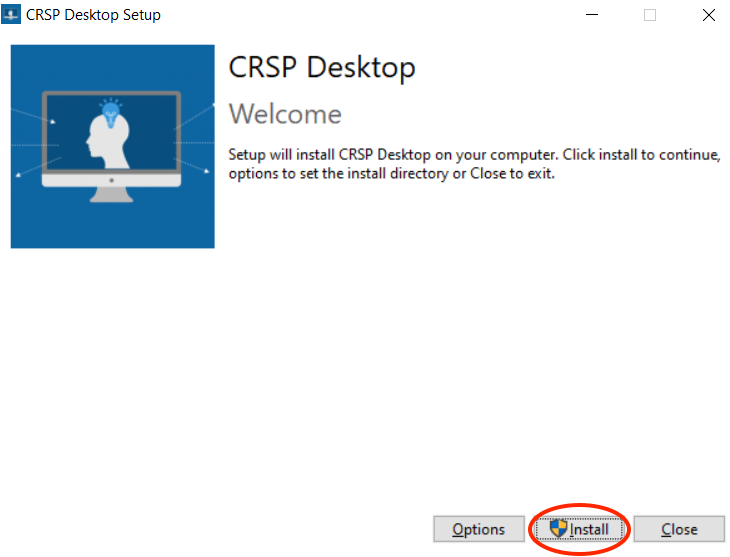
Fig. 5.23 Install the CRSP Desktop.
- Install Step 3
After a successful installation, follow the instructions and click Restart to restart your computer:
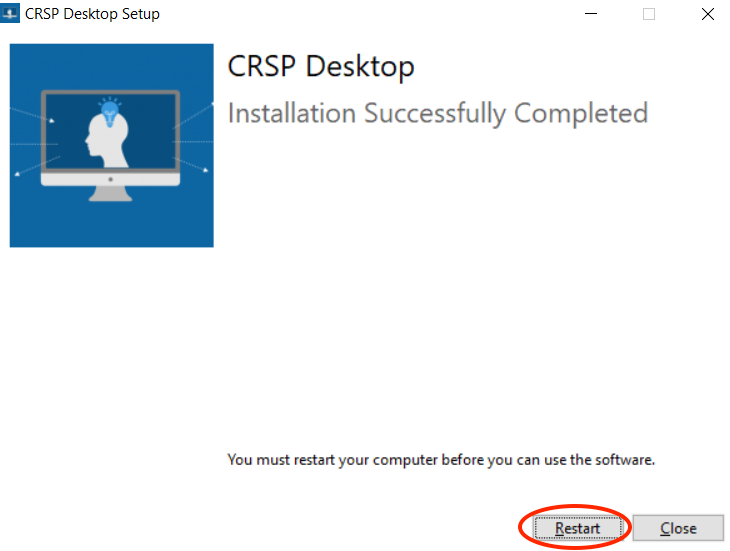
Fig. 5.24 Restart your computer
Congratulations! CRSP Desktop is now installed in your system!
- Windows: Configure Lab Share
This will Map CRSP Lab Share as a folder on your laptop.
Attention
If Accessing CRSP ANNEX, then this step requires modification and is similar to win Add New Shares
- Configure Step 1
CRSP Desktop shows in the Windows Notification Area (also known as system tray). You can left-click or right-click on the CRSP Desktop icon to open it (left image). Once opened in a set of bookmarks choose a template bookmark labeled panteater (right image):
Open the App
Choose a template bookmark
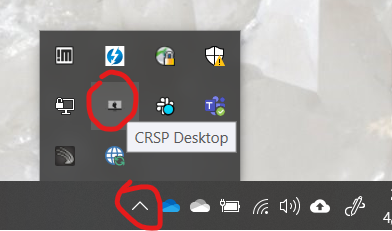
Fig. 5.25 Start CRSP Desktop App
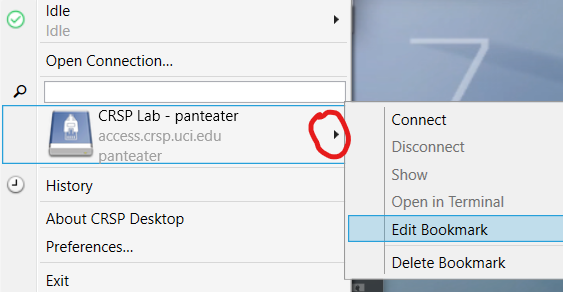
Fig. 5.26 Choose the template bookmark
- Configure Step 2
The most common share to access is a lab share, owned by a UCI’s PI.
Information needed to connect to CRSP:
Your UCInetID
- The UCInetID of the CRSP lab owner:It is our UCInetID if you own CRSP LabIt is the UCInetID of your PI, If you are a graduate student/post-doctoral researcher.
In the following example configuration, we are going to use the information for user nppapadop to access the npw lab:
UCInetID - ppapadop
UCInetID of the CRSP lab owner - npw
You will edit 5 fields in the default bookmark (left image below):
Nickname - we recommend to change it to something like: CRSP LAb - <pi> lab
Username - your UCInetID
SSH Private Key - use an SSH key name that you generated when following the Quick Start procedure for working effectively with DUO. The corresponding public key should have also been copied to CRSP into ~/.ssh/authorized_keys file.
Path - only the last part (highlighted below) that represents CRSP Lab Owner’s UCInetID should be edited. The /mmfs1/crsp/lab must remain unchanged.
Connect Mode - change to Online. This keeps all files on CRSP and reduces local cache space. If you use CRSP from multiple clients, this the most reliable mechanism for keeping all data in sync.
The URL is created automatically from the information you type in other fields,
After editing the bookmark, your screen should look similar to the one below (right image) but with your specific information in place. Click OK to save the updated bookmark.
Default bookmark
Edited bookmark
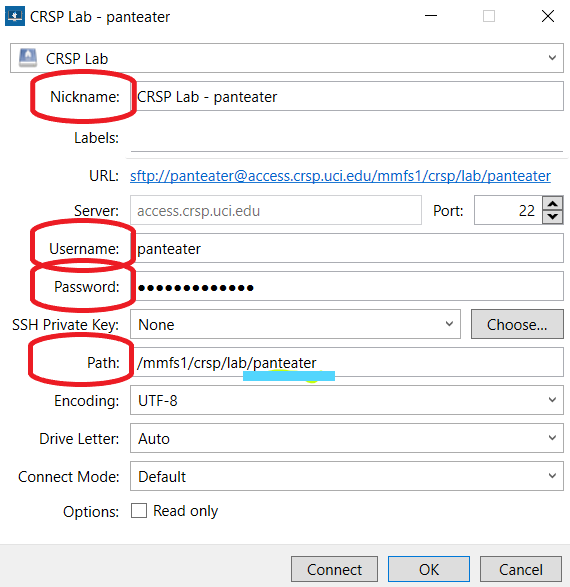
Fig. 5.27 Default template bookmark
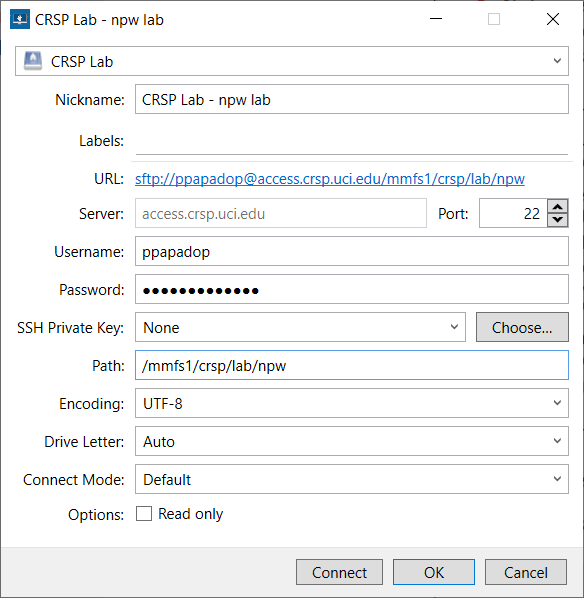
Fig. 5.28 Edited bookmark
- Windows: Connect to Lab Share
After editing, if you click on the CRSP Desktop notification icon, you should see your edited bookmark. For our example, it looks like the following:
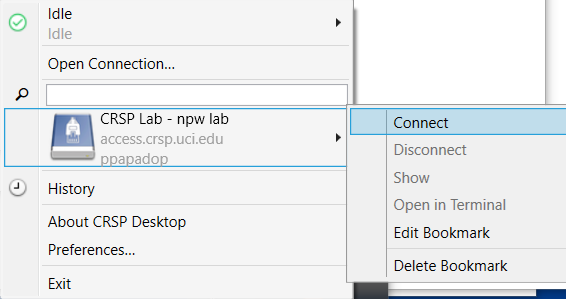
Fig. 5.29 Connect to Lab Share
Click connect to open your share.
If you are not running ssh-agent or CRSP desktop has not remembered your password, you should be asked for the passphrase to your ssh private key file that you specified.
At this point, your lab share is connected and you can use it just like a folder or network drive.
- Windows: Password + DUO vs. Passphrase
You have two authentication options when connecting to CRSP:
- Option 1: SSH Key with Passphrase
We highly recommend that you use ssh keys with a passphrase as described in the Quick Start guide. When you click Connect in the previous step win Connect to Lab Share, you should see a pop-up window similar to the following:
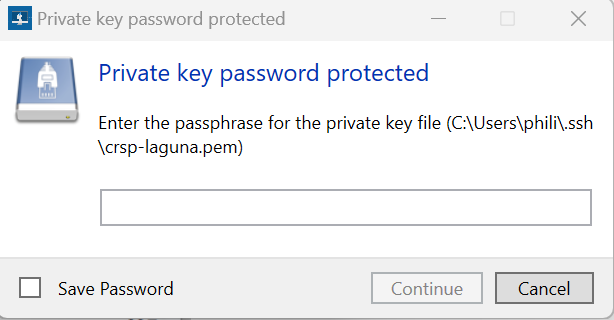
Fig. 5.30 Enter the ssh key passphrase
Notice that a passphrase is requested for a local file (ssh private key). You can optionally save the passphrase. Assuming that the public key for the private key has been properly installed on CRSP, you should be connected without a DUO prompt.
- Option 2: UCInetID + password + DUO Push
If you do NOT install an ssh key, you will be prompted for your UCInetID password and a DUO push. Even if you have the CRSP Desktop remember your password, the DUO Push will be required each and every time the desktop reconnects to CRSP.
Step 1 Enter your password, similar to the following:
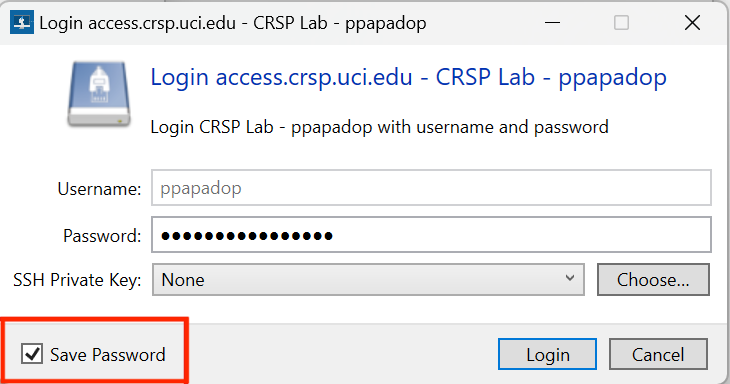
Fig. 5.31 Enter the password associated with YOUR UCInetID
Step 2 Respond to the DUO push
Usually, you would enter 1 in the box, and you will receive a DUO push on your phone. If your phone isn’t available, then you can enter one of your DUO backup codes that you set up when you enrolled in DUO through the UCI Office of Information Technology

Fig. 5.32 Respond to DUO
- Windows: Add New Shares
You are not limited to just a single, mapped, space. To create a new share, click Open Connection to create a new template and edit it following the directions above in win Configure Lab Share.
Here is an example with multiple connections configured and active:
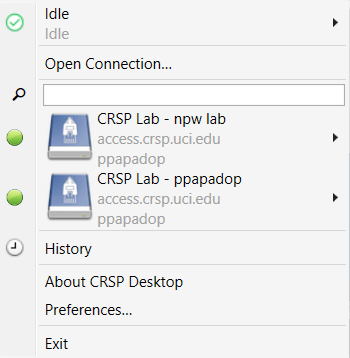
Fig. 5.33 Multiple Lab Shares
5.4. Web based File Browser
A simple, easy to use File Browser is platform independent and is compatible with most web browsers.
Important
File Browser is suitable only for lightweight use.
Use macOS CRSP Desktop App and Windows CRSP Desktop App for moderate/heavy use.
Your system must be updated with the latest version of Google Chrome, or Firefox or Safari
You must be registered and setup with UCI DUO
- The following sections explain how to install and use CRSP Desktop app on macOS:
- Web Browser Login
Using your choice of the web browser open URL CRSP File Browser and login using your UCInetID and password (left image below). Once you see a request for a Duo push (right image below) respond to it with your phone’s Duo app.
Logging in
Duo authentication
Fig. 5.34 Login using your UCI credentials
Fig. 5.35 Request for a DUO push
- Web Browser Connect to Shares
Once logged in, you will be presented with the CRSP top level screen. You can follow the tab My-labs to your Lab shared areas or the tab My-Home to your HOME private area.
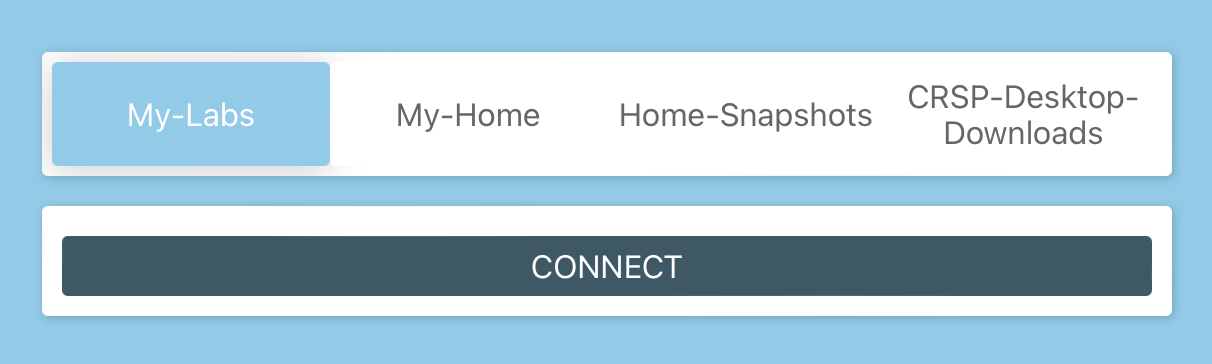
Fig. 5.36 Top level File Browser
Important
Nothing can be stored in HOME area, it is used for for files associated with the account and for storing quota info file. It is a completely private area, only you have access.
All work on CRSP must be done in your lab area. Lab areas are flexible for sharing. You can be granted access to multiple Lab areas.
To see your labs, Click on My-Labs, then click on CONNECT. You will see a screen similar to the image below. In this example a user npw has an access to 4 labs:

Fig. 5.37 File browser labs for user npw
- Web Browser Navigation
The File Browser is fairly easy to navigate, with some very basic sets of functions.
Create folders (directories)
Click on desired folders to navigate to a location where you want to create a new folder. Click on NEW FOLDER and on a newly opened line type desired folder name:
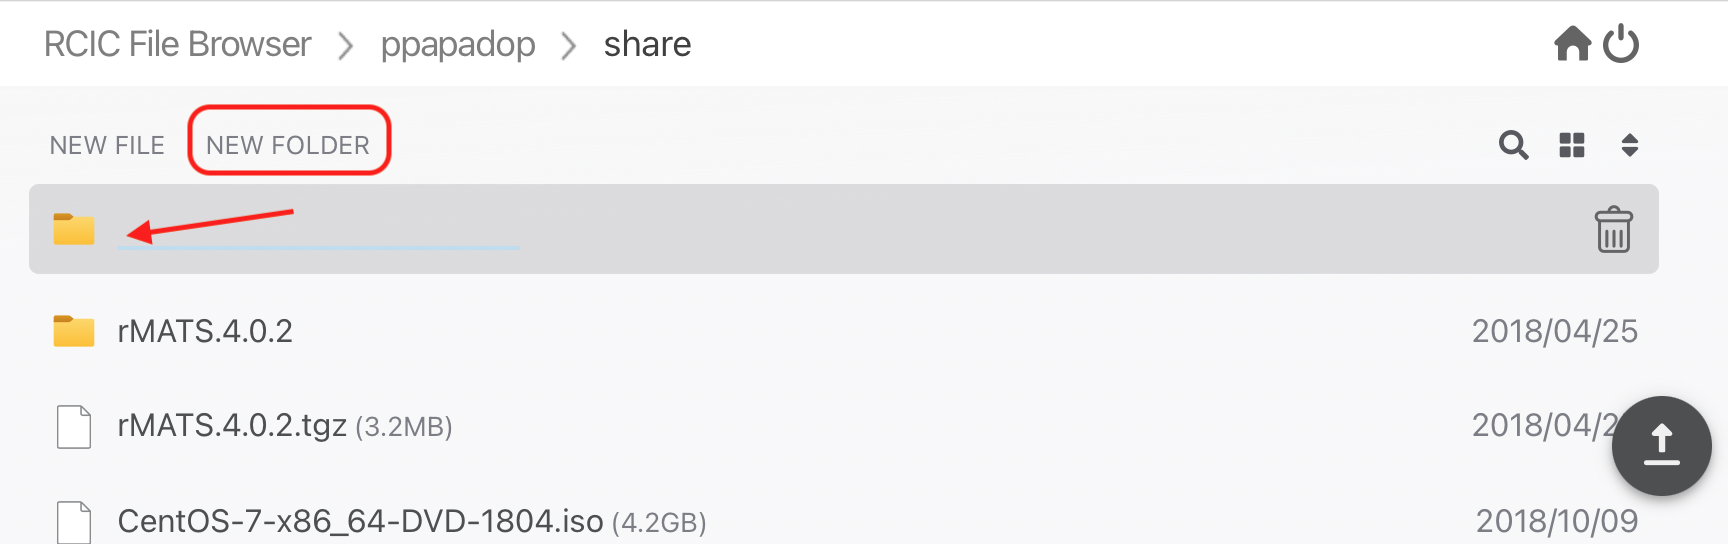
Fig. 5.38 Create a new folder
Create files
Click on desired folders to navigate to a location where you want to create a file then click on NEW FILE and on a newly opened line type desired file name:
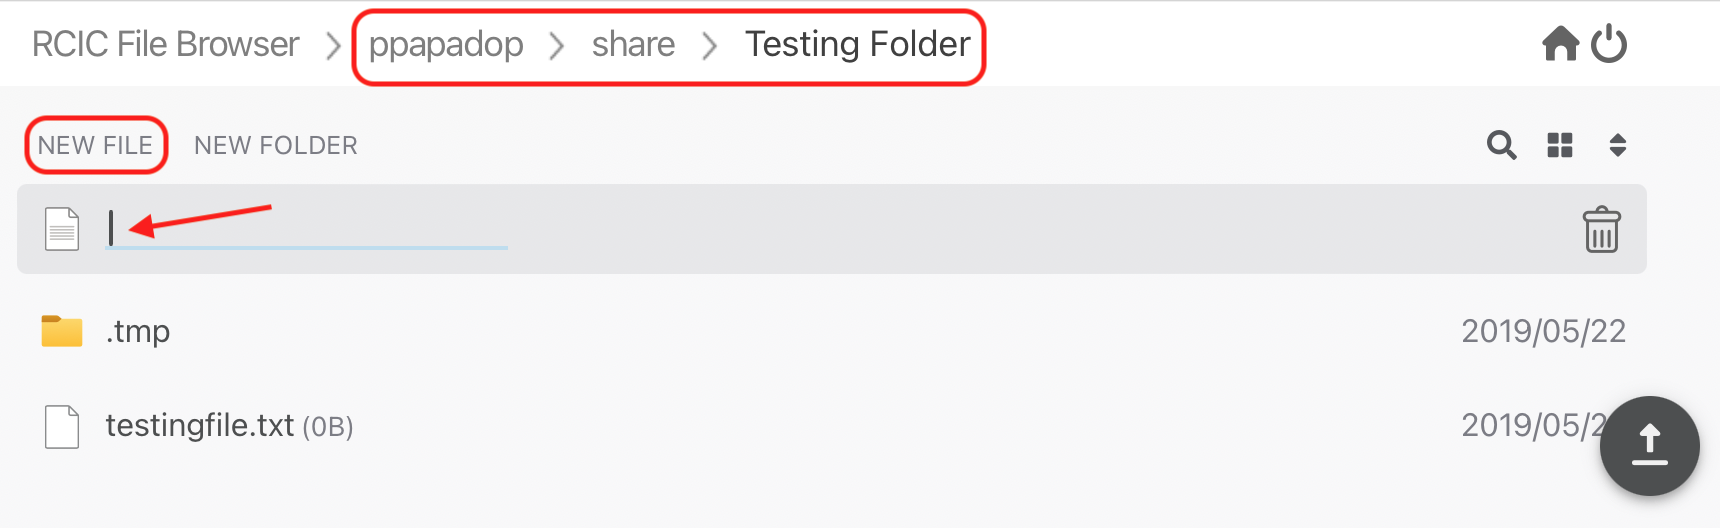
Fig. 5.39 Create a new file
Download files
Select a file or multiple files to download, click on Download:
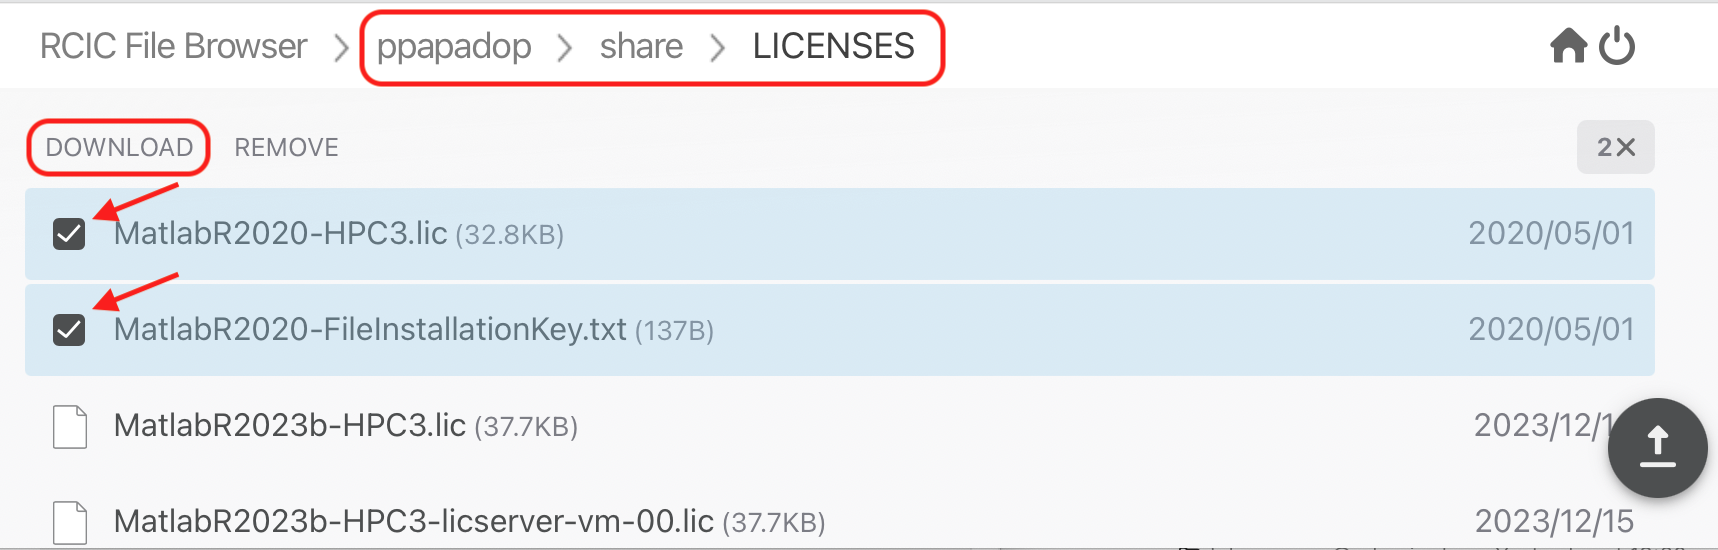
Fig. 5.40 File download
a single file will be downloaded as a file with the same name
multiple files will be downloaded as download.zip file which will need to be unzipped to access the contents.
Upload files
Navigate to a folder where you want to upload files to and click on the upload button at the bottom-right of the screen:

Fig. 5.41 File upload
Then follow your local laptop file finder application that will let you choose file or multiple files for upload. Once uploaded the CRSP browser will show a confirmation similar to the one below showing your uploaded file name:

Fig. 5.42 File upload confirmation
Delete files or directories
Navigate to a folder or directory you want to remove and click on the icon before its name to choose it, then click on REMOVE:
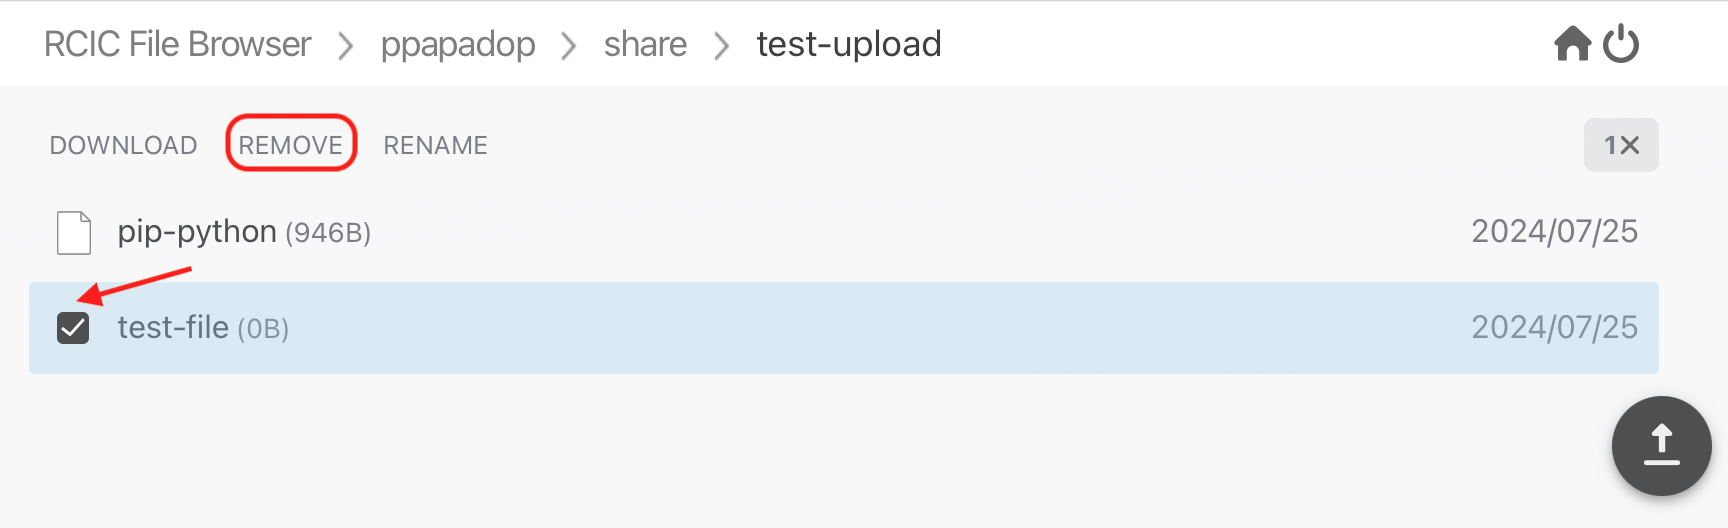
Fig. 5.43 Delete file or folder
You will see a popup window asking to type item name, in this example it is test-file:
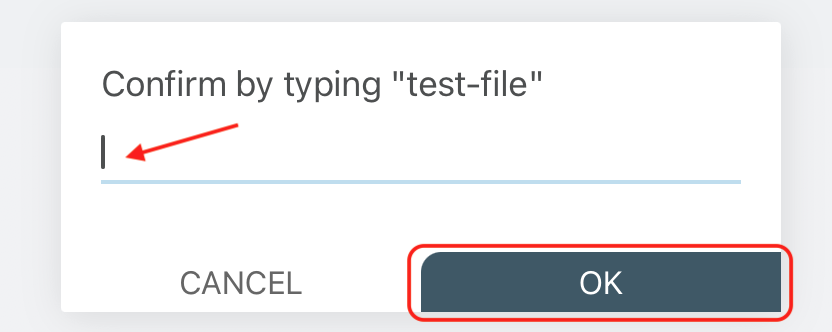
Fig. 5.44 Confirm deletion via typing file or folder name
Logout from CRSP FIle Browser
To logout from the CRSP browser click on the power icon in the top right corner:
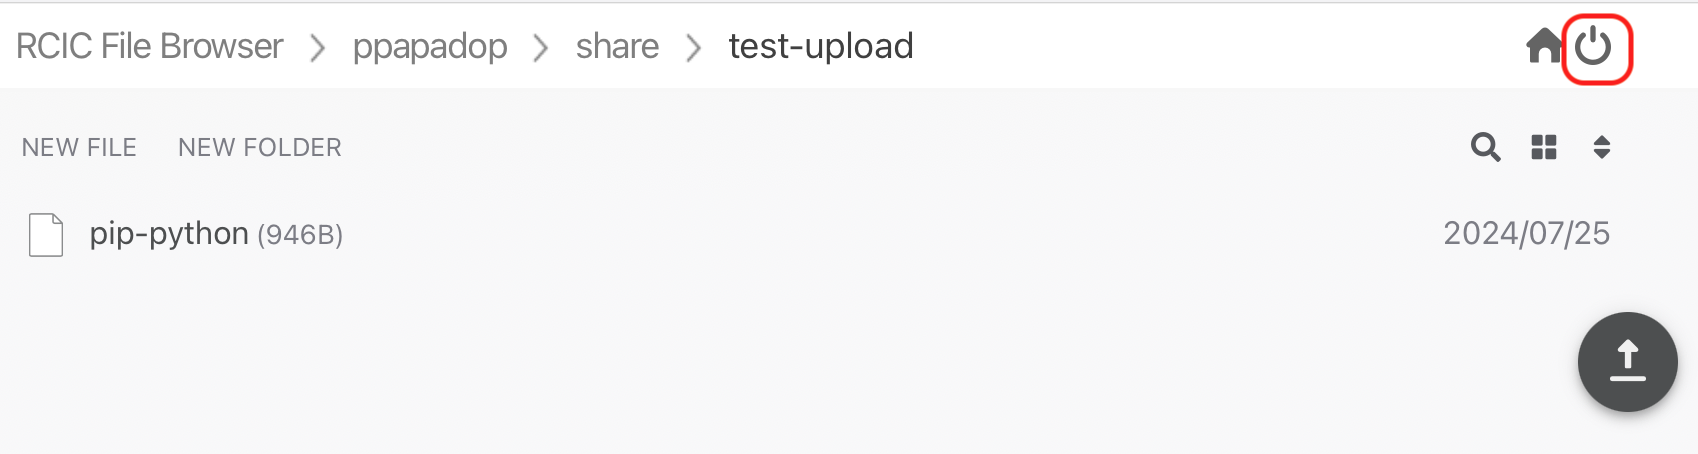
Fig. 5.45 CRSP File Browser logout
You should see a confirmation:
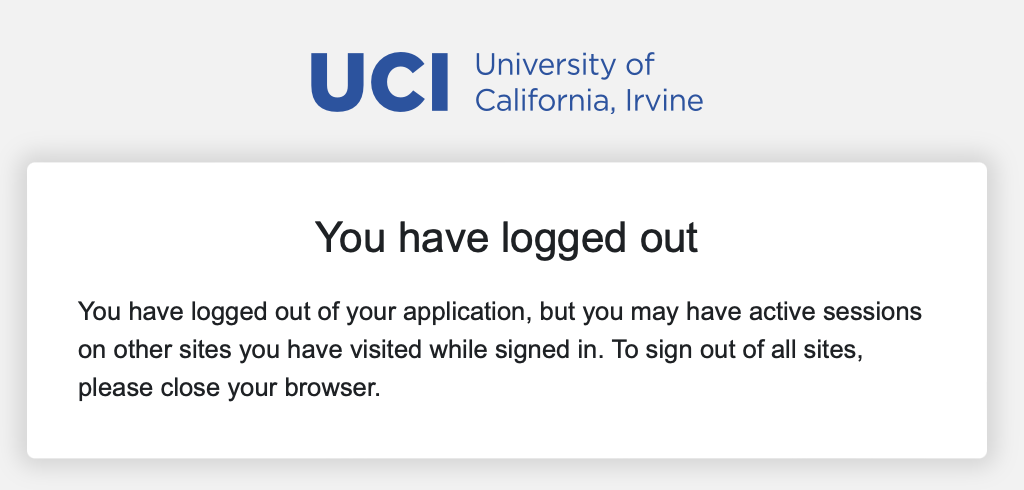
Fig. 5.46 CRSP File Browser logout confirmation
5.5. Linux SSHFS
The following sections explain how to install and use SSHFS on Linux laptop for accessing CRSP:
- Install SSHFS
On your laptop you will need super user (sudo) rights to install SSHFS.
For CentOS based laptop
$ yum -y install sshfs
For Ubuntu/Debian based systems
$ apt-get -y install sshfs
- Mount CRSP shares
SSHFS will Map CRSP Lab Share as a folder on your laptop.
Important
You must either be on the campus network or connected to the UCI campus VPN.
Information needed to connect to CRSP:
Your UCInetID
- The UCInetID of the CRSP lab owner:It is our UCInetID if you own CRSP LabIt is the UCInetID of your PI, If you are a graduate student/post-doctoral researcher.
From your desktop or laptop, execute the following command replacing username and labname with the appropriate UCInetID(s):
$ cd ~
$ mkdir crsp_mount
$ sshfs -o ssh_command='ssh -A -X -o StrictHostKeyChecking=no' \
        -o idmap=user username@access.crsp.uci.edu:/mmfs1/crsp/lab/labname \
        ~/crsp_mount
As a result,
sshfsmounts CRSP Lab share under ~/crsp_mount directory. Use any name of your choice in place of crsp_mount.Sshfs will not automatically map all your remote UID and GID from all of your CRSP groups into your local Linux system, it will only present your primary UID/GID. Note in the command above the use of -o idmap=user option.
As the campus does not have a centralized directory service to manage every system, options to keep your local system and CRSP accounts synced are very limited.
- Unmount CRSP shares
To unmount the share that was mounted in the above example:
$ fusermount -u ~/crsp_mount
- Using SSHFS
Copy a file from your local system to your SSHFS mounted drive
$ cp ~/dir1/file.tar.gz ~/crsp_mount/share/
Recursively copy a directory from local system to mounted CRSP share using
rsync$ rsync -rltv ~/dir1 ~/crsp_mount/share/
5.6. Access from HPC3
On HPC3, CRSP shares are mounted in /share/crsp:
[user@login-x:~]$ ls /share/crsp
home  lab
- home:
HOME area for all users accounts. All HOME snapshots are in /share/crsp/home/.snapshots with read only access. Users can only access their own HOME area.
- lab:
Lab area for all users accounts. Each LAB directory has snapshots in .snapshots/ for read-only access by LAB members.
- CRSP HOME
User CRSP HOME area is /share/crsp/home/UCInetID:
it is a placeholder for login related files.
it is different from your HPC3 account’s $HOME
Do not store anything in your CRSP HOME
file quotas.txt is placed automatically in your CRSP HOME area and provides information about quotas. Please see Quotas for details.
- CRSP LAB
LAB area is your primary storage area. It is /share/crsp/lab/UCInetID or any other LAB directories you have access for.
If you are a PI and it’s your lab
USERNAME
LABNAME
Mounted location
Read/write access
your
UCInetID
your
UCInetID
/share/crsp/lab/LABNAME
you can create any directories and files
/share/crsp/lab/LABNAME/USERNAME
your personal space
If you are added to a PI lab e.g., you are a student/postdoc in the lab
USERNAME
LABNAME
Mounted location
Read/write access
your
UCInetID
your PI
UCInetID
/share/crsp/lab/LABNAME/USERNAME
you and PI
/share/crsp/lab/LABNAME/share
all lab members
The following example shows the directory structure and permissions for a PI panteater who has a lab and added 2 students:
[user@login-x:~]$ ls -ld /share/crsp/lab/panteater
drwxr-x--T 3 panteater panteater_lab_share  512 Mar  6 15:58 /share/crsp/lab/panteater

[user@login-x:~]$ ls -l /share/crsp/lab/panteater
drwx--S--- 2 panteater panteater_lab      2048 Jul 12 10:22 panteater # PI access
drwxrws--- 2 student1  panteater_lab       512 Apr 29 10:27 student1  # student1/PI access
drwxrws--- 2 student2  panteater_lab       512 Apr 29 10:27 student2  # student2/PI access
drwxrws--T 4 panteater panteater_lab_share 512 Nov  2  2020 share     # all in lab access
- Moving data to CRSP
Please see Data transfer for in-depth commands examples.
Recursively copy your mydir/ directory from dfs6b storage to your LAB share on CRSP:
[user@login-x:~]$ rsync -rv /dfs6b/pub/paneater/mydir /share/crsp/lab/panteater/