3. UNIX primer
The information in this guide is intended to provide familiarity with Linux/UNIX for HPC3 users that are new to these operating systems. Please consult the rest of the user guides for information that is not covered here.
3.1. Bash init files
A shell is a program that acts as an interface between the user and the operating system’s kernel, allowing users to type and execute commands and interact with the system.
On HPC3 the default shell is bash and it uses 2 initialization files.
Both files are located in your $HOME directory
and are provided with the default settings when your account is created.
Both files start with dot which makes them invisible to a regular ls command.
- .bash_profile
Is the initialization file executed only for login shells. Anything you want to run when you log in, you put in .bash_profile. A default one is sufficient for nearly all users and has the following content:
# .bash_profile
# Get the aliases and functions
if [ -f ~/.bashrc ]; then
      . ~/.bashrc
fi

# User specific environment and startup programs

PATH=$PATH:$HOME/bin
export PATH
- Best practices:
It should be a very small file, keep changes here to a bare minimum.
It will source .bashrc by default so you don’t have to duplicate any commands you want to run for every shell.
- .bashrc
Is the initialization file executed every time a user starts a new shell. It can include all customizing of your shell environment with aliases, functions, environment variables, etc.
- What to put in this file:
Aliases - shortcuts to the commands.
Environment variables that affect your shells and applications.
History configuration.
Terminal color scheme.
Prompt configuration.
- Do not put in this file:
Any module load/unload commands.
Conda init commands, see Install with conda/mamba section to learn how to use them.
- Best practices:
Keep your file clean and concise.
Use a text editor
vimornanoto modify your .bashrc file. Before editing make a copy of your current file so you can revert to it if your edits go wrong.Consider using separate files for different types of customizing that can be sourced when needed, for example complex environments for specific applications.
Reload your file after editing for the changes to take an affect:
[user@login-x:~]$ . ~/.bashrc
- Example file:
# Source global definitions
if [ -f /etc/bashrc ]; then
     . /etc/bashrc
fi

alias rm='rm -i'
alias c='clear'
alias h='history'
alias la='ls -la'
alias pub="cd /pub/$USER"
alias crsplab="cd /share/crsp/lab/PI-LAB/share/"
alias saccf="export SACCT_FORMAT='JobID%20,JobName,User,Partition,NodeList,Start,End,Elapsed,State,ExitCode,MaxRSS,AllocTRES%32'"

# set prompt color
host=`hostname -s`
PS1="\[\033[01;36m\]\\h \!% \[\e[0m\] "

export VISUAL=vi
export EDITOR=emacs
export CLICOLOR=true
export MYPUB=/pub/$USER
export biojhub4HOME="/pub/$USER/biojhub4_dir"
3.2. My processes
When you login on any cluster node and start some programs there will be processes started on your behalf. Sometimes some processes do not stop on their own due to some errors or are a result of failed commands.
- How to find what are my processes ?
To see what processes are running right after login:
[user@login-x:~]$ ps -ef | grep $USER
UID            PID     PPID     C STIME TTY      TIME     CMD
panteater      2083897       1  6 17:08 ?        00:00:00 /usr/lib/systemd/systemd --user
panteater      2083900 2083897  0 17:08 ?        00:00:00 (sd-pam)
panteater      2083916 2083891  0 17:08 ?        00:00:00 sshd: panteater@pts/51
panteater      2083922 2083916  0 17:08 pts/51   00:00:00 -bash
panteater      2084185 2083922  0 17:09 pts/51   00:00:00 ps -ef
panteater      2084186 2083922  0 17:09 pts/51   00:00:00 grep --color=auto panteater
The output shows a few processes started by ssh session and by running
pscommand. All listed are standard and expected for this case. The header line in the output is added for readability and for the explanation of the columns. The first column is your UCInetID, the second is the process ID. To learn more about the rest of the output fields and the command itself seeman ps.The $USER is set to the UCInetID, so the output will show info for a user who runs this command at any time during the login session.
- How to stop unwanted processes ?
In some cases when a user knowingly or unknowingly runs some commands or programs, there can be processes that do not stop and hang.
For example, you may see in the
psoutput:[user@login-x:~]$ ps -ef | grep $USER panteater 2937630 1 0 May11 ? 00:00:00 bash -c echo 3aGl...Ml9zZSc= | base64 -d | bash panteater 2937635 1 0 May11 ? 00:00:00 sleep 0.5
Depending on what user does there can be any number of processes of different type. Assuming these above are unwanted processes, they can be removed :
[user@login-x:~]$ kill -9 2937630 2937635
3.3. File permissions
Important
File permissions are used in determining quotas.
Our cluster and storage systems are running one of the UNIX operating systems. All data in Unix is organized into files, all files are organized into directories and the directories are organized into a tree-like structure called the filesystem.
There are three basic types of files:
- ordinary file:
is a file on the system can contains data, text, program instructions.
- special file:
file that can provide access to hardware such as hard drives, symbolic links.
- directory:
directories store special and ordinary files. Unix directories are equivalent to folders on Windows or Mac OS.
Every file has the following access modes:
- read:
denoted as r, the capability to read or view the contents of the file.
- write:
denoted as w, the capability to modify and remove the content of the file.
- execute:
denoted as x, the capability to run a file as a program.
- sticky bit:
denoted as s, the additional capability to set permissions for Set User ID (SUID) and Set Group ID (SGID) bits.
Every file has the following attributes or permissions:
- owner:
determine what actions the owner of the file can perform on the file.
- group:
determine what actions a user, who is a member of the group that a file belongs to, can perform on the file.
- other (world):
determine what action all other users can perform on the file.
Display file permissions
Use
ls -lcommand: to display file permissions of files and directories:$ ls -l total 55524423 drwxrwsr-x 7 panteater bio 127 May 12 16:29 biofiles -rw-r--r-- 1 panteater panteater 4967296 May 31 2022 perf.tst ... deleted lines ...In the output, a first line labeled total shows number of blocks used in the file system by the files which are listed as the directory’s contents. The default block size is 512 bytes.
The remaining lines are the listing of a directory’s contents with the following information for each:
file
mode
links
number
owner
group
bytes
number
last
modified
name
drwxrwsr-x
7
panteater
bio
127
May 12 16:29
biofiles
-rw-r–r–
1
panteater
panteater
4967296
May 31 2022
perf.tst
The file mode field in the output, represents file type and its associated permissions. For example,
drwxrwsr-xfor biofiles:
character
position
meaning
1
dis a file type, in this case a directory2-4
rwxare the owner permissions. The owner has read (r), write (w) and execute (x) permissions.5-7
rwsare the group permissions. The group has read (r), write (w), execute (x) permissions, the sticky bitsis set.8-10
r-xare the world permissions. Everyone else has read (r) and execute (x) permissions.To learn more about files permissions execute command
man ls.
3.4. Symbolic Links
Symbolic links, also known as soft links or symlinks, are special types of files that point to other files. The data in the target file does not appear in a symbolic link, instead, it points to another file system entry.
While symbolic links can be a practical choice, sometimes they can have a significant, adverse impact on performance
- Best practices:
Use when making shortcuts for the names between the files on the same filesystem.
Use when making shortcuts from a local file system to a remote file (networked) file system, for example /pub -> /dfs6b/pub.
Use aliases or environment variables in place of symbolic links when you are making shortcuts for the file names in different filesystems.
- Do not use:
Attention
Do not create symbolic links between any two networked filesystems:$HOME and CRSP
$HOME and DFS
CRSP and DFS
The CRSP and DFS servers can handle high-volumes of traffic, the $HOME servers cannot.- Example of inappropriate use
Suppose you define a convenience link from your home area $HOME to your PI’s CRSP lab area as:
$ ls -l crsplab
crsplab -> /share/crsp/lab/pilab
In this scenario:
Every file operation that uses $HOME/crsplab as part of its path must first go to the NFS server that provides $HOME. This includes any
lscommand or any ocmmand that parses a file path starting with $HOME.The NFS home server then redirects to CRSP server and a second network transaction is made for the CRSP server.
Essentially, this kind of convenience link forces the home area server to be in the middle, doing completely useless work that can have significant impact on the home area server for all users and on your code running on a cluster node.
- Use aliases or environment variables
A shortcut name can be accomplished via an alias or an environment variable. For example, in your .bashrc add:
alias crsplab='cd /share/crsp/lab/pilab'
export CRSPLAB=/share/crsp/lab/pilab
Then use either an alias or an environment variable that you defined. For example, when need to change to your CRSP lab area can simply execute one of the following commands (both commands give the same result):
$ crsplab
$ cd $CRSPLAB
When need to list contents of your CRSP lab area:
$ ls $CRSPLAB
For using aliases and environment variables in your Slurm jobs please see Using Aliases.
3.5. Special Characters
Important
Please see a list of special characters and avoid using them in file and directory names.
Special characters are used by bash and have an alternative, non-literal meaning. For example, a white space is one such special character and can be represented by:
White space characters to avoid
space
newline
tab
vertical tab
carriage return
form feed
Using a white space character in in the file name will require special handling of such files. To avoid this, simply use dot (.), underscore (_) or dash (-) in its place, for example: first.example.results, file_name.txt, my-file.doc.
3.6. SSH keys
This guide provides an introduction to the SSH keys.
Note
You must either be on the campus network or connected to the UCI campus VPN to access HPC3.
- Keys Concepts
A high-level understanding of how things work will enable you to better secure your own logins. SSH uses Public Key Cryptography and Challenge/Response to negotiate secured sessions.
What do these terms really mean?
- Public Key Cryptography
Text or data can be encrypted using the public key of the recipient. The recipient then uses the matching private key to decrypt the message.
- Challenge/Response
The SSH server (e.g., HPC3) encrypts a message using your SSH public key and challenges your client on your laptop to decrypt it and send back a response based on the contents. If you can successfully respond to the challenge, the SSH server considers you authenticated.
- Passphrase
A password associated with your SSH key pair.
- The Algorithm Steps:
The figure below shows where your SSH keys are located and the challenge/response steps.
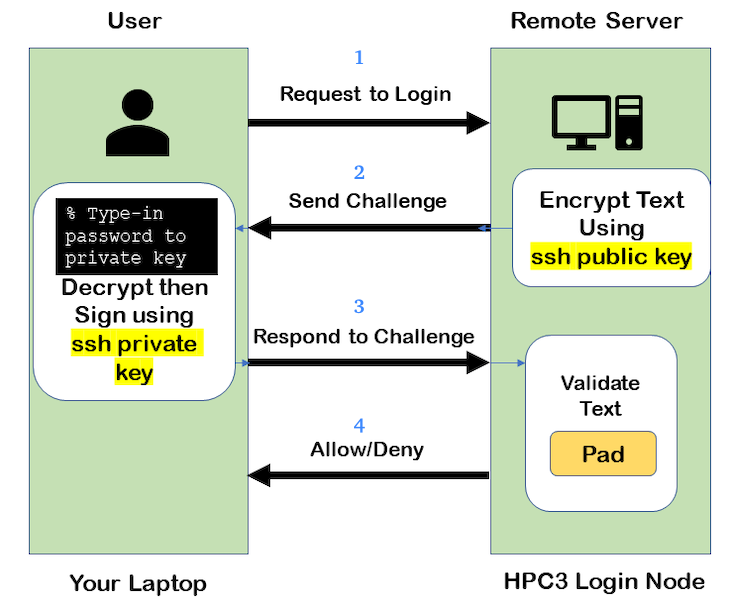
Fig. 3.11 SSH Keys Challenge Response
From a laptop, user requests to login.
Server creates a random code and encrypts the code with the user’s SSH public key and sends it back to the user - challenge.
On a laptop, user decrypts the challenge with the user’s SSH private key. To do it, need to type in the passphrase to that key. The now-decrypted challenge is used to create a valid response message. That message is digitally signed with the SSH private key and is then sent back to the server - response to challenge.
The server uses the user’s public key to verify the authenticity and content of the message. If the response matches the challenge, then login access is granted otherwise it is denied.
- Takeaways
Your SSH private key should never leave your laptop.
You should always use a strong passphrase (password) on your SSH private key.
This passphrase should be different than all of your other passwords.
You need to type in your passphrase each time you login.
- Ssh-agent
ssh-agentIf you have access to your private key and use it to respond to HPC3’s challenge, you need to type in the passphrase to that key for success.
Ssh-agent enables you to load the key into the agent with a passphrase and have the agent respond to login challenges for you.
In this scenario, you enter your the passphrase to your private key once when loading your local agent and then the agent responds for you.
The Algorithmic Steps:
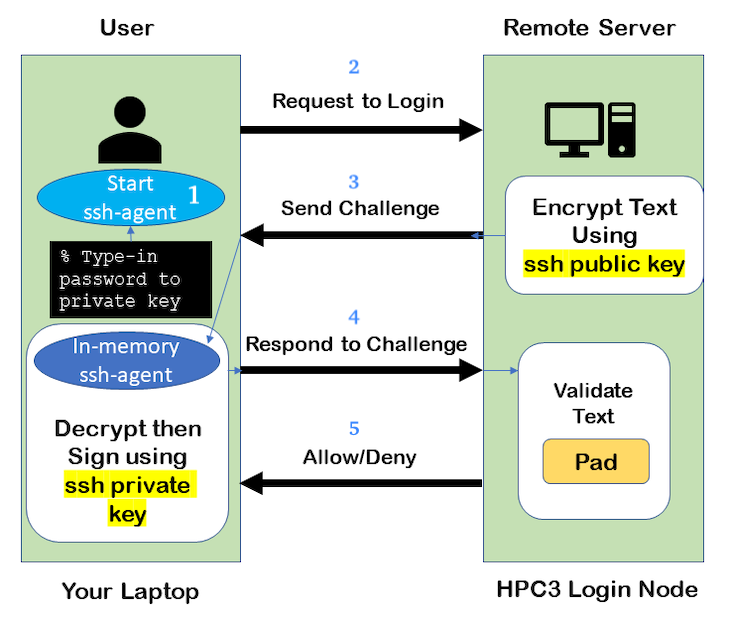
Fig. 3.12 SSH Challenge Response with Agent
On a laptop, user starts an ssh agent and to activate it enters the passphrase to SSH key.
From the laptop user requests to login.
Server creates a random code and encrypts the code with the user’s SSH public key and sends it back to the user - challenge.
On the laptop, ssh-agent decrypts the challenge with the user’s SSH private key, uses decrypted challenge to create a valid response message, digitally signs it with the private key and sends it back to the server - response.
The server uses the user’s public key to verify the authenticity and content of the message. If the response matches the challenge, then access is granted otherwise it is denied.
- Takeaways
Using ssh-agent reduces the number of times you type a passphrase.
When you reboot your laptop (or logout), the agent is wiped from memory.
- Ssh-agent & Windows
With the general background of how ssh-agent functions, Microsoft Windows 10/11 has two commonly-used ssh-agent mechanisms:
Ssh-agent running in Microsoft Powershell
PuTTY SSH client that uses PuTTYgen to create a public/private key pair and pageant as the ssh-agent.
Please see SSH agents guides listing.
- Troubleshooting
There are many online guides for ssh, please sea SSH links.