4. User installed software
HPC3 software installation guides |
|||
|---|---|---|---|
Important
There are a few important initial installation steps that are unique to the HPC3. They are explained in the guides below.
Please note, you don’t need to install Python / R / Perl / Conda. We have a few versions of each software installed and they all are accessible via modules.
4.1. Install with conda/mamba
Note
Steps below explain the basic conda application install specific to the cluster.
Usually, to install an application one needs to create a local conda environment. You can choose either Miniconda, Anaconda or Mamba depending on what your package installation instructions require.
You do not need to install Miniconda, Anaconda or Mamba (your software instructions may say you do so). We provide a few basic versions that can be accessed via modules and they can be used to create your local environments.
To find out what modules are available:
[user@login-x:~]$ module avail miniconda
----------------- /opt/rcic/Modules/modulefiles/LANGUAGES ----------------------
miniconda3/4.8.5  miniconda3/4.12.0  miniconda3/23.5.2

[user@login-x:~]$ module avail anaconda
---------------- /opt/rcic/Modules/modulefiles/LANGUAGES -----------------------
anaconda/2020.07  anaconda/2021.11  anaconda/2022.05  anaconda/2024.06

[user@login-x:~]$ module avail mamba
mamba/24.3.0
To install conda environment in your user area follow the example steps below done for the user (UCInetID) panteater who is using Miniconda version 23.5.2.
The installation steps are the same for the other versions of conda, simply substitute module name and version where needed.
Attention
Conda always provides python and a few other applications. For this reason DO NOT load any python or other modules when loading anaconda/miniconda/mamba modules. If you do, your environment will have problems.
Attention
Note, if you previously tried to install conda packages make sure that your $HOME/.bashrc file does not have any conda-added lines. Remove the lines before you proceed with the install, step 4 below explains what they are.
Get an interactive node
Always claim an interactive node because conda builds involve compilation and downloads that can use a lot of CPU time and memory. If you do this on login node you will have problems and your install will likely fail.
[user@login-x:~]$ srun -c 2 -p free --pty /bin/bash -i
For info how to get an interactive node with more memory or with GPU see Interactive job.Next steps are executed on interactive node.Load desired anaconda/miniconda/mamba module
For building in your $HOME area, first you need to load anaconda module:
[user@hpc3-xx-yy:~]$ module load miniconda3/23.5.2
[user@hpc3-xx-yy:~]$ module list
Currently Loaded Modulefiles:
 1) miniconda3/23.5.2
Verify conda info
Check that
condacommand is available after module loading, the output of the command below should be similar to:[user@hpc3-xx-yy:~]$ which conda /opt/apps/miniconda3/23.5.2/bin/conda
To check info about conda:
[user@hpc3-xx-yy:~]$ conda info
              active environment : None
      user config file : /data/homezvol0/panteater/.condarc
populated config files : /opt/apps/miniconda3/23.5.2/condarc
                         /data/homezvol0/panteater/.condarc
         conda version : 23.5.2
   conda-build version : not installed
        python version : 3.11.4.final.0
      virtual packages : __archspec=1=x86_64
                         __glibc=2.28=0
                         __linux=4.18.0=0
                         __unix=0=0
      base environment : /opt/apps/miniconda3/23.5.2  (read only)
     conda av data dir : /opt/apps/miniconda3/23.5.2/etc/conda
 conda av metadata url : None
          channel URLs : https://conda.anaconda.org/bioconda/linux-64
                         https://conda.anaconda.org/bioconda/noarch
                         https://repo.anaconda.com/pkgs/main/linux-64
                         https://repo.anaconda.com/pkgs/main/noarch
                         https://repo.anaconda.com/pkgs/r/linux-64
                         https://repo.anaconda.com/pkgs/r/noarch
                         https://conda.anaconda.org/conda-forge/linux-64
                         https://conda.anaconda.org/conda-forge/noarch
                         https://conda.anaconda.org/qiime2/linux-64
                         https://conda.anaconda.org/qiime2/noarch
         package cache : /data/homezvol0/panteater/.conda/pkgs
                         /opt/apps/miniconda3/23.5.2/pkgs
      envs directories : /data/homezvol0/panteater/.conda/envs
                         /opt/apps/miniconda3/23.5.2/envs
              platform : linux-64
            user-agent : conda/23.5.2 requests/2.29.0 CPython/3.11.4 Linux/4.18.0-477.15.1.el8_8.x86_64 rocky/8.8 glibc/2.28
               UID:GID : 1234567:1234567
            netrc file : None
          offline mode : False
Check package cache and envs directories entries in the above output. There should be 2 lines for each, one referring to the system installed location (lines start with /opt/apps) and another to your user location (line starts with /data/homezvol). You can not write in system location, the install will be in your user location.
If there are missing entries which point to your user area, you will need to create a file in your $HOME using your favorite editor. The file name is .condarc and the content is similar to the following (substitute your version, home directory and user name):
pkgs_dirs:
  - /data/homezvol0/panteater/.conda/pkgs
  - /opt/apps/miniconda/23.5.2/pkgs
envs_dirs:
  - /data/homezvol0/panteater/.conda/envs
  - /opt/apps/miniconda/23.5.2/envs
Note, by default conda does installations in $HOME and usually there is plenty of space in $HOME for multiple environments.
- Alternative install location:
It is possible to change installs to go to a different location. For example, if you want to install conda environments in your /pub/$USER/myconda/23.5.2 directory, your .condarc should be edited to look like:
pkgs_dirs:
  - /pub/$USER/myconda/23.5.2/pkgs
  - /opt/apps/miniconda/23.5.2/pkgs
envs_dirs:
  - /pub/$USER/myconda/23.5.2/envs
  - /opt/apps/miniconda/23.5.2/envs
In place of editing .condarc file one can do this dynamically and run command:
[user@login-x:~]$ conda config --write \
  --set pkgs_dirs /pub/$USER/myconda/23.5.2/pkgs \
  --append pkgs_dirs /opt/apps/miniconda/23.5.2/pkgs \
  --set envs_dirs /pub/$USER/myconda/23.5.2/envs \
  --append envs_dirs /opt/apps/miniconda/23.5.2/pkgs
Note
Your .condarc file is always in $HOME regardless of the install location.
Initialize conda for your shell
Run command:
[user@hpc3-xx-yy:~]$ conda init bash
no change     /opt/apps/miniconda3/23.5.2/condabin/conda
no change     /opt/apps/miniconda3/23.5.2/bin/conda
no change     /opt/apps/miniconda3/23.5.2/bin/conda-env
no change     /opt/apps/miniconda3/23.5.2/bin/activate
no change     /opt/apps/miniconda3/23.5.2/bin/deactivate
no change     /opt/apps/miniconda3/23.5.2/etc/profile.d/conda.sh
no change     /opt/apps/miniconda3/23.5.2/etc/fish/conf.d/conda.fish
no change     /opt/apps/miniconda3/23.5.2/shell/condabin/Conda.psm1
no change     /opt/apps/miniconda3/23.5.2/shell/condabin/conda-hook.ps1
no change     /opt/apps/miniconda3/23.5.2/lib/python3.11/site-packages/xontrib/conda.xsh
no change     /opt/apps/miniconda3/23.5.2/etc/profile.d/conda.csh
modified      /data/homezvol0/panteater/.bashrc

==> For changes to take effect, close and re-open your current shell. <==
The output is just the info for you which tells:
no change was done to any of the system location files, which is correct.
your .bashrc file was changed and you need to renew your shell for it to take an effect.
The lines that are added to your .bashrc modify your shell behavior and this is not be desirable for all your work and can create a problem when you are using other commands or software modules.
You need to move the conda lines from .bashrc to a different file which then will be executed only when you need to use conda and will not impact your shell environment for all your other work.
Choose your favorite text editor to edit the .bashrc file and move all the lines added by conda into a new file in your $HOME, for example to .mycondainit-23.5.2. The lines are at the end of your .bashrc file (lines start and end with conda initialize and all the lines between them):
# >>> conda initialize >>>
# !! Contents within this block are managed by 'conda init' !!
__conda_setup="$('/opt/apps/miniconda3/23.5.2/bin/conda' 'shell.bash' 'hook' 2> /dev/null)"
if [ $? -eq 0 ]; then
    eval "$__conda_setup"
else
    if [ -f "/opt/apps/miniconda3/23.5.2/etc/profile.d/conda.sh" ]; then
        . "/opt/apps/miniconda3/23.5.2/etc/profile.d/conda.sh"
    else
        export PATH="/opt/apps/miniconda3/23.5.2/bin:$PATH"
    fi
fi
unset __conda_setup
# <<< conda initialize <<<
Note, your lines will be a little different depending on what module name and version were used. Keep the new file name consistent with the module name and version. The file must be in your $HOME.
Now you can execute a command for the conda-added changes to take an effect and renew your shell:
[user@hpc3-xx-yy:~]$ . ~/.mycondainit-23.5.2
(base)[user@hpc3-xx-yy:~]$
Note, your command line prompt changed and now has (base) prepended. This means conda base environment is activated.
Create a local environment
Now you are ready to create your local conda environment.
Follow the instructions provided by your software package.
Your specific instructions may require adding conda channels or setting some other parameters, simply execute needed commands as specified.
These commands may be similar to:conda config –add channels NAME-OF-CHANNELconda config –set channel_priority TYPE-OF-PRIORITYconda config –set auto_activate_base BOOLEAN-VALUEConda config commands add lines to your ~/.condarc file.The name of your environment can be anything that makes sense, has to be a single word (no spaces), the exact command will be provided in your software instructions and may have additional arguments in it. Here, as an example we create a local environment called Local2:
(base)[user@hpc3-xx-yy:~]$ conda create -n Local2
Collecting package metadata (current_repodata.json): done
Solving environment: done

==> WARNING: A newer version of conda exists. <==
  current version: 23.5.2
  latest version: 24.9.2

Please update conda by running
    $ conda update -n base -c defaults conda

Or to minimize the number of packages updated during conda update use
     conda install conda=24.9.2

## Package Plan ##
  environment location: /data/homezvol0/panteater/.conda/envs/Local2

Proceed ([y]/n)? y

Preparing transaction: done
Verifying transaction: done
Executing transaction: done
#
# To activate this environment, use
#     $ conda activate Local2
#
# To deactivate an active environment, use
#     $ conda deactivate
Above, most if the line are just info from conda.The only input from the user is y on the Proceed ([y]/n)? line.This will take some time to complete as conda is installing packages in your directory ~/.conda and depending on conda version it may take 1-4GB of space.
The last few lines indicate the commands you will need for activating and deactivating your conda environment.
Note
Do not run conda update. You can’t run conda update command because it requires writing in the base environment in the system location to which users have no write permissions.
Sometimes, conda gives the error similar to (uid/gid will be for your account):
Collecting package metadata (current_repodata.json): done
Solving environment: done

NotWritableError: The current user does not have write permissions to a required path.
  path: /opt/apps/miniconda/23.5.2/pkgs/urls.txt
  uid: 1234567
  gid: 1234567

If you feel that permissions on this path are set incorrectly, you can manually
change them by executing

  $ sudo chown 1234567:1234567 /opt/apps/miniconda3/23.5.2/pkgs/urls.txt

In general, it's not advisable to use 'sudo conda'.
In this case create .condarc file per Step 3 above and try again.
Install your software packages
In the previous step you created your local environment. Before installing software you need to activate it:
(base)[user@hpc3-xx-yy:~]$ conda activate Local2
(Local2)[user@hpc3-xx-yy:~]$
Note that after activation your prompt changed and has Local2 prepended.
Using your newly created environment you can now install desired software per your software instructions. The instructions vary, here is a handful of possible examples:
(Local2)[user@hpc3-xx-yy:~]$ conda install bioconda::bcftools
(Local2)[user@hpc3-xx-yy:~]$ conda install xarray
(Local2)[user@hpc3-xx-yy:~]$ conda install r-base=4.3.1
Once the install command of a specific package is executed conda prints some information about the install progress. You may see lines similar to (some output is cut for brevity):
Collecting package metadata (current_repodata.json): done
Solving environment: done
==> WARNING: A newer version of conda exists. <==
  current version: 23.5.2
  latest version: 24.9.2
Please update conda by running
    $ conda update -n base -c defaults conda
Or to minimize the number of packages updated during conda update use
     conda install conda=24.9.2
## Package Plan ##
  environment location: /data/homezvol0/panteater/.conda/envs/Local2
  added / updated specs:
    - bioconda::bcftools
The following packages will be downloaded:
    package                    |            build
    ---------------------------|-----------------
    _libgcc_mutex-0.1          |      conda_forge           3 KB  conda-forge
    _openmp_mutex-4.5          |            2_gnu          23 KB  conda-forge
    bcftools-1.21              |       h8b25389_0         987 KB  bioconda
    ... lines cut ...
The following NEW packages will be INSTALLED:
  _libgcc_mutex      conda-forge/linux-64::_libgcc_mutex-0.1-conda_forge
  _openmp_mutex      conda-forge/linux-64::_openmp_mutex-4.5-2_gnu
  bcftools           bioconda/linux-64::bcftools-1.21-h8b25389_0
  bzip2              conda-forge/linux-64::bzip2-1.0.8-h4bc722e_7
  c-ares             conda-forge/linux-64::c-ares-1.34.3-heb4867d_0
    ... lines cut ...
The only input from the user is y on the Proceed ([y]/n)? line, type y in response:
Proceed ([y]/n)? y
A successful install ends with lines :
Downloading and Extracting Packages

Preparing transaction: done
Verifying transaction: done
Executing transaction: done
Important
Some instructions give commands to install in the base environment. While this is ok for a full personal install of conda, it will not work on the cluster where you are using conda module and where the base environment is read only.If your instructions specify to install in base, for example:conda install -n base somea-pkg-namesimply remove base from the command as:conda install somea-pkg-nameThis will tell conda to install in your active environment where you have write permissions and not in base where users have no write permissions.Clean your install
During the install conda downloads packages, create cache, temporary files and log files. All of these take quite a bit of space but are not needed after the install.
We recommend to clean your conda installation each time you create a new environment or add packages to the existing environment.
The following command will remove index cache, lock files, unused cache packages, tarballs, and log files from your ~/.conda/pkgs/. This can free a few gigabytes of disk space for each install (size depends on installed packages).
(Local2)[user@hpc3-xx-yy:~]$ conda clean -a -f -y
Important
Failure to clean can reasult in $HOME overquota.
Use your conda environment
The above installation steps 1-5 need to be done only once for specific software install in a specific local conda environment.
You can build multiple local environments using the same method. Or you can add more packages to the existing environments. The choice depends on the software and on its instructions.
- Using interactively:
Every time you login and want to use your conda local environment and its packages you will need to get an interactive node and run the following commands to activate your conda environment:
[user@login-x:~]$ srun -c 2 -p free --pty /bin/bash -i
[user@hpc3-xx-yy:~]$ module load miniconda3/23.5.2
[user@hpc3-xx-yy:~]$ . ~/.mycondainit-23.5.2
(base)[user@hpc3-xx-yy:~]$ conda activate Local2
(Local2)[user@hpc3-xx-yy:~]$
Note, once conda is initialized (base) is added to the prompt, and once you activate your environment the (base) changes to the environment name, here (Local2).
Your environment is deactivated automatically when you logout from the interactive node. To deactivate your environment right away in your current shell:
(Local2)[user@hpc3-xx-yy:~]$ conda deactivate
(base)[user@hpc3-xx-yy:~]$
- Using in Slurm batch script:
If you submit your computation via Slurm script the commands to load conda module and activate your desired environment need to be present in your Slurm script before the lines that execute your software commands, for example:
#!/bin/bash -l

#SBATCH --job-name=test      ## Name of the job.
#SBATCH -p standard          ## partition/queue name
#SBATCH --nodes=1            ## (-N) number of nodes to use
#SBATCH --ntasks=1           ## (-n) number of tasks to launch
#SBATCH --cpus-per-task=1    ## number of cores the job needs
#SBATCH --mem=500            ## 500Mb of memory
#SBATCH --time=00:02:00      ## run time 2 min
#SBATCH --error=slurm-%J.err ## error log file

# load conda module and activate environment
module load miniconda3/23.5.2
. ~/.mycondainit-23.5.2
conda activate Local2

# run your desired application commands
command1 arg1 arg2
command2 arg3 arg4
Your environment is deactivated automatically when you Slurm jobs finishes.
Build additional environments
- I. Build with different conda version
You can build another environment with a completely different version of conda. Simply follow the instructions from step 1.
You will have a different .mycondainit-VERSION file and this allows to cleanly separate conda initialization for different conda modules.
- II. Build with the same conda version
You can build more environments with the same conda module and can reuse most of the conda environment existing setup. For example, to add another environment (using the same conda module):
Get an interactive node
[user@login-x:~]$ srun -c 2 -p free --pty /bin/bash -i
On interactive node, load conda module and initialize conda, then create new environment:
[user@hpc3-xx-yy:~]$ module load miniconda3/23.5.2
[user@hpc3-xx-yy:~]$ . ~/.mycondainit-23.5.2
(base)[user@hpc3-xx-yy:~]$ conda create -n NewEnv
Collecting package metadata (current_repodata.json): done
Solving environment: done
==> WARNING: A newer version of conda exists. <==
  current version: 23.5.2
  latest version: 24.9.2
Please update conda by running
    $ conda update -n base -c defaults conda
Or to minimize the number of packages updated during conda update use
     conda install conda=24.9.2
## Package Plan ##
  environment location: /data/homezvol0/panteater/.conda/envs/NewEnv

Proceed ([y]/n)? y

Preparing transaction: done
Verifying transaction: done
Executing transaction: done
#
# To activate this environment, use
#     $ conda activate NewEnv
#
# To deactivate an active environment, use
#     $ conda deactivate
Again, the only input from the user is y on the Proceed ([y]/n)? y line.
Once conda install ends, activate your new environment and it is ready to install your desired software:
[user@hpc3-xx-yy:~]$ conda activate NewEnv
(NewEnv)[user@hpc3-xx-yy:~]$
Tips
Any
condacommands can be executed after loading a conda module, usually one that was used to create your conda environment and executing its corresponding conda initialization file:[user@login-x:~]$ module load miniconda3/23.5.2 [user@login-x:~]$ . .mycondainit-23.5.2 (base)[user@login-x:~]$
In the following commands we are not activating any environments, but simply collecting info.
- What conda environments do I have defined?
(base)[user@login-x:~]$ conda env list
# conda environments:
#
Local2                   /data/homezvol0/panteater/.conda/envs/Local2
NewEnv                   /data/homezvol0/panteater/.conda/envs/NewEnv
Test                     /data/homezvol0/panteater/.conda/envs/Test
mageck-vispr             /data/homezvol0/panteater/.conda/envs/mageck-vispr
ngless                   /data/homezvol0/panteater/.conda/envs/ngless
base                   * /opt/apps/miniconda3/23.5.2
qiime2-2023.7            /opt/apps/miniconda3/23.5.2/envs/qiime2-2023.7
Note, the * in the output means active loaded conda version (per loaded module). Available environments are listed but not activated.
- How did I build my conda environments?
[user@login-x:~]$ grep create ~/.conda/envs/*/conda-meta/history
/data/homezvol0/panteater/.conda/envs/Local2/conda-meta/history:# cmd: /opt/apps/miniconda3/23.5.2/bin/conda create -n Local2
/data/homezvol0/panteater/.conda/envs/mageck-vispr/conda-meta/history:# cmd: /opt/apps/anaconda/2022.05/bin/conda create -n mageck-vispr
/data/homezvol0/panteater/.conda/envs/NewEnv/conda-meta/history:# cmd: /opt/apps/miniconda3/23.5.2/bin/conda create -n NewEnv
/data/homezvol0/panteater/.conda/envs/ngless/conda-meta/history:# cmd: /opt/apps/anaconda/2020.07/bin/conda create -n ngless
/data/homezvol0/panteater/.conda/envs/Test/conda-meta/history:# cmd: /opt/apps/miniconda3/4.12.0/bin/conda create -n Test
Note, listed environments were created with different versions of anaconda and miniconda.
4.2. Special instructions for miniconda3 users
Two miniconda modules miniconda3/4.8.5 and miniconda3/4.12.0 will be removed from the cluster follow up December 2024 maintenance.
If you are currently using the these modules you need to switch before Dec 18, 2024 to using already installed miniconda3/23.5.2 module.
Follow the steps below. Since this switch does not involve installation or building of environments these 3 steps can be done on a login node.
Check your ~/.bashrc file
If you see any lines related to conda, remove them. The lines start and end with conda initialize and all the lines between them (for a reference see Step 4 in Install with conda/mamba).
If your command line prompt starts with (base) reload your newly edited file, the prompt will change:
(base)[user@login-x:~]$ . ~/.bashrc
[user@login-x:~]$
Load a new miniconda3 module and run conda initialization command:
[user@login-x:~]$ module load miniconda3/23.5.2
[user@login-x:~]$ conda init bash
Check your ~/.bashrc file again
Conda initialization adds a few lines to your ~/.bashrc. Move all conda lines (see Step 1) to a new file in your $HOME, call it .mycondainit-23.5.2. The lines will be similar to those you removed in Step 1.
To use miniconda3/23.5.2 module for your local environment that was previously built with miniconda3/4.8.5 or miniconda3/4.12.0 do:
[user@hpc3-xx-yy:~]$ module load miniconda3/23.5.2
[user@hpc3-xx-yy:~]$ . ~/.mycondainit-23.5.2
(base)[user@hpc3-xx-yy:~]$ conda activate your-env-name
4.3. Install Python packages
Python has thousands of specific packages and it is not possible for us to maintain them all. For this reason users can easily add their desired packages to the base installs using local user area.
The local installation of Python packages will go to the $HOME/.local and is automatically available to the user.
When you want to install a specific Python package you do not need to install Python. We provide a few Python versions that can be accessed via modules.
To find out what Python is available:
[user@login-x:~]$ module avail python
---------------------- /opt/rcic/Modules/modulefiles/LANGUAGES ---------------------------
python/2.7.17  python/3.8.0  python/3.10.2
Important
While you can still choose python version 2.7.17, it is no longer supported and may not work properly under Rocky Linux 9 operating system. It is advisable to use Python 3.
For detailed info on installing Python packages please see Python packages with pip.
Steps below explain the basic commands specific to the cluster.
Get an interactive node
Always claim an interactive node because python builds involve compilation and downloads that can use a lot of CPU time and memory. If you do this on login node you will have problems and your install will likely fail.
[user@login-x:~]$ srun -c 2 -p free --pty /bin/bash -i
Next steps are executed on interactive node.
Load desired python module
For building in your user area, first you need to load Python module:
[user@hpc3-xx-yy:~]$ module load python/3.8.0
Check that
pythonandpipcommands are available to you, the output of the commands should be similar to:[user@hpc3-xx-yy:~]$ which python /opt/apps/python/3.8.0/bin/python [user@hpc3-xx-yy:~]$ which pip /opt/apps/python/3.8.0/bin/pip
Install your python package
Below we provide a common installation example and are using
pipto install pluggy package:.[user@hpc3-xx-yy:~]$ pip install --user pluggy Collecting pluggy Using cached pluggy-1.0.0-py2.py3-none-any.whl (13 kB) Installing collected packages: pluggy Successfully installed pluggy-1.0.0
Verify that pluggy is now available.
[user@hpc3-xx-yy:~]$ python
Python 3.8.0 (default, Jun  8 2022, 08:17:26)
[GCC 8.5.0 20210514 (Red Hat 8.5.0-10)] on linux
Type "help", "copyright", "credits" or "license" for more information.

>>> import pluggy
>>>
Use your installed python package
Next time you need to use your installed python package simply load the same python module that you used for building the package:
[user@hpc3-xx-yy:~]$ module load python/3.8.0
and proceed with the rest of the commands per your software instructions.
4.4. Install R packages
When you want to install a specific R package you do not need to install R. We provide a few versions of R that can be accessed via modules. The base installs already have a lot of added packages. To find out what R is available:
[user@login-x:~]$ module avail R
------------ /opt/rcic/Modules/modulefiles/LANGUAGES -----------------
R/4.0.4 R/4.1.2 R/4.2.2 R/4.3.3
You can choose either R version, however it is advisable to use a later release.
For additional info on installing R packages via different methods please see R documentation Installing R packages.
Steps below explain the basic commands specific to the cluster.
R has thousands of specific packages and it is not possible for us to maintain them all. For this reason users can easily add their desired packages to the base installs using local user area. The local installation of R packages will go to the $HOME/R and is automatically available to the user.
Get an interactive node
Always claim an interactive node because R builds involve compilation and downloads that can use a lot of CPU time and memory. If you do this on login node you will have problems and your install will likely fail.
[user@login-x:~]$ srun -c 2 -p free --pty /bin/bash -i
Next steps are executed on interactive node.
Load desired module
For building in your user area, first you need to load R module:
[user@hpc3-xx-yy:~]$ module load R/4.1.2
Check that
Rcommand is available to you, the output of the below command should be similar to:[user@hpc3-xx-yy:~]$ which R /opt/apps/R/4.1.2/bin/R
Start R
[user@hpc3-xx-yy:~]$ RCheck if your package is already installed, for example for farver:
> packageVersion('farver')
[1] ‘2.1.0’
In case the package is not installed there will be an error:
> packageVersion('farverB')
Error in packageVersion("farverB") : there is no package called ‘farverB’
Install your R package
Below we provide an example of installation of ggfun package from CRAN: There are 3 places when you need to type a response.
> install.packages("ggfun")
Warning in install.packages("ggfun") :
  'lib = "/opt/apps/R/4.1.2/lib64/R/library"' is not writable
Would you like to use a personal library instead? (yes/No/cancel)  # type yes
Would you like to create a personal library
‘~/R/x86_64-pc-linux-gnu-library/4.1’
to install packages into? (yes/No/cancel)                          # type yes
--- Please select a CRAN mirror for use in this session ---
Secure CRAN mirrors
 1: 0-Cloud [https]
 2: Australia (Canberra) [https]
       ... more lines deleted here
71: USA (IA) [https]
72: USA (KS) [https]
73: USA (MI) [https]
74: USA (OH) [https]
75: USA (OR) [https]
76: USA (TN) [https]
77: USA (TX 1) [https]
78: Uruguay [https]
79: (other mirrors)
Selection: 72                                                      # type number

trying URL 'https://rweb.crmda.ku.edu/cran/src/contrib/ggfun_0.0.6.tar.gz'
Content type 'application/x-gzip' length 148598 bytes (145 KB)
==================================================
downloaded 145 KB

* installing *source* package ‘ggfun’ ...
** package ‘ggfun’ successfully unpacked and MD5 sums checked
** using staged installation
** R
** inst
** byte-compile and prepare package for lazy loading
** help
** installing help indices
** building package indices
** installing vignettes
** testing if installed package can be loaded from temporary location
** testing if installed package can be loaded from final location
** testing if installed package keeps a record of temporary installation path
* DONE (ggfun)

The downloaded source packages are in
    ‘/tmp/Rtmpg5SeVX/downloaded_packages’
Your typed responses:
The warning at the beginning of output is normal as users can’t write in the system area. Type yes to confirms to use a local library in your user area.
Type yes to confirms a creation of personal library. This is done once. Future installs will use this existing location.
There are many CRAN mirrors where R packages are available. Please select the USA mirror and type its number.
Use your installed R package
Next time you need to use your installed R package simply load the same R module that you used for building the package:
[user@hpc3-xx-yy:~]$ module load R/4.1.2
and proceed with the rest of the commands per your software instructions.
4.5. Install Perl modules
Perl has thousands of specific packages and it is not possible for us to maintain them all. For this reason users can easily add their desired packages to the base installs using local user area. The local installation of Perl packages will go to the $HOME/perl5 and will be automatically available to the user.
When you want to install a specific Perl module you do not need to install perl, cpan or cpanm. We provide a few Perl versions that can be accessed via modules. The base installs already have a lot of added packages.
To find out what Perl is available:
[user@login-x:~]$ module avail perl
----------------- /opt/rcic/Modules/modulefiles/LANGUAGES ----------------------
perl/5.30.0   perl/5.34.1
For a detailed info on installing Perl packages please see How to Install Perl CPAN modules
Steps below explain the basic commands specific to the cluster.
Verify local Perl directory
Make sure that $HOME/perl5 exists and if it does not, create it:
[user@login-x:~]$ cd $HOME
[user@login-x:~]$ ls perl5
ls: cannot access 'perl5': No such file or directory

[user@login-x:~]$ mkdir $HOME/perl5
Note
Creation of $HOME/perl5 needs to be done only once, the name should not be changed to another arbitrary name.
Get an interactive node
Always claim an interactive node because Perl builds involve compilation and downloads that can use a lot of CPU time and memory. If you do this on login node you will have problems and your install will likely fail.
[user@login-x:~]$ srun -c 2 -p free --pty /bin/bash -i
Next steps are executed on interactive node.
Load desired perl module
For building in your user area, first you need to load Perl module, for example:
[user@hpc3-xx-yy:~]$ module load perl/5.30.0
Check that
perlandcpanmare available, the output of the commands below will be similar to:[user@hpc3-xx-yy:~]$ which perl /opt/apps/perl/5.30.0/bin/perl [user@hpc3-xx-yy:~]$ which cpanm /opt/apps/perl/5.30.0/bin/cpanm
Install your software package
Below we provide an installation example for package X::Tiny using
cpanm:[user@hpc3-xx-yy:~]$ cpanm X::Tiny --> Working on X::Tiny Fetching http://www.cpan.org/authors/id/F/FE/FELIPE/X-Tiny-0.21.tar.gz ... OK Configuring X-Tiny-0.21 ... OK ==> Found dependencies: Test::FailWarnings --> Working on Test::FailWarnings Fetching http://www.cpan.org/authors/id/D/DA/D.../Test-FailWarnings-0.008.tar.gz ... OK Configuring Test-FailWarnings-0.008 ... OK Building and testing Test-FailWarnings-0.008 ... OK Successfully installed Test-FailWarnings-0.008 Building and testing X-Tiny-0.21 ... OK Successfully installed X-Tiny-0.21 2 distributions installed
Check that the installed module is found and can be loaded by
perl:[user@hpc3-xx-yy:~]$ perl -e "use X::Tiny"
The command should produce no errors and no output, this means
perlfound the installed package.Using your installed perl package
When you need to use your installed packages simply load the same Perl module that was used for the installation:
[user@hpc3-xx-yy:~]$ module load perl/5.30.0
and proceed with using your packages per your software instructions.
4.6. Create Singularity Containers
Attention
We do not provide Docker containers on the cluster due to security.
Sometime people need to create containers for running specific versions of applications or sets of applications. We provide Singularity containers that can be built and used from Docker recipes.
For more info about using containers please see SingularityCE User Guide
When you want to build a Singularity container you do not need to install Singularity. We provide a few versions of Singularity and its prerequisites that can be accessed via modules.
The following steps include what is specific to the cluster and can be used as a guide to create your own container using Singularity that is already installed.
To find out what Singularity is available:
[user@login-x:~]$ module avail singularity
------------ /opt/rcic/Modules/modulefiles/LANGUAGES -----------------
singularity/3.7.2  singularity/3.9.4  singularity/3.11.3
If you have never built container before we suggest to use the latest available singularity version.
Get an interactive node
Always claim an interactive node because Singularity builds involve compilation and downloads that can use a lot of CPU time and memory. If you do builds on login nodes you will have problems and your install will likely fail.
[user@login-x:~]$ srun -c 2 -p free --pty /bin/bash -i
[user@hpc3-xx-yy:~]$
In addition, Singularity container can be large, we recommend to use your private area in /pub/UCInetID or your group lab allocation on another DFS file system for building the images:
[user@hpc3-xx-yy:~]$ cd /pub/UCInetID
Next steps are executed on interactive node.
Load desired singularity module
For building in your user area, first you need to load Singularity module:
[user@hpc3-xx-yy:~]$ module load singularity/3.9.4
Run a container create command
Follow your specific software instructions for your build. Singularity containers can be created as follows:
3a. Create from a download of pre-built images
This is done from a known URL (provided by your desired software). The following example command is for creating a vg container with specific software from an available docker image:
[user@hpc3-xx-yy:~]$ singularity pull vg.sif docker://quay.io/vgteam/vg:v1.43.0
INFO:    Converting OCI blobs to SIF format
INFO:    Starting build...
Getting image source signatures
Copying blob 3b65ec22a9e9 done
... < cut lines> ...
Copying blob 4643aa901e21 done
Writing manifest to image destination
Storing signatures
2022/10/14 10:03:57  info unpack layer: sha256:3b65ec22...aa3f792ff03330f3a3eb601a98
... <cut lines > ...
2022/10/14 10:04:10  info unpack layer: sha256:4643aa90...e3d443f4b04dd0110d8fe6ffcf
INFO:    Creating SIF file...
A successful build will result in creating vg.sif container in the working directory:
[user@hpc3-xx-yy:~]$ ls
downloads  scripts  prev  vg.sif
3b. Build from a recipe
This approach involves:
using a definition file (also called a recipe file)
administrative access to the node which we do not allow to regular users.
You will need to submit a ticket and provide us with a recipe file and your software build instructions URL. We will build a container using the info you provide.
Verify your container
To check the software in your new container:
[user@hpc3-xx-yy:~]$ singularity run vg.sif
Singularity> vg version

vg version v1.43.0 "Barisano"
Compiled with g++ (Ubuntu 9.4.0-1ubuntu1~20.04.1) 9.4.0 on Linux
Linked against libstd++ 20210601
Built by root@buildkitsandbox

Singularity> exit
exit
Use your container
Now you can use your container either interactively on a command line using an interactive node (get it with
sruncommand) or submitting as a batch job to Slurm.In either case, load the same singularity module, provide a full path to the container image and specify arguments to your desired software command:
[user@hpc3-xx-yy:~]$ module load singularity/3.9.4
[user@hpc3-xx-yy:~]$ singularity run /pub/anteater/vg.sif arg1 arg2 arg3
Additional commands to interact with the container are
shellandexec. Please see the SingularityCE User Guide for in-depth command reference.
4.7. Compile software
Sometimes people need to compile specific versions of applications from source. This is done according to your specific software instructions plus using cluster’s existing modules.
In general, for compiling one needs a compiler, make, or cmake, possibly some prerequisite software packages,
or a few other build tools. All of generic build tools needed for compilation
are accessible via modules that are installed on the cluster.
Attention
sudo and su are not available per security vulnerability.Steps below explain the basic steps specific to compile software that are specific to the cluster.
Get an interactive node
Always claim an interactive node because software builds involve downloads and compilation and both actions can use a lot of CPU time and memory.
From a login node: request an interactive node and 4 CPUs:
[user@login-x:~]$ srun -c 4 -p free --pty /bin/bash -i
Note
If your software requires CUDA support you will need to use an interactive node in one of gpu-enabled partitions (see Interactive job for details) and load one of available CUDA modules in the next step.
Next steps are executed on interactive node.
Download your software
Software sources and temporary compilation files can be large.Do not copy software distribution files into your $HOME.We recommend to use your private area /pub/$USER ($USER is your UCInetID) or your group lab allocation on some DFS file system for downloading, compiling and installing.
For example, to use your private area:
[user@hpc3-xx-yy:~]$ cd /pub/$USER
Download your software distribution via
curl,wgetor other method indicated by your software instructions..Find and load desired modules
Read your software instructions and figure out what modules provide tools you will need for compilation.
We have GCC and Intel compilers, a few versions of OpenMPI, make, cmake and a handful of other build tools. They are provided via different modules. To see what is available:
[user@hpc3-xx-yy:~]$ module avail gcc
[user@hpc3-xx-yy:~]$ module avail intel
[user@hpc3-xx-yy:~]$ module avail openmpi
[user@hpc3-xx-yy:~]$ module avail cmake
[user@hpc3-xx-yy:~]$ module avail foundation
Module foundation includes
cmake,makeplus a few other commands. For details see the output ofmodule display foundation/v8.The gcc and intel modules include fortran compilers.
Your software may have prerequisites, for any prerequisites please check already installed modules and load if you find that they satisfy your software needs. See Environment modules guide for information how to find and use modules.
For example, if you are compiling software that needs
gcccompiler,cmake, and need an OpenMPI-aware HDF5 you will load the following modules:[user@hpc3-xx-yy:~]$ module load cmake/3.22.1 [user@hpc3-xx-yy:~]$ module load hdf5/1.13.1/gcc.11.2.0-openmpi.4.1.2
Note, that HDF5 module hdf5/1.13.1/gcc.11.2.0-openmpi.4.1.2 name implies that:
it is compiled with GCC and OpenMPI and their versions are listed in the module name.
prerequisite GCC and OpenMPI modules will be automatically loaded by the HDF5 module no need to load them separately.
Note
Intel and mkl module provide access to a number of Intel Math Kernel Libraries including LAPACK, SCALAPACK, BLAS and threading options. The MKL libraries can be linked with Intel or GNU compilers. If you are compiling your software and using intel or mkl modules please see external links Intel MKL Documentation and Intel MKL Link Advisory to help you figure out how to use them.
Follow your package instructions
After loading the modules you can configure and compile per your package instructions.
Many packages use
configureorcmakefor configuring and for specifying the installation location. The instructions may tell to edit makefiles and set some variables.For example, if your software package requires HDF5, you can use
module displaycommand to find out what environment variables are set by a specific HDF5 module and then use them in your makefiles or in your configuration commands.Important
While your software package may have some optional configuration parameters, you must specify an installation location. We recommend to use your user area for the installation location, for example, /pub/$USER/sw/ where you can install multiple software packages.
Two examples below show how to configur and install software. Your installation, while similar will be different. Read your software install instructions thoroughly.
Example of installing software using cmake
To install salmon software from the downloaded salmon-1.8.0.tar.gz file the steps are:
tar xzvf salmon-1.8.0.tar.gz  # step 1
cd salmon-1.8.0/

module load foundation/v8     # step 2
module load boost/1.78.0/gcc.11.2.0

mkdir build                   # step 3
cd build
export CMAKE_LIBRARY_PATH=$LD_LIBRARY_PATH:$CMAKE_LIBRARY_PATH
cmake -DBOOST_ROOT=$BOOST_HOME -DCMAKE_INSTALL_PREFIX=/pub/$USER/sw -DNO_IPO=TRUE ..

make -j 4                     # step 4
make install                  # step 5
Steps explanation:
step 1: Untar the software distro and change to distribution directorystep 2: Load needed modulesstep 3: This is the configuration step of the compilation process.Create a directory where the build will happen and change into it.Theexportcommand sets CMAKE_LIBRARY_PATH variable to use librariesdefined by the modules. Usually, cmake does it by default and this command is not needed.Thecmakecommand defines a variable BOOST_ROOT and sets it to BOOST_HOMEwhich is provided by the boost module; it also sets installation location viaCMAKE_INSTALL_PREFIX variable and then runs configuration.step 4: This is the compilation step.Themake -j 4command uses 4 CPUs that were requested for the interactivenode to compile the software per above configuration.step 5: The install step runsmake installcommand to create bin, lib,and any other required subdirectories in /pub/$USER/sw/ and installs files there.Note, the install command can be different, your software instructions willspecify it. Sometimes it can look similar to:cmake -DCMAKE_INSTALL_PREFIX=/path/to/install/dir -P cmake_install.cmakeExample of installing software using configure and make
To install bsftools software that depends on gsl and htslib packages (already installed on the cluster and available via modules) the steps are:
tar xzvf bcftools-1.10.2.tar.gz     # step 1
cd bcftools-1.10.2

module load htslib/1.10.2           # step 2
module load gsl/2.6/gcc.8.4.0

export CFLAGS='-fpic -fplugin=annobin -fplugin-arg-annobin-disable' # step 3
./configure --prefix=/pub/$USER/sw  --enable-libgsl --enable-perl-filters --with-htslib=$HTSLIB_HOME

make USE_GPL=1 prefix=/pub/$USER/sw # step 4
make install                        # step 5
Steps explanation:
step 1: Untar the software distro and change to distribution directorystep 2: Load needed modules.step 3: This is the configuration step of compilation process.Runexportcommand that was specified by the software instructions.Theconfiguresets the installation location via –prefix,sets the location of htslib installation via a variable HTSLIB_HOME(provided by the htslib module) and runs software configuration.step 4: This is the compilation step.Set a specific variable (per software instructions) and runmaketo compile.step 5: Themake installcreates bin, lib, and any other required subdirectoriesin /pub/$USER/sw/ and installs the compiled files there.Create a module for your software
This step is optional. For instructions on creating modules for your installed software please see User installed modules.
Use your software
If you created a module for your software
Simply load your module and execute your software commands, for example:
module load myprog/3
myprog arg1 arg2
If you did not create a module
You need to adjust $PATH and $LD_LIBRARY_PATH to include your installed software location. This needs to be done once for every new installation location.
Edit your $HOME/.bashrc file (your software may provide additional instructions) and add the needed changes at the end. Assuming your software was installed in /pub/$USER/sw:
export PATH=/pub/$USER/sw/bin:$PATH
export LD_LIBRARY_PATH=/pub/$USER/sw/lib:$LD_LIBRARY_PATH
Note, compiled libraries may be installed in lib or lib64, adjust export command accordingly. Your software install instructions may specify additional variables needed for your software to work properly.
Always make a copy of your existing $HOME/.bashrc file before editing so that you can revert it if you make a mistake.
To use your software you will need to load the same modules that you used for compilation (except foundation module). For example if you used gsl and htslib modules for your software compilation:
module load htslib/1.10.2
module load gsl/2.6/gcc.8.4.0
myprog arg1 arg2
4.8. Install in JupyterHub
Your JupyterLab server is a Singularity container. The container is a subset of the full HPC3 software stack. While the lab environment is reasonably complete, you may want to install additional Python or R modules.
Default settings
Different containers will have a different subset of modules and available applications. Here’s what your Lab interface may look like the first time you start. The highlighted area is where you can upload/download files from/to your laptop (built-in capabilities) and where empty Python or R notebooks are:

Fig. 4.13 Server Lab Area
A standard Jupyter Notebook can be started from within your lab server.
The is also a Unix terminal application, you can use it for command-line access. The following example shows the available software modules and the modules loaded by default:
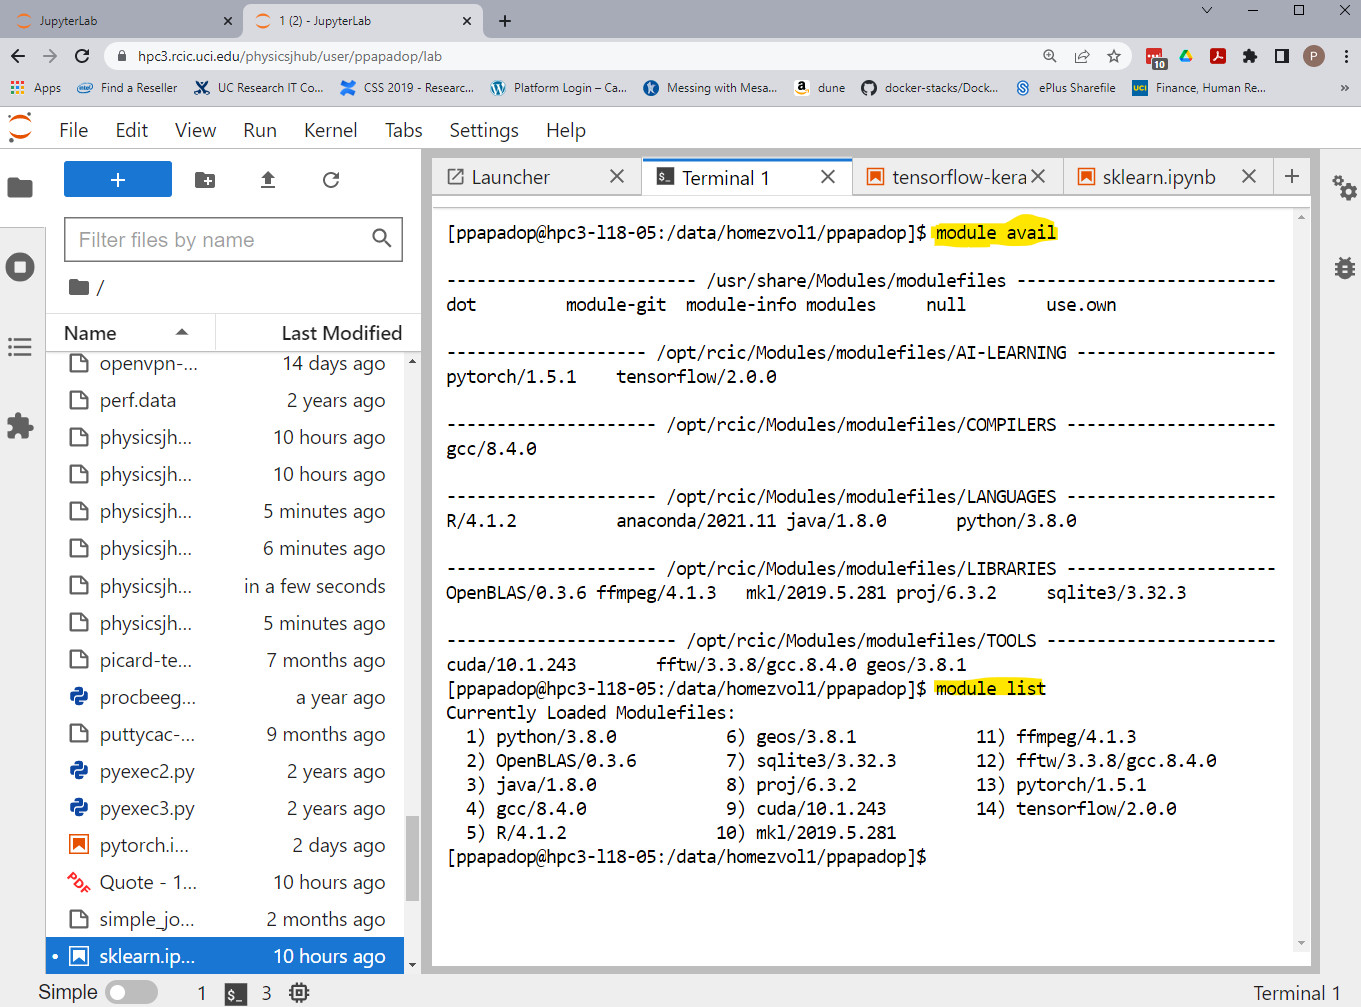
Fig. 4.14 Server Terminal App
Depending on the Singularity version and container build your initial screen in the Terminal app may look different.
Often, a default $HOME in Jupyter container is different from the one you usually have when you login on the cluster:
- default $HOME in the container:
/home/jovyan
- your cluster $HOME on the container:
/home/jovyan/UCInetID
Your cluster $HOME location is still available to you if you are adding R or Python packages or simply want to access it.
Important
If you are installing R or Python packages. Reset your default container $HOME to make sure you can install packages in your cluster $HOME area.
For example, A user npw starts a container and can reset $HOME from a default /home/jovyan to a regular cluster $HOME location which is available in the container and is a folder with the user’s UCInetID:
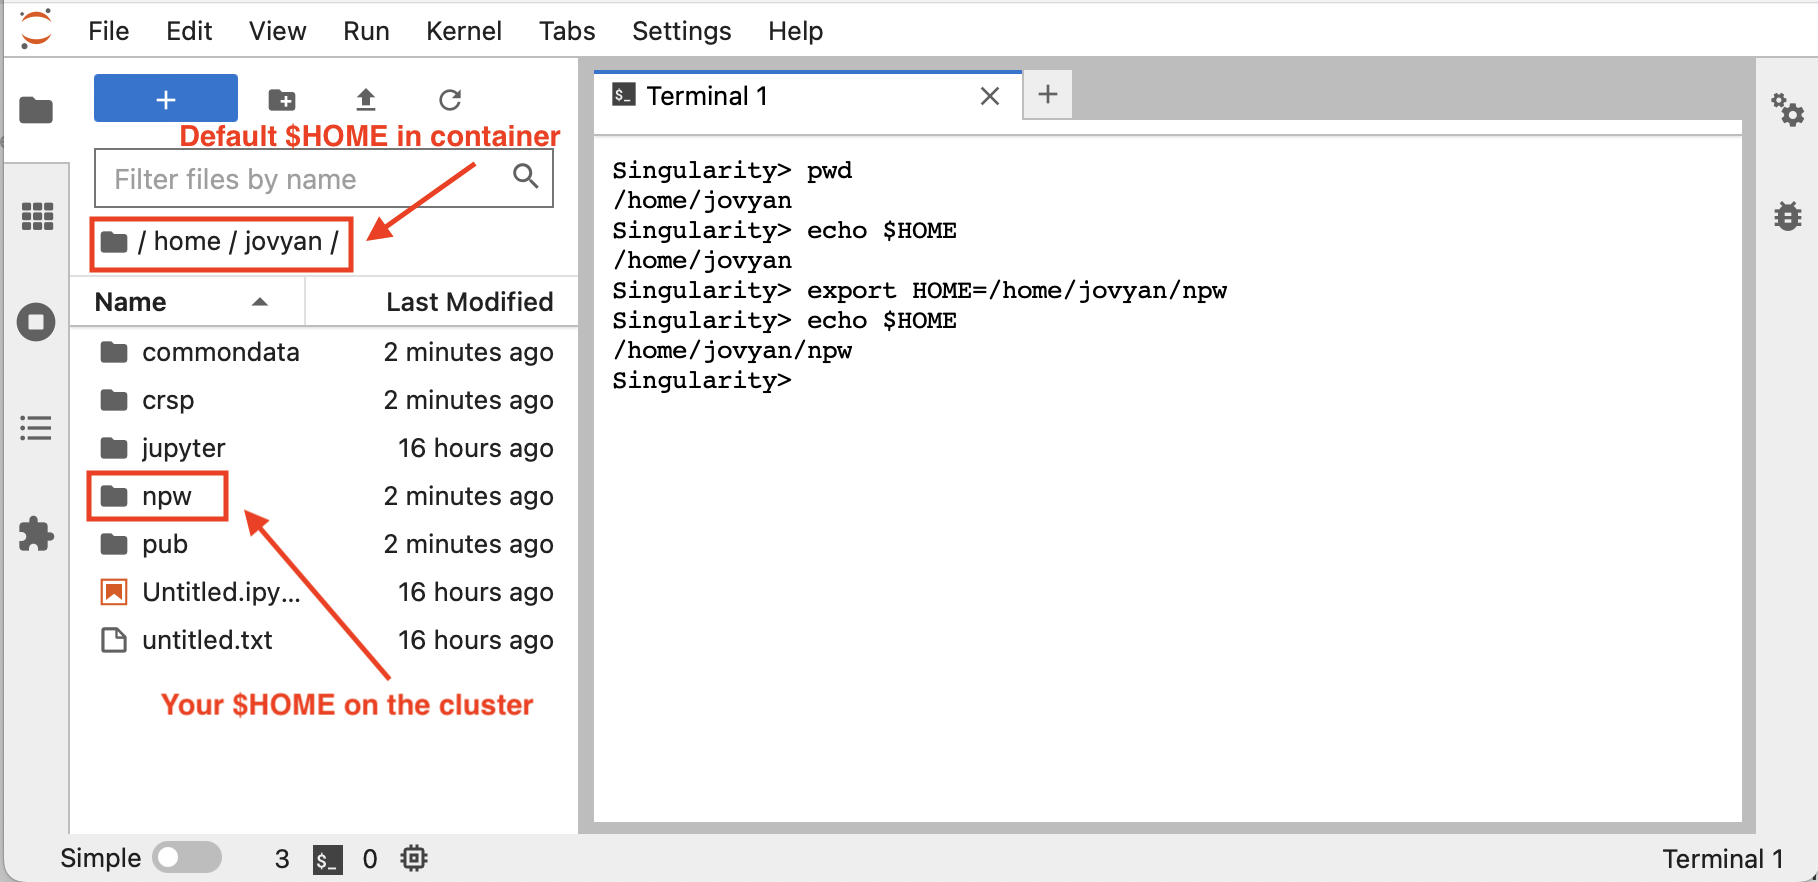
Fig. 4.15 Reset $HOME
Here,
pwdandechocommands show what the settings for $HOME are and theexportcommand resets $HOME to desired area.Make sure to reset $HOME to a correct path, this can not be an arbitrary location.
Upload/Download Files
You have a few choices to upload/download files. Among these are
The upload/download capabilities of the built-in file browser
Use
scpfrom the Terminal widget in the lab (you must initiatescpfrom within your lab)Use
curlto download files from the web
Adding Python packages with pip
Make sure your $HOME is reset to use your regular cluster $HOME location.
You can use Python from Console, Notebook or Terminal simply via clicking on the App image in the Launcher window.
This example uses
pipto install Python package ttictoc. In your lab, click on the Terminal Icon, and after it opens run the command:$ pip install --user ttictoc
Your output should look something like:
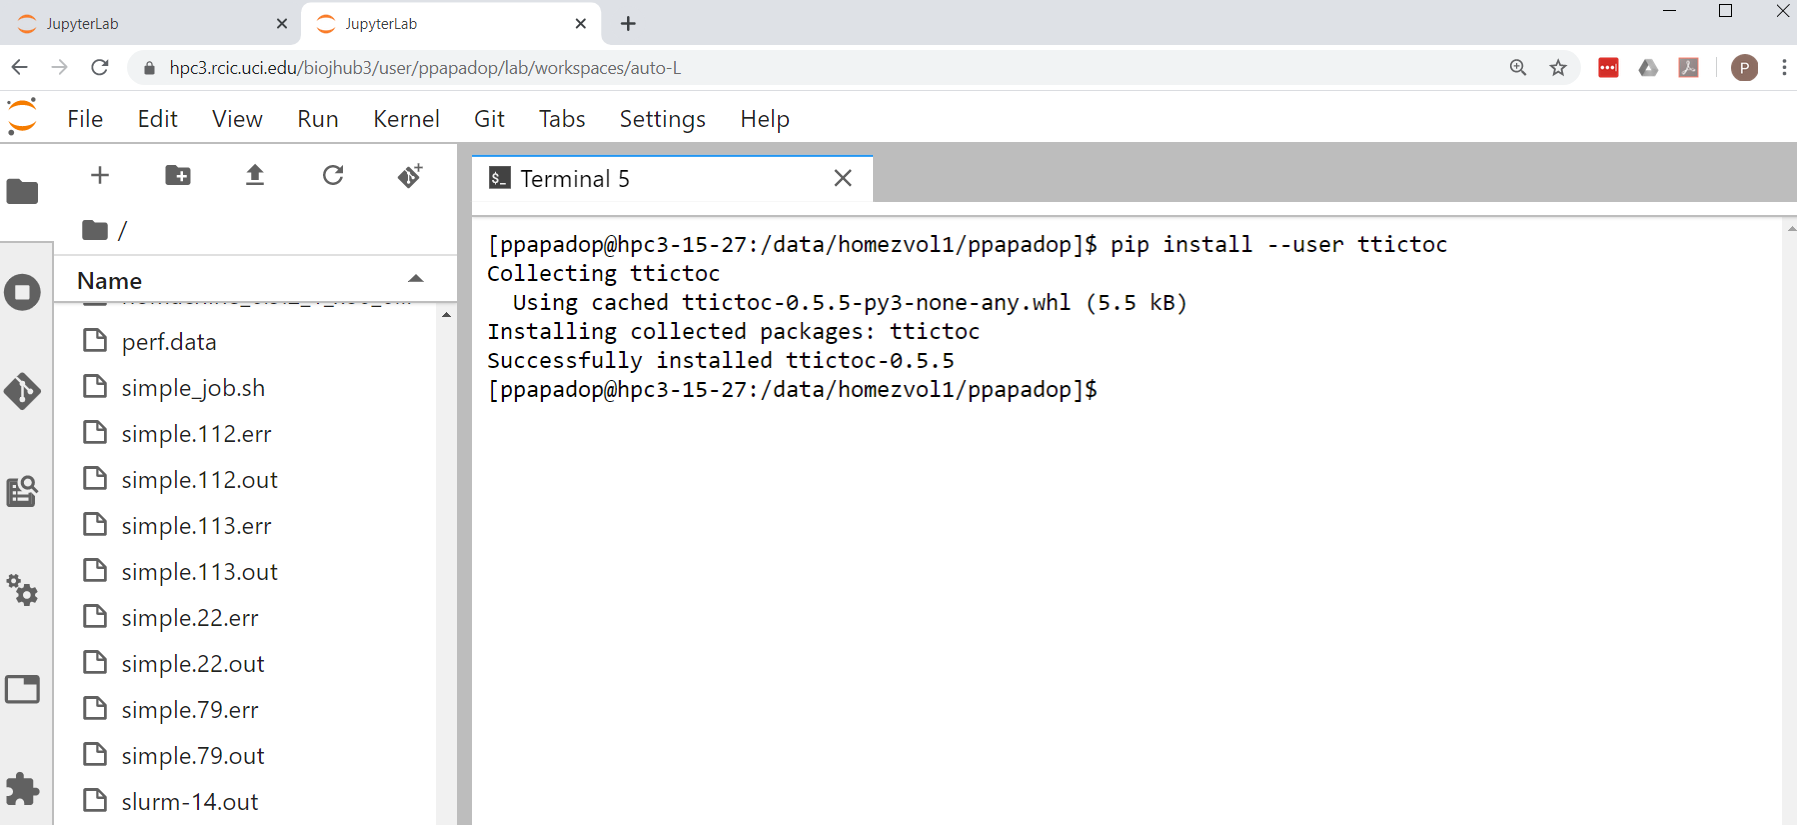
Fig. 4.16 Installing with pip
Adding R packages
Make sure your $HOME is reset to use your regular cluster $HOME location.
You may need to install additional R packages. Once you have added the package, you should be able to use it in your R notebook.
You must be in a Terminal to add new R packages as a user. Check if R module is already loaded, and if not load it:
$ module list
$ module av R
R/4.3.3
$ module load R/4.3.3
Note, different containers may have different R versions, use the one that is shown for you.
Start R and depending on your desired package you may need to use different options for installing. In general, one needs to follow the software package instructions for installing it. Most packages can be installed with the regular install command giving it a desired package name, for example to install cicerone package:
$ R
> install.packages("cicerone")
Some packages can be installed using source in github. Here is an example of installing SCopeLoomR:
> library('devtools')
> devtools::install_github("aertslab/SCopeLoomR")
Enable full software stack
When installing R or python packages sometimes a limited software stack that is installed on a container is not enough. If you find that the package you need to install has prerequisites that are not available on a container (but are available on HPC3 via modules) you can start your container and overwrite its software stack to include all applications that we provide on HPC3.
Note, this is needed only in a few rare instances and the majority of packages should be installed without enabling this option.
To enable a full stack, on a screen with server options choose Enable full HPC3 software stack (override container stack) before starting your container:
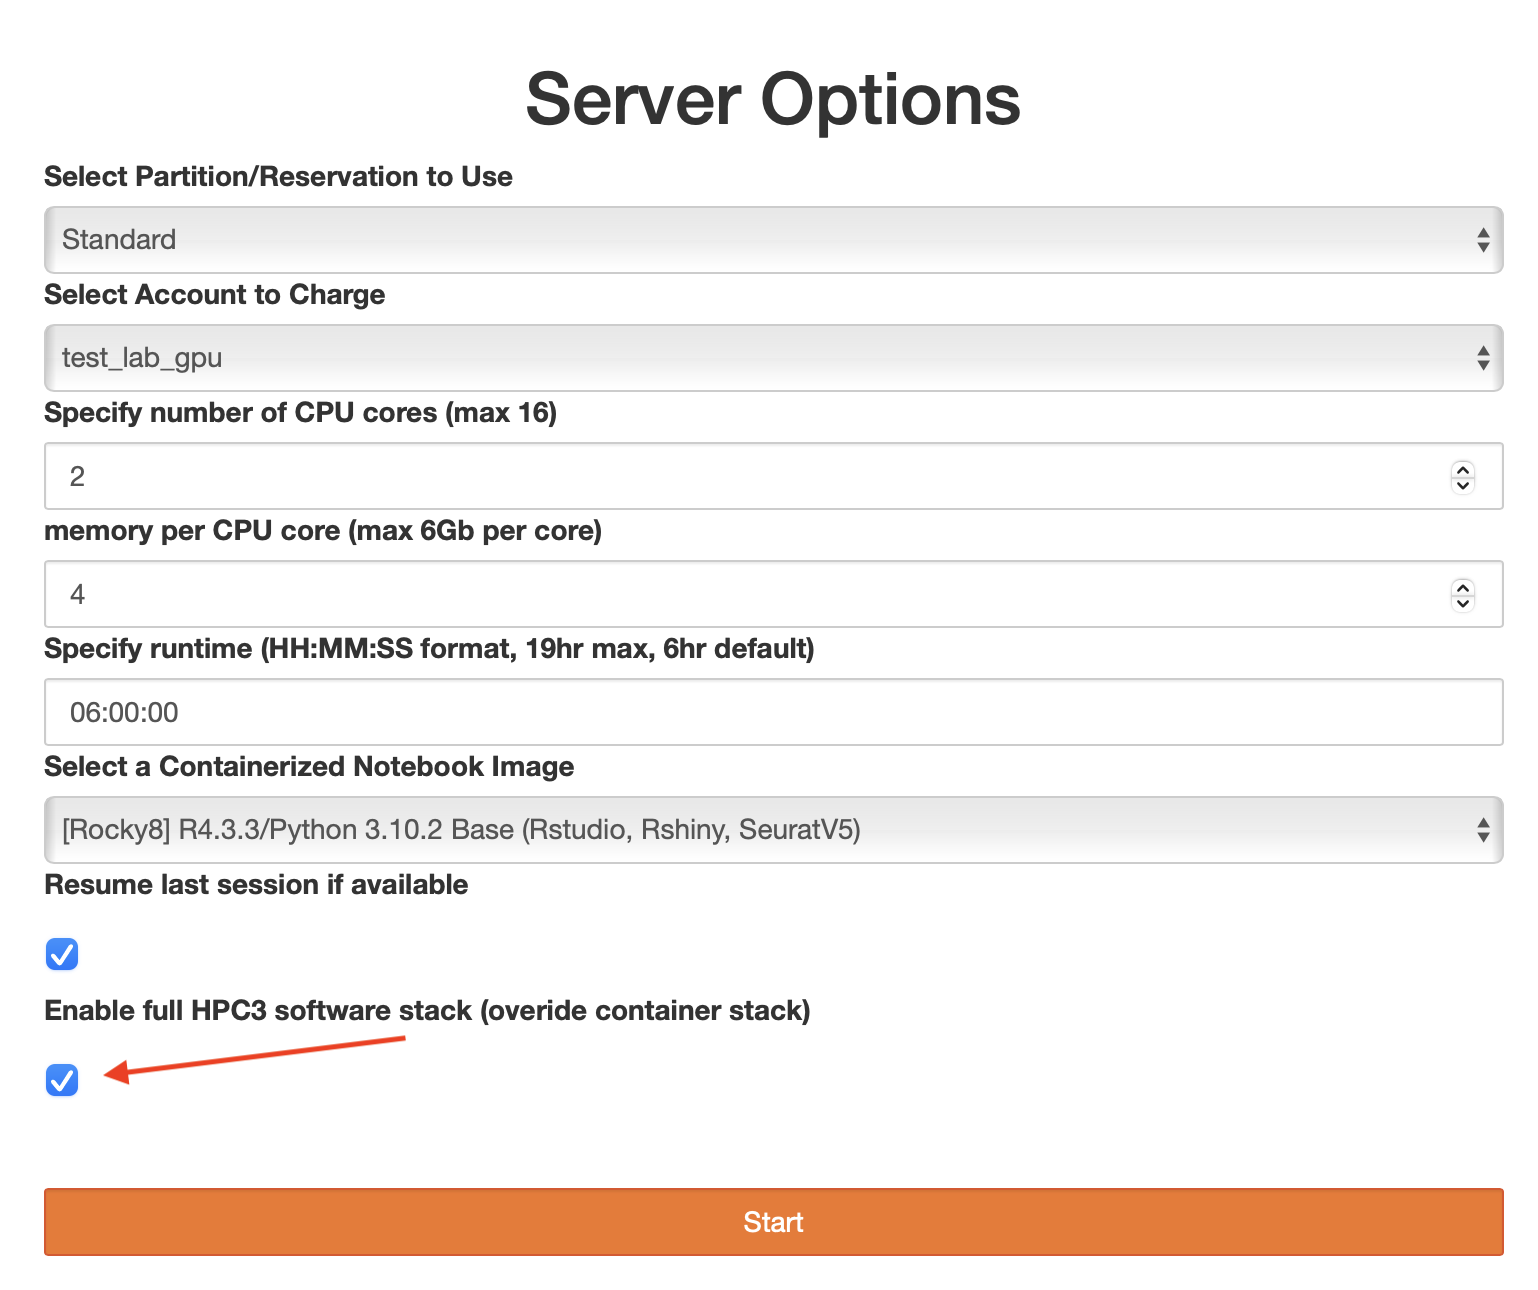
Fig. 4.17 Container with a full software stack