Generate SSH keys
The information provided in this section shows how to generate SSH keys on different laptops and then copy a public key to your account on the HPC3 cluster.
If you reached this guide when creating keys for CRSP, many of the steps are identical. The main difference is in the step of copying public keys. CRSP uses this procedure for that step.
Before you create keys
To create the keys, one needs to choose:
name for ssh keys files. This needs to be a single word with no spaces, for example key-to-hpc3 or UCInetID-to-hpc3. Replace UCInetID with your specific id.
comment to add to the key. For example “panteater@uci.edu (MacBook Air)”
very strong passphrase must be used for protecting your SSH key. It can contain spaces, numbers and special characters and must be at least 10 characters long. Always use a non-empty passphrase for your key and remember it! You will use it for logging in.
Attention
While, technically, you can create a key with an empty passphrase, you never should.It is a violation of UCI password security rules to use empty passphrase.
Generate SSH keys on macOS
Make sure, you made choices choices for your keys.
We assume your ssh is from OpenSSH, for other ssh distributions please
use your specific software instructions.
Open your Terminal application
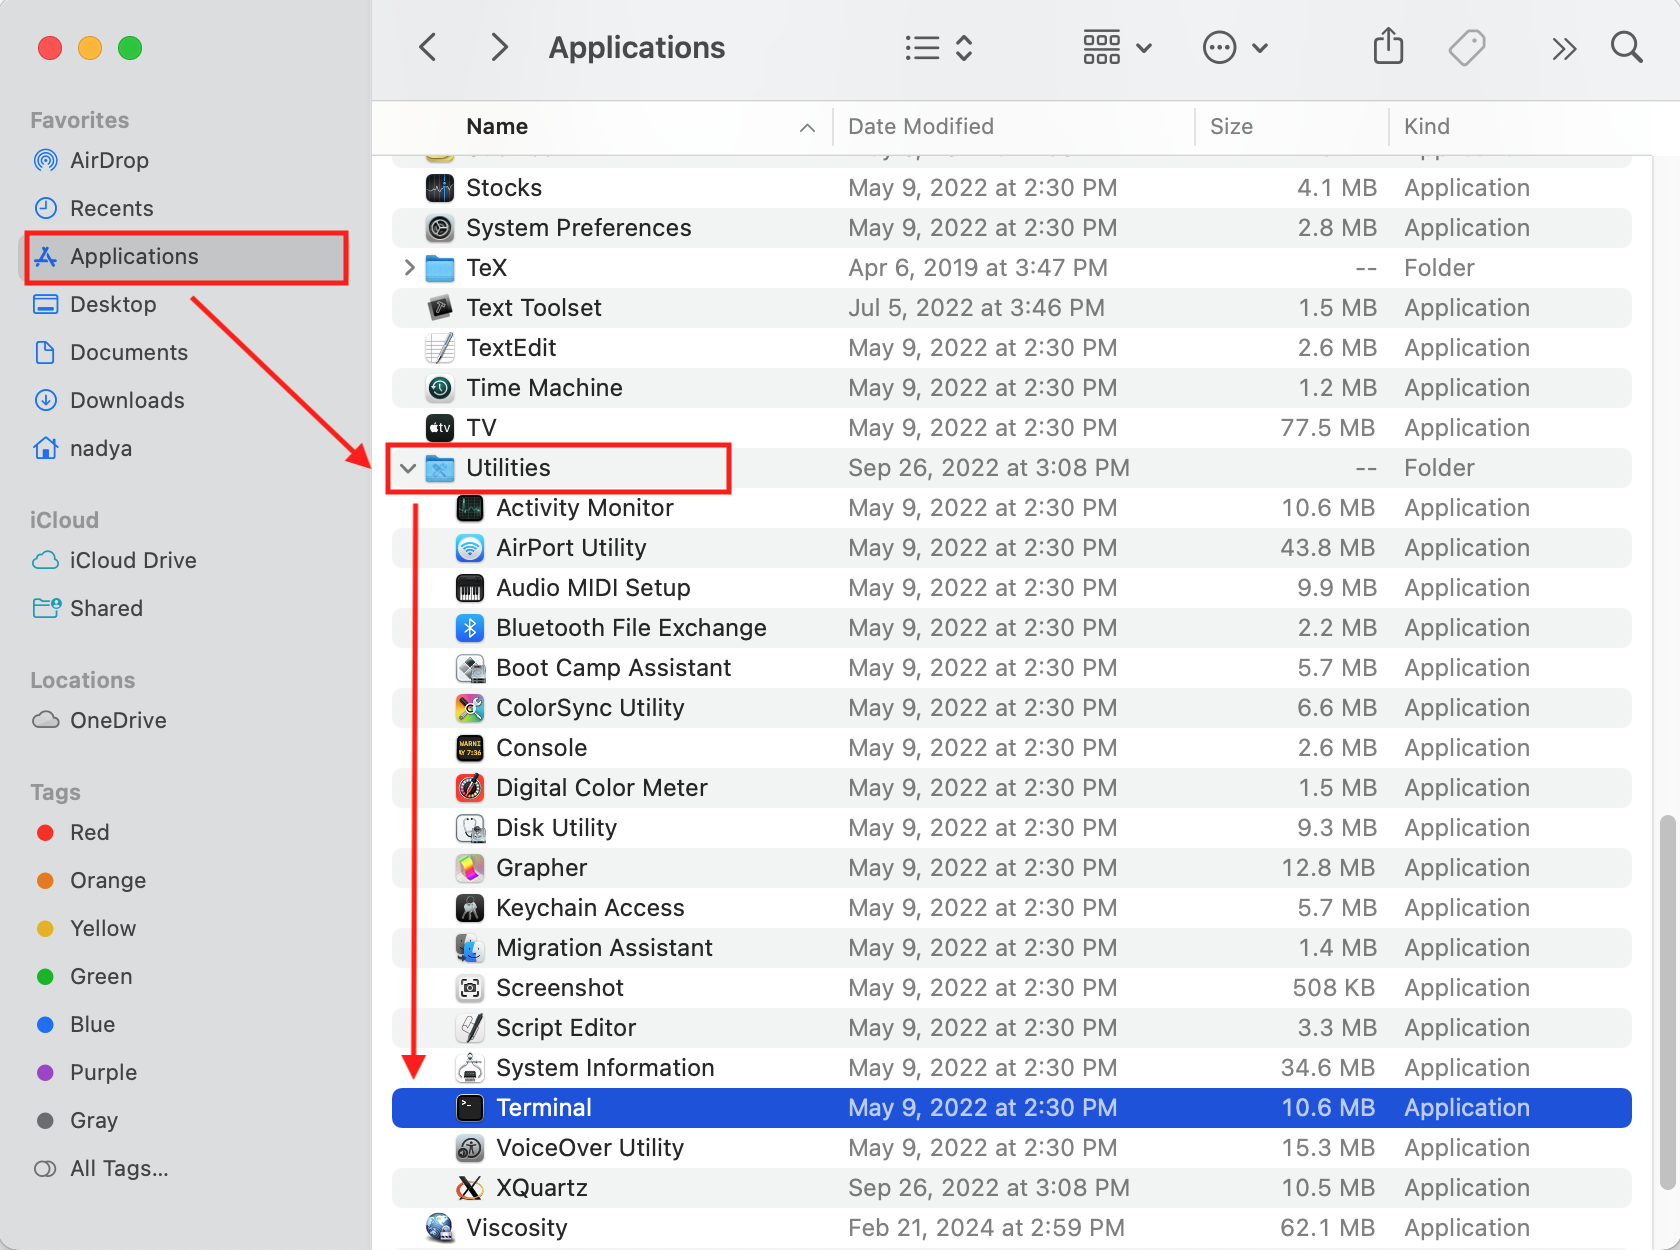
Open macOS Terminal App
In the Terminal window check your ssh software is OpenSSH
ssh -V
OpenSSH_8.6p1, LibreSSL 3.3.6
The output shows OpenSSH, your version may differ depending on your installed ssh.
Create ssh keys
In the following example we use the following choices:
- name:
key-to-hpc3
- comment:
“panteater@uci.edu (MacBook Air)”
- passphrase:
you need to type it twice when prompted
To create keys for HPC3:
Execute the
ssh-keygencommand to create RSA type ssh keys. Use your UCInetID in place of panteater:ssh-keygen -t rsa -C "panteater@uci.edu (MacBook Air)" Generating public/private rsa key pair. Enter file in which to save the key (/Users/panteater/.ssh/id_rsa): /Users/panteater/.ssh/key-to-hpc3 Created directory '/Users/panteater/.ssh'. Enter passphrase (empty for no passphrase): Do not use empty passphrase !!! Enter same passphrase again: Your identification has been saved in /Users/panteater/.ssh/key-to-hpc3 Your public key has been saved in /Users/panteater/.ssh/key-to-hpc3.pub The key fingerprint is: SHA256:KLY8s4Aq1JBrD8pCitYkn7MbZjUu6FOyUzgyuOevSuk panteater@uci.edu (MacBook Air) The key's randomart image is: +---[RSA 3072]----+ |*=T=. | |*.o*. | |=.1. o | |== o + . | |B.X * o S | |=E B o o o | |=. o . . | |.+oo | |==. . | +----[SHA256]-----+
The command will create an .ssh directory (directory is another name for folder) in your $HOME directory and generate two files there: a private key key-to-hpc3 and a public key key-to-hpc3.pub. They are always generated and work as a pair.
To create keys for CRSP:
Note
If you are creating ssh key pair for CRSP desktop client use the following
ssh-keygencommand to create ssh keys in PEM format:ssh-keygen -t rsa -m PEM -C "panteater@uci.edu (MacBook Air)" Generating public/private rsa key pair. Enter file in which to save the key (/Users/panteater/.ssh/id_rsa): /Users/panteater/.ssh/key-to-crsp.pem Created directory '/Users/panteater/.ssh'. Enter passphrase (empty for no passphrase): Do not use empty passphrase !!! Enter same passphrase again: Your identification has been saved in /Users/panteater/.ssh/key-to-crsp.pem Your public key has been saved in /Users/panteater/.ssh/key-to-crsp.pem.pub The key fingerprint is: SHA256:QRPoU/qBfvhB6leEvGPWzTegzQSBADRQS0gKl7CifjE panteater@uci.edu (MacBook Air) The key's randomart image is: +---[RSA 3072]----+ |oT+**... o+. | |.+o. o +. . | |+ . =. . 0 | |o = o. o . | |. E . S.+ = o | |. o + =o. . . | | . . . oo | | . ..=. | | oo. | +----[SHA256]-----+
The command adds an explicit format and the .pem file extension. This will create files key-to-crsp.pem (private key) and key-to-crsp.pem.pub (public key). PEM-formatted keys are the most reliable format for the CRSP Desktop Client.
Check your ssh keys. The first command simply lists the contents of your .ssh/ directory, and the second prints the contents of your public RSA type ssh key:
ls ~/.ssh
key-to-hpc3     key-to-hpc3.pub

cat ~/.ssh/key-to-hpc3.pub
ssh-rsa AAAA1yc2Ew...characters deleted...97VU0yRlaTxEX= panteater@uci.edu (MacBook Air)
Transfer your public ssh key
Once your keys are generated you will need to copy the contents of your public key to the desired server. See Copy SSH public keys from macOS.
Generate SSH keys on Linux
Make sure, you made choices choices for your keys.
Follow the of the steps for generating ssh keys on macOS except in the first step use any terminal application that is available on your laptop. Once your keys are generated you will need to copy the contents of your public key to the desired server. See Copy SSH public keys from macOS.
Generate SSH keys on Windows in PowerShell
Make sure, you made choices choices for your keys.
Follow the of the steps for generating ssh keys on macOS except in the first step use PowerShell that is available on your laptop. Once the keys are generated you will need to copy to the contents of your public key to the desired server. See Copy SSH Public Key From Windows below.
Generate SSH keys on Windows with PuTTYgen
Make sure, you made choices choices for your keys.
PuTTY is a very common terminal program used on Windows laptops and desktops. Other software that can use key-based authentication can also use keys generated by PuTTYgen. This tutorial assumes that you have downloaded and installed PuTTY, Pageant, PuTTYgen (using their MSI-based installer is the simplest method)
Open PuTTYgen from the Windows Start Button to see the following screen and press the Generate button
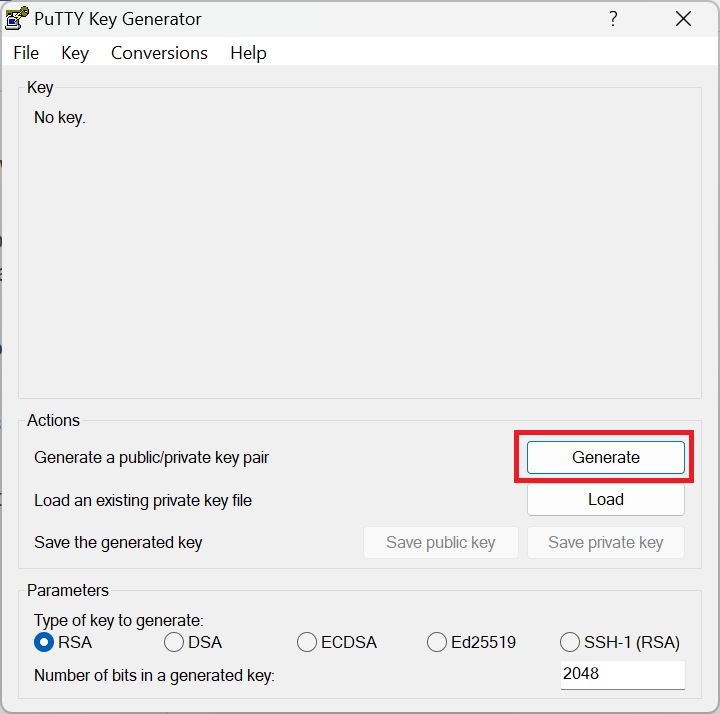
PuTTYgen start screen
Assign a non-empty passphrase and save both the public and private key.
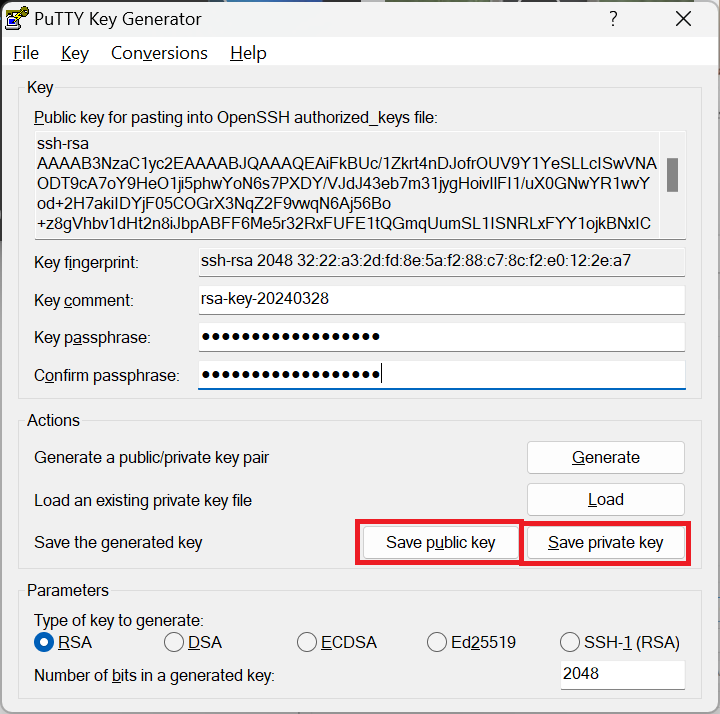
PuTTYgen assign a non-empty passphrase and save
The private key file is of type ppk for PuTTY Private Key. The private key should remain on your laptop. You will need to copy to the contents of your public key to the server. See section Copy SSH Public Key From Windows below.
Copy SSH public keys from macOS
Important
Private key should NEVER be shared. It remains on your laptop.
If you need to transfer ssh keys to CRSP, follow Managing Keys on CRSP
To transfer the public keys to HPC3:
Use
ssh-copy-idcommand to copy your public key from your laptop to your account on HPC3.You will be prompted for the standard password and DUO authentication by this command. Here is an example session for user panteater, use your UCInetID in its place:
ssh-copy-id -i ~/.ssh/key-to-hpc3 panteater@hpc3.rcic.uci.edu
The authenticity of host 'hpc3.rcic.uci.edu (128.200.221.16)' can't be established.
ED25519 key fingerprint is SHA256:KLY8s4Aq1JBrD8pCitYkn7MbZjUu6FOyUzgyuOevSuk.
This key is not known by any other names
Are you sure you want to continue connecting (yes/no/[fingerprint])?  yes
/usr/bin/ssh-copy-id: INFO: attempting to log in with the new key(s), to filter out any that are already installed
/usr/bin/ssh-copy-id: INFO: 1 key(s) remain to be installed -- if you are prompted now it is to install the new keys
(panteater@hpc3.rcic.uci.edu) Password:  type your UCInetID password
(panteater@hpc3.rcic.uci.edu) Duo two-factor login for panteater

Enter a passcode or select one of the following options:

 1. Duo Push to XXX-XXX-1234

   Passcode or option (1-1): 1

 Number of key(s) added:        1

 Now try logging into the machine, with  ssh panteater@hpc3.rcic.uci.edu
 and check to make sure that only the key(s) you wanted were added.
The content of your public key will be added to $HOME/.ssh/authorized_keys file in your HPC3 account.
Create key mapping
This task is done on your laptop once for generated ssh keys pair.
Your ssh keys are stored in the default directory but they have non-default names. We need to add newly generated key’s name to the ssh configuration file to let the ssh commands know what keys to use when connecting to HPC3 cluster.
Create ~/.ssh/config file with your choice of editor and add the following:
Host hpc3.rcic.uci.edu
  IdentityFile ~/.ssh/key-to-hpc3
The ~/ssh/config is a user’s ssh configuiration file that is used by ssh commands. The added content tells ssh to use this specific ssh key when connecting to HPC3.
Copy SSH Public Key From Windows
Important
Private key should NEVER be shared. It remains on your laptop.
If you need to transfer ssh keys to CRSP, follow Managing Keys on CRSP
To transfer the public keys to HPC3:
Since Windows does not have the convenience of ssh-copy-id, one has to type a bit more. The following can be run
from either a Command window or a Powershell window to place the key panteater-to-hpc3.pub in the appropriate place.
C:> type .\panteater-to-hpc.pub | ssh panteater@hpc3.rcic.uci.edu "cat >> .ssh/authorized_keys"
(panteater@hpc3.rcic.uci.edu) Password: type your UCInetID password
(panteater@hpc3.rcic.uci.edu) Duo two-factor login for panteater

Enter a passcode or select one of the following options:

1. Duo Push to XXX-XXX-1234

Passcode or option (1-1): 1

C:>
The content of your public key will be added to $HOME/.ssh/authorized_keys file in your HPC3 account.
Managing Public SSH Keys on CRSP
CRSP uses ssh for authentication but does not grant shell access. This means that common methods
updating as user’s authorized_keys file cannot be used.
Since there is no shell access to CRSP, you should use the procedure below to copy your ssh public key to CRSP.
To make ssh key management a bit more tractable, RCIC has built a very simple facility to add a new public key to your $HOME/.ssh/authorized_keys file on CRSP or to completely replace the contents of the authorized_keys file.
Note
In the steps below, command-line clients are used. These are available at the Linux terminal, the Mac Terminal, Windows Command line, and Windows Powershell.
Add an SSH Public Key
Suppose you have new public key in format similar to (single line broken for readability):
ssh-rsa AAAAB3NzADAQABAAABgQC1QciUGQzHTtSfnibqUqOotPVPYQcnJ71P12lHhy5R4K9h8SnYQHopwPK0
LxRWkc51LyI6cDSUbV2vmVBCBhAaYiUDmZIBwqXVToHn/B4MEGOBscT3jVd5cSC3F29dPU/oMEED5EPlZe2mZnOn
VMaCK4tlNA5BpBc2oXQzlYZKcaT8PVAK8lC+iom6ECrGm8BBcKSkU7H8A5qbof8jfHrqDHWm2GB6/PezHo4UHEfWH
jPA3QknLjRU71ydNmwoIPPLqSKsYEXyK+E/ULhkJOhU8QCusuKEE6hbScoEJJVgjj1vfiTigyg1khcj1v/QrnV
5IJiqx6vpkOhfbmb05qzUEL34AklhPkL3xpEb0n4Fefp8oE2cugSyYd1vRmLfGsaljgh9LzzBgvdFyeJi
k= ssh key panteater@uci.edu for crsp
Now you need to add this key so that it can be recognized by CRSP. To accomplish this, use
sftpto put the public key into the file $HOME/.ssh/add on CRSP. You will be asked for DUO authentication to authenticate to CRSP.In the following example, replace panteater with your UCInetID and replace the panteater-uci.pub with the name of the file on your laptop that holds your public key.
What you type is in blue:
cd $HOME/.ssh                              (1)
sftp panteater@access.crsp.uci.edu:.ssh    (2)
Password:
Duo two-factor login for panteater

Enter a passcode or select one of the following options:

     1. Duo Push to XXX-XXX-1234

Passcode or option (1-1): 1
Connected to access.crsp.uci.edu.
Changing to: /mmfs1/crsp/home/panteater/.ssh
sftp> put panteter-uci.rsa.pub add         (3)
Uploading panteater-uci.rsa.pub to /mmfs1/crsp/home/panteater/.ssh/add
panteater-uci.rsa.pub                                    100%  742     9.1KB/s   00:00
sftp> ls                                   (4)
  add              authorized_keys  known_hosts
sftp> quit                                 (5)
cd $HOME                                   (6)
(1) The firstcdcommand puts you in a directory where your ssh keys are.(2) Thesftpcommand makes a secure connection to the CRSP server.(3) The sftp’sputcommand copies the public ssh key panteter-uci.rsa.pubfrom your laptop to the CRSP server (your ssh key name will be different).(4) the sftp’slscommand output must have add listed. Additional filesas shown above may be present if you have previously used ssh and added keys.(5) The sftp’squitcommand stops sftp session.(6) The lastcdcommand puts you in your home area on your laptop.After approximately 5 minutes, the CRSP server will append the contents of the uploaded file named add to your $HOME/.ssh/authorized_keys file. You will know that this has been completed when the file add disappears.
Verifying Access
Once your $HOME/.ssh/authorized_keys file is appended, you should be able to
sftpto CRSP using the private key as the identity as in the following example. Notice that the passphrase for the key was requested and DUO was not required:sftp -i panteater-uci panteater@access.crsp.uci.edu Enter passphrase for key 'panteater-uci': Connected to access.crsp.uci.edu. sftp> quit
Starting over: Overwrite authorized_keys
Sometimes your $HOME/.ssh/authorized_keys needs more complex editing than simple addition of new key. You can completely overwrite the contents of the authorized_keys file with a new version.
Create a new version of the file on your local machine called newkeys. Edit it so that it appears exactly how it you need it to appear on CRSP.
Danger
You need to understand the format of authorized_keys file and what to put there. Ad hoc editions can make your CRSP access unusable if you upload a bad file.
Follow the SFTP Procedure EXCEPT once you get to the sftp prompt sftp> put the file as overwrite instead of add:
sftp> put newkeys overwrite
Uploading newkeys to /mmfs1/crsp/home/panteater/.ssh/overwrite
overwrite                                    100%  742     9.1KB/s   00:00
sftp> ls
  overwrite   authorized_keys  known_hosts
sftp> quit
Wait 5 minutes for the new file to be put in place
Additional tutorials
See Tutorials for additional SSH-related reading.
FAQS for Key Generation
- What is being created?
You are generating an ssh key pair. The pair is two parts: a private key, and a public key. The private part remains on your laptop. The public key is copied to the remote system.
- Where is the key pair stored?
The key pair is really two text files. These files are usually stored in the .ssh subdirectory for your $HOME directory on your laptop or desktop.
- What’s the difference between a password and a passphrase?
A password is interpreted by the remote system and must therefore be sent over the network to be verified.
- A passphrase is used to unlock the private part of an ssh key pair.Choose a unique passphrase for each generated ssh key pair.Don’t use your UCInetID password and never use an empty passphrase!The passphrase is local and is never transmitted over the network.
- Can I omit the passphrase when creating my key pair?
This is a violation of UCI password security rules. While technically you can create a passwordless key, you never should.
- Can I use the same key pair to authenticate to both HPC3 and CRSP?
Technically, yes. But it is recommended that you create a unique key pair for each remote system. Each key pair should have its own unique password.
- What do I do if I forget my passphrase?
Follow the procedure below to generate a new key pair and upload the public part of the new key. Finally, destroy the old key pair.
- Do I share the private part of my key?
No. Never. The private part (a file on your local system) should never leave your laptop. It doesn’t need to be backed up. If it is lost, you can always generate a new pair.
- What if somebody gets a copy of my public key?
Nothing to worry about. Public key cryptography means that security is not compromised if the public key were exposed.
- How does the remote system accept my key?
- Short answer:
Public key cryptography with challenge/response.
- A little more information:
Using Password+DUO, you have placed the public key on the remote server in an authorized_keys file.
When you log in, your client presents the public key to the server.
The server then challenges your client to prove that you have the private key. It does this by encrypting a message that can only be decrypted using the private key.
If you can respond with contents of that challenge (providing your passphrase when prompted), then the server accepts your identification.