3. Job examples
This section has several examples of submission scripts for the most common applications. You will have to edit the SBATCH options with your requirements (i.e., partition, cores/memory, GPU, etc.).
Information about requesting memory, local scratch, time, nodes resources for the jobs are explained in Requesting Resources.
3.1. Using Aliases
You can use aliases and environment variables that are defined in your .bashrc file in your Slurm submit scripts. A user panteater has in .bashrc:
alias pub='cd /pub/panteater'
export MYPUB=/pub/panteater
The following Slurm submit script can be used to verify that the defined alias pub and environment variable MYPUB are accessible in Slurm jobs:
File alias.sub
#!/bin/bash -l

#SBATCH --job-name=test      ## Name of the job.
#SBATCH -p standard          ## partition/queue name
#SBATCH --nodes=1            ## (-N) number of nodes to use
#SBATCH --ntasks=1           ## (-n) number of tasks to launch
#SBATCH --cpus-per-task=1    ## number of cores the job needs
#SBATCH --mem=500            ## 500Mb of memory
#SBATCH --time=00:02:00      ## run time 2 min
#SBATCH --error=slurm-%J.err ## error log file

# this line must be present to enables alias expansion on your shell
shopt -s expand_aliases

# execute defined alias then do ls command
# ls output will list the contents of the directory defined in the alias pub
pub
ls

# Check if a defined variable is available
echo "my defined variable MYPUB=$MYPUB"
Note, first line #!/bin/bash -l requests login shell, this is needed to execute your .bashrc on the node where the job is run
3.2. Array
Job arrays provide a way to submit a large number of similar jobs at once. All jobs must have the same initial options (e.g. memory needs, time limit, etc.), but usually have different input parameters.
Using a job array instead of a large number of separate serial jobs is advantageous since the scheduler does not have to analyze job requirements for each task in the array separately, so it will run these jobs more efficiently.
It is also much easier for the user to create 1 submit script instead of multiple submit scripts.
Job arrays are only supported for batch jobs.
The array index values are specified using the –array or -a option
of the sbatch command or in the submit script. The array index can be
specified in a few ways:
#SBATCH --array=0-200             # index values from 0 to 200 inclusive
#SBATCH --array=1,3,5,7,9         # index values 1,3,5,7,9
#SBATCH --array=0-20:2            # step size 2, index values 0,2,4,...,20
#SBATCH --array=1-1000%10         # index values from 1 to 1000, run 10 tasks simultaneously
Note
You should not use a job array to submit tasks with very short run times, e.g. much less than an hour. Tasks with run times of only a few minutes should be grouped into longer jobs using GLOST, GNU Parallel, or a shell loop inside of a job. Please see Running many short tasks.
Please see in-depth Slurm Array Jobs documentation.
3.2.1. Environment Variables
Job arrays will have additional environment variable set as follows:
Variable |
Meaning |
|---|---|
SLURM_ARRAY_JOB_ID |
the submitted batch job job ID, or the first job ID of the array |
SLURM_ARRAY_TASK_ID |
the job array index value, each task has a different one |
SLURM_ARRAY_TASK_COUNT |
the number of tasks in the job array |
SLURM_ARRAY_TASK_MAX |
the highest job array index value |
SLURM_ARRAY_TASK_MIN |
the lowest job array index value |
For example, the following very simple test script is for an array job with 4 tasks. It does nothing computational but shows what variables are available for the job:
File array-vars.sub
#!/bin/bash

#SBATCH --job-name=mytest     ## job name
#SBATCH -p free               ## partition name
#SBATCH --nodes=1             ## (-N) number of nodes the job will use
#SBATCH --ntasks=1            ## (-n) number of processes to be launched
#SBATCH --cpus-per-task=1     ## number of cores  per task the job needs
#SBATCH --mem-per-cpu=500     ## memory per CPU is 500Mb
#SBATCH --array=1-4           ## array index form 1 to 4
#SBATCH -t 00:02:00           ## time limit 2 min
#SBATCH --error=%x.%A_%a.err  ## all Slurm stdout is collected in this file
#SBATCH --output=%x.%A_%a.out ## sll Slurm stderr is collected in this file
                              ## %x will be replaced by job name
                              ## %A will be replaced by SLURM_ARRAY_JOB_ID
                              ## %a will be replaced by SLURM_ARRAY_TASK_ID

echo "SLURM_NTASKS is $SLURM_NTASKS"
echo "I am task SLURM_ARRAY_TASK_ID = $SLURM_ARRAY_TASK_ID"
echo "I am job SLURM_JOB_ID = $SLURM_JOB_ID"
echo "I am array job SLURM_ARRAY_JOB_ID = $SLURM_ARRAY_JOB_ID"

# Do nothing for 10 seconds
# this is to see the job in the queue when running squeue command
sleep 10
We can submit this file as a job and check the result of the submission, for example:
[user@login-x:~]$ sbatch array-vars.sub
Submitted batch job 22413720
[user@login-x:~]$ squeue -u panteater
JOBID       PARTITION    NAME     USER    ACCOUNT ST  TIME CPUS NODE NODELIST(REASON)
22413720_1  free       mytest panteater panteater  R  0:01    1    1 hpc3-l18-05
22413720_2  free       mytest panteater panteater  R  0:01    1    1 hpc3-l18-05
22413720_3  free       mytest panteater panteater  R  0:01    1    1 hpc3-l18-04
22413720_4  free       mytest panteater panteater  R  0:01    1    1 hpc3-l18-04
Note, each array task will have a different JOBID and will produce 2 output files, one for Slurm stderr and one for Slurm stdout. The file names are per specification in the submit script. The mytest.*.err files should be empty, and the mytest.*.out files will have the output from the tasks.
Attention
3.2.2. Array indexing
Simple case
The following example shows how to use environment variables in the array job. This job will be scheduled as 100 independent tasks. Each task has a time limit of 1 hour and each task may start at a different time on any scheduled node.
File array.sub
#!/bin/bash

#SBATCH --job-name=test_array   ## name of the job.
#SBATCH -A panteater_lab        ## account to charge
#SBATCH -p standard             ## partition/queue name
#SBATCH --error=error_%A_%a.txt ## error log file name: %A is job id, %a is array task id
#SBATCH --output=out_%A_%a.txt  ## output filename
#SBATCH --nodes=1               ## number of nodes the job will use
#SBATCH --ntasks=1              ## number of processes to launch for each array iteration
#SBATCH --cpus-per-task=1       ## number of cores the job needs
#SBATCH --time=1:00:00          ## time limit for each array task
#SBATCH --array=1-100           ## number of array tasks is 100 and
                                ## $SLURM_ARRAY_TASK_ID takes values from 1 to 100 inclusive

# Slurm automatically sets $SLURM_ARRAY_TASK_ID variable
# Can use $SLURM_ARRAY_TASK_ID to specify the file names and other variables.

# A user application *myanalyze* takes as an argument a file name based on task ID.
# Each array task takes a different input file: from data_file_1.txt to data_file_100.txt
myanalyze data_file_$SLURM_ARRAY_TASK_ID.txt

# A user application *mysimulate* takes as an argument an integer number
# which can be specified with $SLURM_ARRAY_TASK_ID, for example:
mysimulate $SLURM_ARRAY_TASK_ID
In this example script, for a 100-task job array the input files were named data_file_1.txt through data_file_100.txt which allowed the user to use $SLURM_ARRAY_TASK_ID to specify the file name.
More complex case
Often files are not named in that precise manner but can still be referenced using the task ID. For example if you have a directory inputs/ with 100 files that end in .txt, you can use the following approach in your submit script to get the name of the file for each task automatically:
filename=$(ls inputs/*.txt | sed -n ${SLURM_ARRAY_TASK_ID}p)
MyProg  $filename
Here, in the first line, a command ls list all the files with needed naming
convention (the list will be 100 names long) and pipes the output into the sed
command which takes a single line from the output and assigns it to the
variable filename. The single line corresponds to the to SLURM_ARRAY_TASK_ID
order in the list of files.
The second line simply executes the needed program with the variable which holds now a specific file name for this specific array task.
Multiple input parameters
Array indexing can be used for multiple input parameters to a program. Let say a program X requires 3 parameters, a file name and 2 numbers. A user can create a simple text file that lists all needed parameters for the desired tasks:
/a/path/to/fileM    23 14.5
/a/other/path/fileZ 12 11.2
/a/path/to/fileS     1  2.2
... remaining lines ...
Then in the Slurm submit script a user can request 20 array tasks (same number as the number of lines in the created file) and provide the needed parameters for each task as:
INPUT=/path/to/params.txt
Args=$(awk "NR==$SLURM_ARRAY_TASK_ID" $INPUT)
progX $Args
Here, variable Args will hold 3 values that correspond to a line in params.txt file, the line number is SLURM_ARRAY_TASK_ID. The last line simply runs the desired program on 3 parameters for the current array task.
3.2.3. Running many short tasks
When each array task is short (seconds or a few minutes), array jobs become inefficient and overload the scheduler because time spent on managing tasks will be longer than doing actual work. This is a negative impact not only on your job but on all other users.
When you have hundreds or thousands of very short tasks, it is better to combine simple array with a loop that groups multiple tasks for efficiency.
In the following example, we:
specify 4 array tasks,
then use shell variables and a loop to set the number of runs that each array task will do and the starting and ending number of runs for them.
the submit script will do 4,000 runs of a program (here substituted by
echofor simplicity) where each run takes just a few seconds to complete.
Instead of running an array job with 4,000 tasks, the script will be much more efficient to run 4 array tasks where each completes 1,000 runs.
File array-short-tasks.sub
#!/bin/bash

#SBATCH --job-name=tinytask   ## Name of the job.
#SBATCH -p free               ## partition/queue name
#SBATCH --nodes=1             ## (-N) number of nodes the job will use
#SBATCH --ntasks=1            ## (-n) number of processes to be launched
#SBATCH --cpus-per-task=1     ## number of cores the job needs
#SBATCH --mem-per-cpu=1G      ## RAM per CPU
#SBATCH --array=1-4           ## number of array tasks
#SBATCH --error=%x.%A_%a.err  ## error log file: %x - job name, %A - job ID, %a - task ID
#SBATCH --output=%x.%A_%a.out ## output log file: %x - job name, %A - job ID, %a - task ID

#Set the number of runs that each SLURM task should do
PER_TASK=1000

# Calculate the starting and ending values for this task based
# on the SLURM task ID  and the number of runs per task.
START_NUM=$(( ($SLURM_ARRAY_TASK_ID - 1) * $PER_TASK + 1 ))
END_NUM=$(( $SLURM_ARRAY_TASK_ID * $PER_TASK ))

# Print the task and run range
echo "Task $SLURM_ARRAY_TASK_ID: for runs $START_NUM to $END_NUM"

# Run the loop of runs for this task.
for (( run=$START_NUM; run<=END_NUM; run++ )); do
  # this loop repeats PER_TASK times
  # do your real commands here and comment echo line below
  echo "SLURM task $SLURM_ARRAY_TASK_ID, run number $run"
done
3.3. Dependent
Job dependencies are typically used to construct pipelines where jobs need to be launched in sequence upon the successful completion of previously launched jobs. Dependencies can also be used to chain together long simulations requiring multiple steps.
With Slurm this is done by using the –dependency feature. To familiarize yourself with the dependency feature
take a look at the man page man sbatch and read dependency section.
Here is an example workflow of commands that shows how to use this feature.
Submit a 1st job that has no dependencies and set a variable jobid1 to hold the job ID
[user@login-x:~]$ jobid1=$(sbatch --parsable first_job.sub)
Submit a 2nd job with a condition that will launch only after the first job completed successfully. Set a variable jobid2 to hold this 2nd job ID.
[user@login-x:~]$ jobid2=$(sbatch --dependency=afterok:$jobid1 second_job.sub
Submit a 3rd job that depends on a successful completion of the second job. Set a variable jobid3 to hold this job ID.
[user@login-x:~]$ jobid3=$(sbatch --dependency=afterok:$jobid2 third_job.sub)
Submit the last job with a condition that will launch only after the 2nd and the 3rd jobs are completed successfully.
[user@login-x:~]$ sbatch --dependency=afterok:$jobid2,afterok:$jobid3 last_job.sub
Show dependencies in
squeueoutput:[user@login-x:~]$ squeue -u $USER -o "%.8A %.4C %.10m %.20E"
Note
If a dependency condition is not satisfied, then the dependent job will remain in the Slurm queue with status DependencyNeverSatisfied. In this case, you need to cancel your jobs manually with the
scancelcommand and check for job errors.
3.4. GPU
To run a GPU job one needs to request:
- GPU partition name
Specify a GPU partition in your submit script. To see all available partitions use
sinfocommand that lists all partitions and nodes managed by Slurm.To use free-gpu partition, your own account will be used but not charged
#SBATCH -p free-gpuTo use other GPU partitions specify a partition name and your GPU Lab account to charge. Note, CPU and GPU lab accounts are different and not all labs have both.
#SBATCH -p gpu
#SBATCH -A panteater_lab_gpu   # Note, GPU Lab name has 'gpu' in it
GPU number
Important
Set GPU number to 1. Nearly 100% of applications on the cluster can use only 1 GPU.
None of Perl, Python, or R-based applications need multi-GPU.
Very few applications can use multiple GPUs in P2P (peer-2-peer) mode, for example, Amber, VASP and NAMD. These applications are designed and compiled with very specific flags and options to be able to use multi-GPU acceleration.
If you request multi-GPU but use only 1 you will be charged for all requested GPUs regardless of the usage.
To set the GPU number add to your submit script:
#SBATCH --nodes=1
#SBATCH --gres=gpu:1    # specify 1 GPU
- GPU type
This is an optional parameter and most jobs do not care what GPU type is used. For many jobs, it is better to omit the type as Slurm will have a better change to put your job on any available node with any GPUs.
HPC3 has a few GPU types. GPU type and number are specified with gres directive, for both interactive and batch jobs. In your Slurm submit script you will need to add:
#SBATCH --nodes=1
#SBATCH --gres=gpu:V100:1    # specify 1 GPU of type V100
To find out what Generic RESource (GRES) and GPU types are is available use the following:
[user@login-x:~]$ sinfo -o "%60N %10c %10m %30f %10G" -e
- Example GPU job submit script:
#SBATCH -J gpuJob                   # job name
#SBATCH --nodes=1                   # request to run on 1 node
#SBATCH -p gpu                      # request gpu partition
#SBATCH --gres=gpu:1                # request 1 gpu
#SBATCH -t 5-00:00:00               # set time limit 5 days
#SBATCH --tasks-per-node=1          # request 1 task per node
#SBATCH --cpus-per-task=1           # request 1 cpu per task
#SBATCH --mem=16gb                  # request 16Gb of memory
#SBATCH --account panteater_lab_gpu
#SBATCH --output slurm-%x.%A.out

<your job commands>
The above job request translates into the following:
job request
actual job allocation
1 node
1 node
1 GPU
1 GPU
16Gb memory
16Gb memory
1 CPU
2 CPU
billing is 33 = 32(gpu) + 1(cpu)
billing is 34 = 32(gpu) + 2(cpu)
The CPU and billing increase is due to the memory request of 16Gb. For gpu partition max memory per CPU is 9Gb, thus 2 CPUs are needed to supply requested memory.
3.5. JupyterHub Portal
Sometimes applications are available via containers on our Jupyterhub portal. This includes many Bioinformatics applications, RStudio, etc. Below are the steps to start a container.
A user must have an HPC3 account to use the portal.
Authenticate at Jupyterhub portal
Point your browser to https://hpc3.rcic.uci.edu/biojhub4/hub/login You will see the following screen where you will use your usual login credentials (UCInetID and password) to sign in:

Fig. 3.1 Sign in
Select your server configuration and start a container
After a successful authentication you will see a screen with server options similar to:
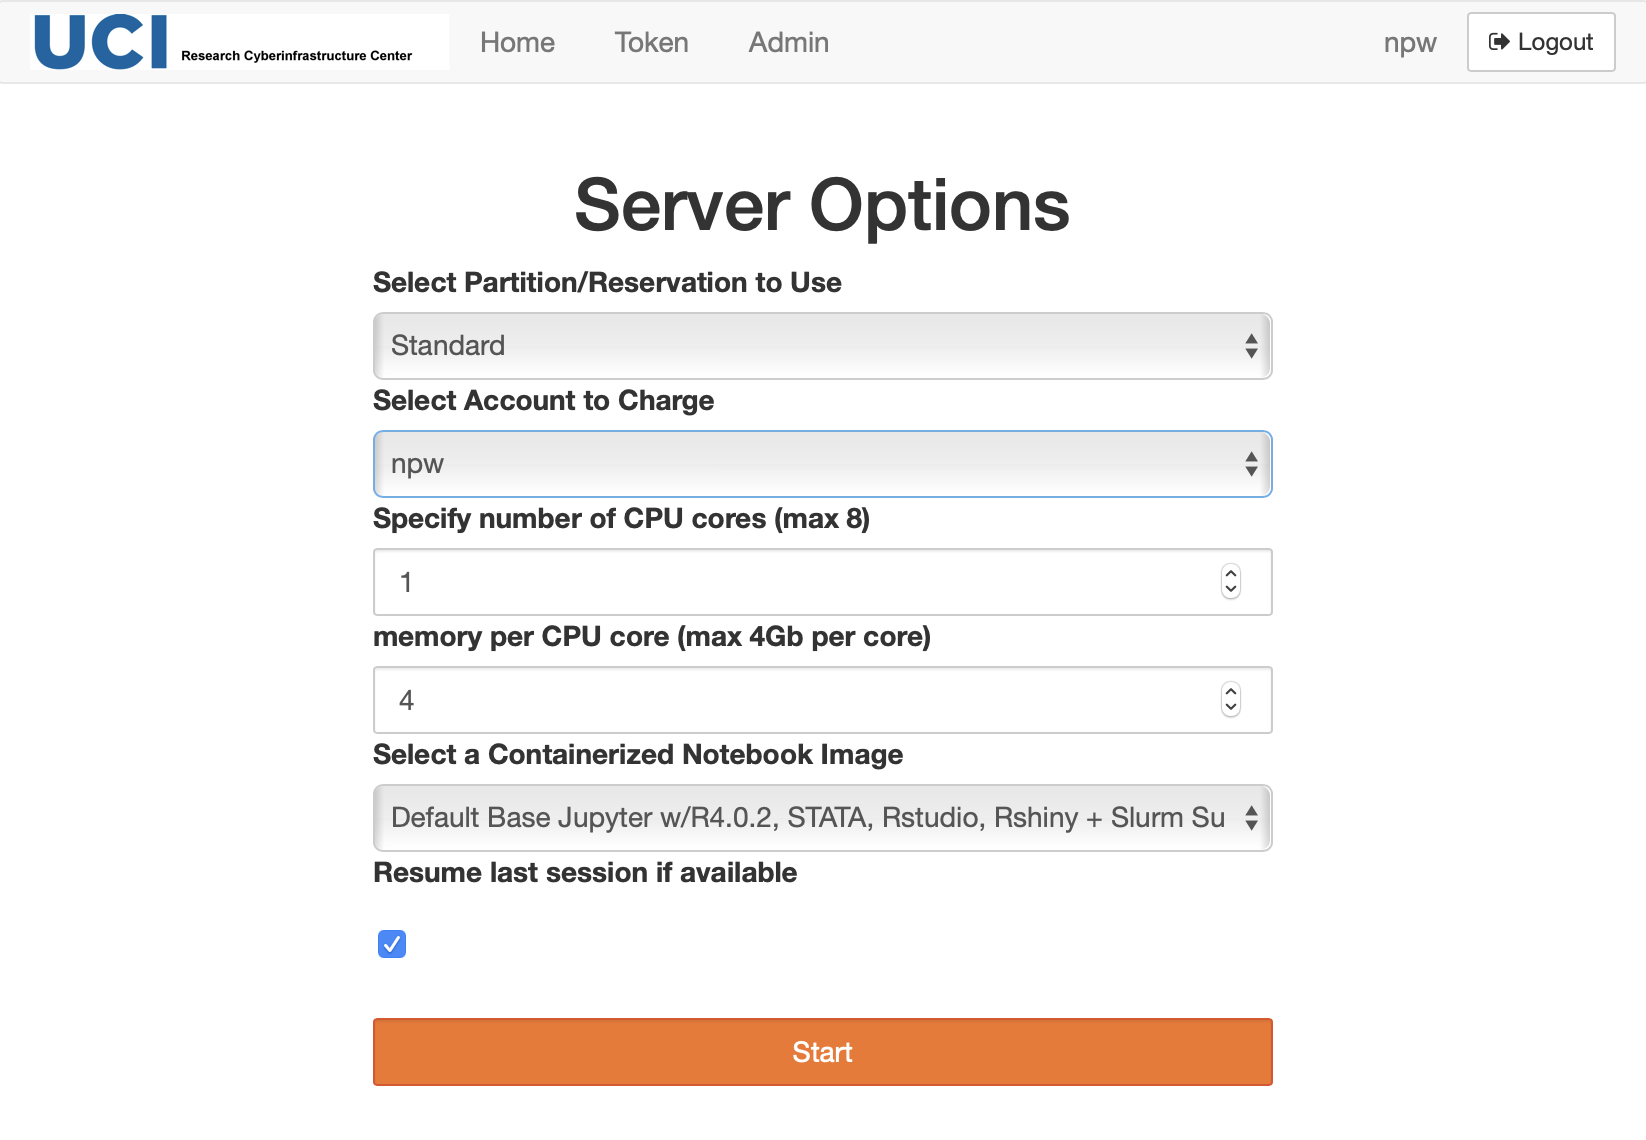
Fig. 3.2 Choose Server Options
Modify
Select Partition/Reservation to use - choose one of partitions or reservations
Select Account to Charge - choose one of your Slurm accounts
Select a Containerized Notebook image - select your desired container. Note, if you used this portal before check carefully the updated list of containers. The older containers names are prefixed with Centos7, and the new containers with Rocky8.
change number of CPUs and amount of memory if needed
Press Start. You may see a screen that looks similar to:

Fig. 3.3 Container is starting
Your server environment
Once the notebook is done spawning, you will get a Launcher screen with a number GUI apps you can use. The first time you start your Lab interface it will look similar to:

Fig. 3.4 Container Initial Lab
The container is a subset of the full HPC3 software stack. A standard Jupyter Notebook can be started from within your running server. You also have access to a Linux command-line terminal, if you need it. You may need to download/upload files, or install a few R or Python packages. Please see Install in JupyterHub guide.
Important
You must have sufficient space in your $HOME in order to run a session.If your $HOME is full the server will fail to start with an error similar to theSpawn failed: Server at <…> didn’t respond in 300 seconds where <…> shows the http address of a compute node where the container was placed to start.You need to bring your $HOME usage under the :ref:`quota <home quotas>` before you can start your session.
Your server generated files
Your running container generates session files and directories. Usually, these are placed in your $HOME. For example, if you login on HPC3 you might see in your $HOME:
[user@login-x:~]$ ls
biojhub4.12098786.err
biojhub4.12098786.out
biojhub4_dir
biojhub4.12098786.err is a session error file. The number in the file name is a Slurm JOBID. The file contains info messages about the session plus will have any error messages which are helpful to identify reasons for container failure to start or work.
biojhub4.12098786.out is a session output file. It contains mostly environment settings associated with the container.
biojhub4_dir - a directory to keep container generated files (temporary, cache, or persistent). This is NOT a place where you work with your data files and programs, this is needed for a container.
If you run many sessions without clearing out these files and directories you can fill up your $HOME quota and your container will not start a new session or will fail to continue the current one.
One can set an alternative place for biojhub4_dir in the pub area. You will need to edit your ~/.bashrc file and at the end add a line (use your UCInetID):
export biojhub4HOME="/pub/UCInetID/biojhub4_dir"Your next invocation of the container will write session files in your /pub/UCInetID/biojhub4_dir location. The biojhub4.*.err and biojhub4.*.err files are still written in your $HOME and need a periodic removal.
Shutdown your server
Attention
Be sure to stop your JupyterHub server after you are done with your work.This releases computing resources for other active computational needs.Your notebooks and other files should be saved prior to shutting down your lab. Jupyter writes a state file for your lab, so that when you relaunch the server, you will be back where you were prior to shutting down.
The shutdown process involves (1) shutting down ALL your notebooks (2) then shutting down the server. If you simply shutdown the server, the notebooks remain running and consume server resources.
Step 1: Shut down notebooks
For each active notebook, from the File menu choose Close and Shutdown Notebook:

Fig. 3.5 Close and Shutdown Notebook
There will be a pop-up window asking to confirm, click Ok

Fig. 3.6 Confirm Closing Notebook
Alternatively, choose the sessions tab on the left hand panel and click SHUT DOWN for each session:
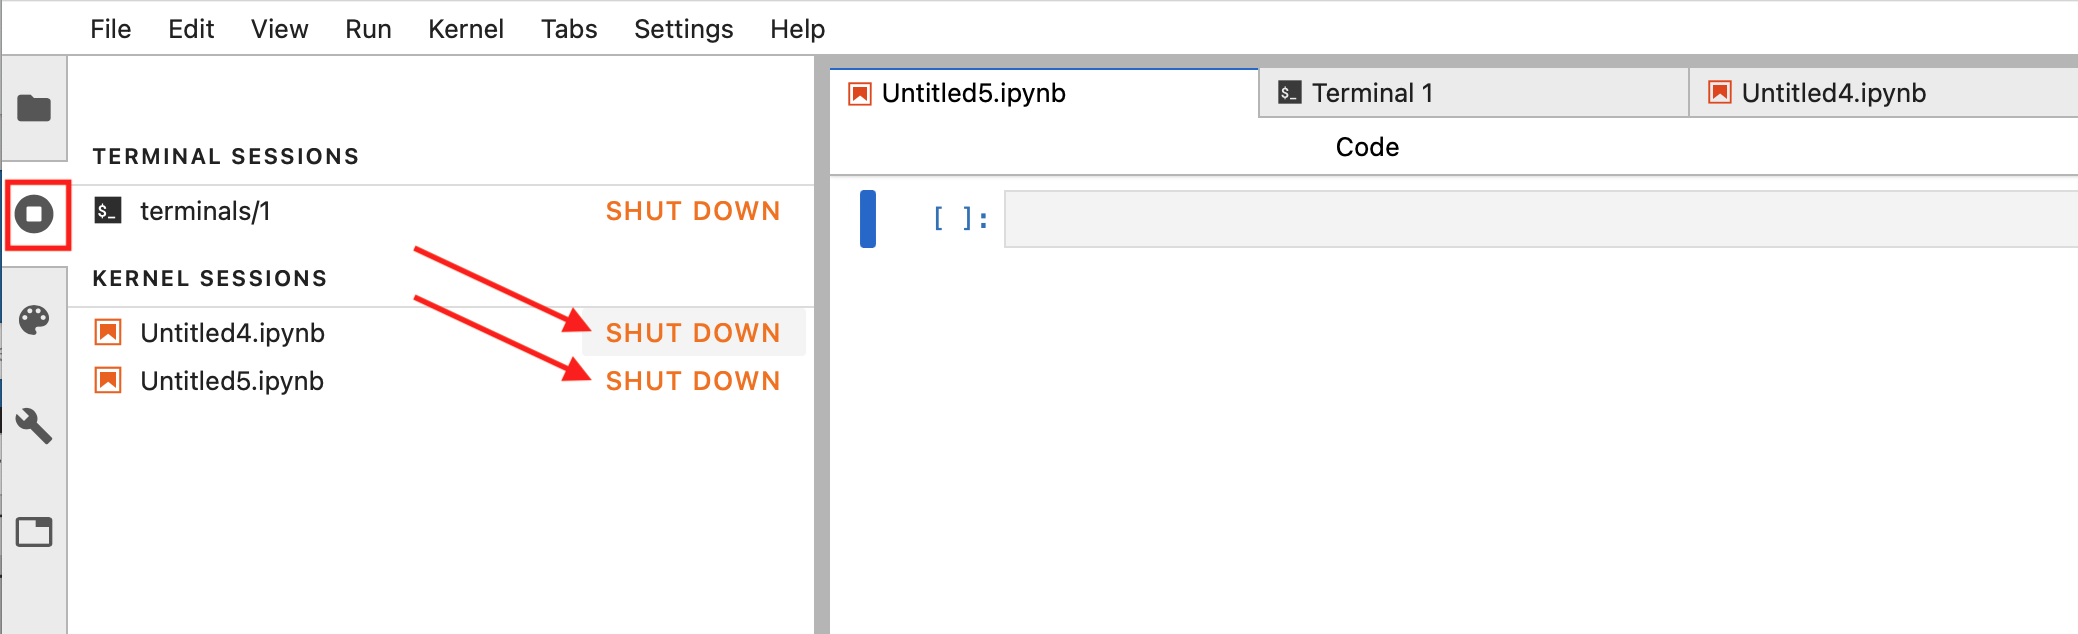
Fig. 3.7 Alternative notebook closure method
Step 2: Shutdown server
From the File menu choose Hub Control Panel:
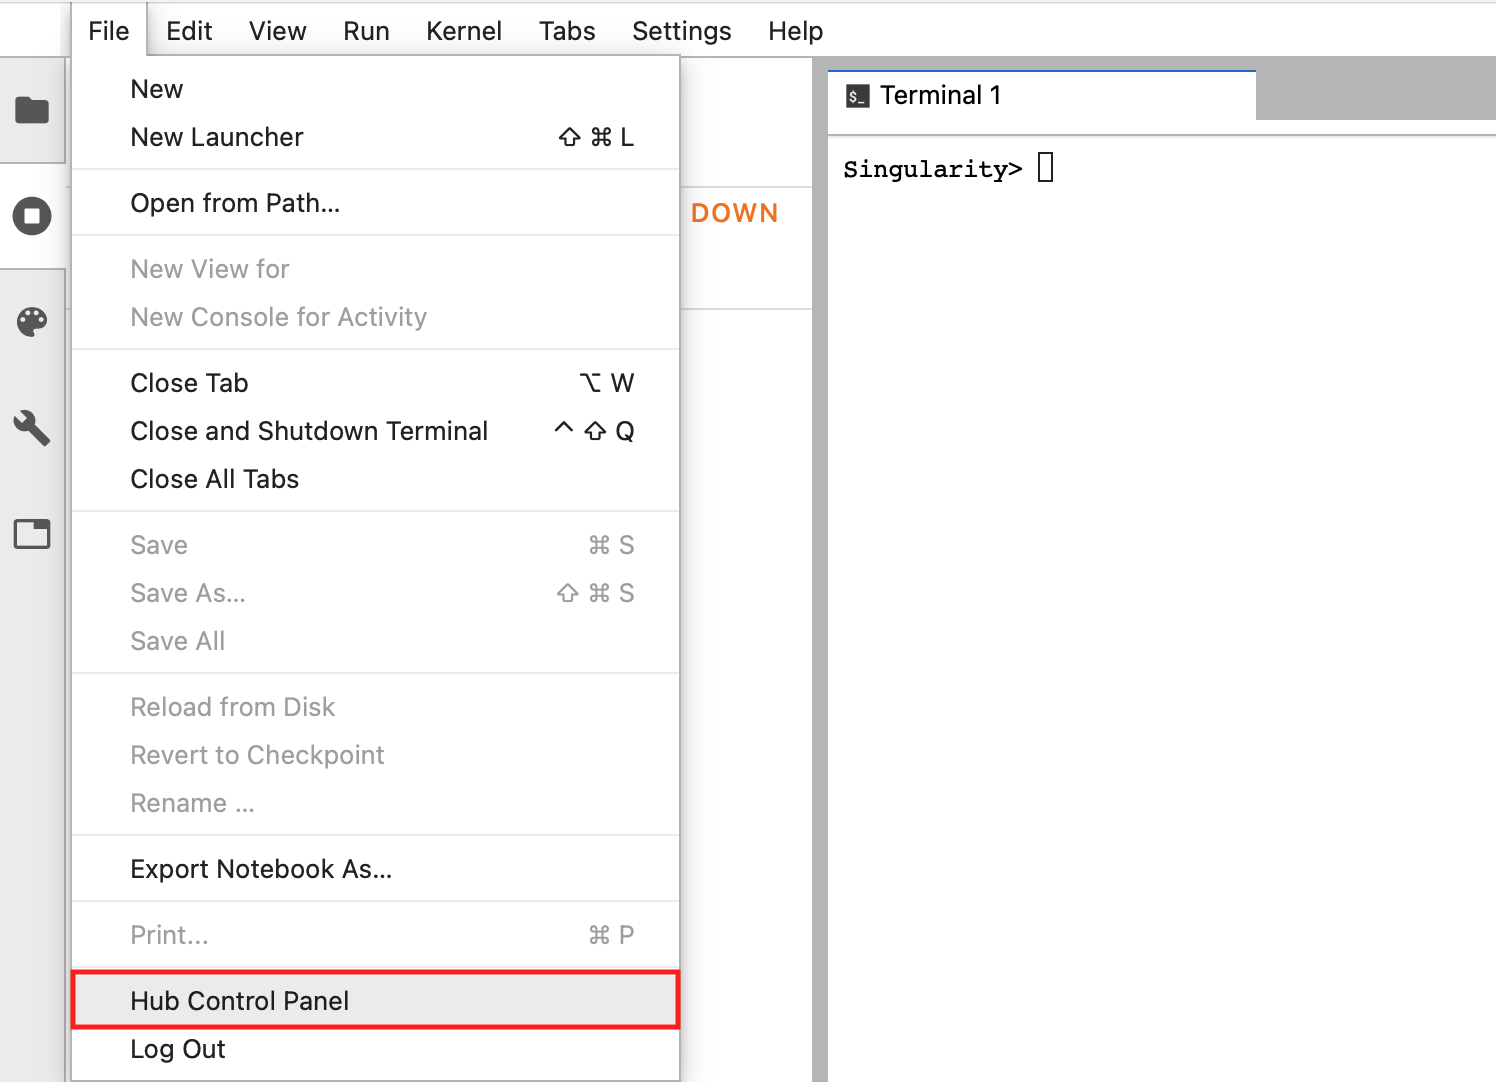
Fig. 3.8 Hub Control panel
and you will be forwarded to a screen where you can press on Stop My Server to shut down the server:

Fig. 3.9 Server logout
your window should look similar to the following when the server is stopped:

Fig. 3.10 Server Logout Result
3.6. Jupyter Notebook
Sometime people create specific conda environments with additional software and wish to run them in Jupyter notebooks. As we do not allow computational jobs on login nodes, here are the steps to run notebooks on interactive nodes.
Once you login to HPC3, get an interactive node using
sruncommand. The example below will give 1 CPU and default 3 GB memory. For most cases this is sufficient.[user@login-x:~]$ srun -p free --pty /bin/bash -i
In some instances, users need to request more memory which is done with –mem= or –mem-per-cpu directives (see more info in Requesting Resources) and specify that all cores should be on a single node. For example, to get 20 GB for your Notebook do:
[user@login-x:~]$ srun -p free --mem=20G --node=1 --pty /bin/bash -i
Please note, the above requests are for a free partition, depending on what work you do you may need a standard partition.
After executing
sruncommand you will be put on a compute node of the cluster. Take a note of the hostname, it is usually a part of your shell prompt. If unsure simply execute this command to find out:[user@hpc3-14-00:~]$ hostname -s
In this example the hostname (node name) is hpc3-14-00
Load your desired anaconda module, for example:
[user@hpc3-14-00:~]$ module load anaconda/2020.07
Pick a high numbered port (above 6000) and check if it is free:
[user@hpc3-14-00:~]$ ss -l -n | grep 8989
If the port is free there will be no output from the command. If there is an output from the command, then the port is in use, pick another number and check again until you find a free port
Start the notebook with the –ip, –port and –no-browser options. For the ip the following command will automatically fill in the correct value, for example:
[user@hpc3-14-00:~]$ jupyter notebook --no-browser --ip=$(hostname -s) --port=8989
[I 18:19:57.912 NotebookApp] JupyterLab extension loaded from /opt/apps/anaconda/2020.07/lib/python3.8/site-packages/jupyterlab
[I 18:19:57.912 NotebookApp] JupyterLab application directory is /opt/apps/anaconda/2020.07/share/jupyter/lab
[I 18:19:57.914 NotebookApp] Serving notebooks from local directory: /data/homezvol0/panteater
[I 18:19:57.914 NotebookApp] The Jupyter Notebook is running at:
[I 18:19:57.914 NotebookApp] http://hpc3-14-00:8989/?token=ddfb32c5804b57a452e3f66d2d1572e35af845e84b138dc9
[I 18:19:57.914 NotebookApp]  or http://127.0.0.1:8989/?token=ddfb32c5804b57a452e3f66d2d1572e35af845e84b138dc9
[I 18:19:57.914 NotebookApp] Use Control-C to stop this server and shut down all kernels (twice to skip confirmation).
[C 18:19:57.919 NotebookApp]
    To access the notebook, open this file in a browser:
        file:///data/homezvol0/panteater/.local/share/jupyter/runtime/nbserver-4042129-open.html
    Or copy and paste one of these URLs:
        http://hpc3-14-00:8989/?token=ddfb32c5804b57a452e3f66d2d1572e35af845e84b138dc9
     or http://127.0.0.1:8989/?token=ddfb32c5804b57a452e3f66d2d1572e35af845e84b138dc9
At this point, you don’t have a prompt and you can’t do anything in this window as your Jupyter notebook is running.
Note the last URL line of the output above, it includes local host IP, port and a token. Take a note of this line and copy it. You will need to use it on your laptop in the browser. The URL line to use must start with http://127.0.0.1:.
Note, your output from
jupyter notebookcommand will have a different port, host and a token string.On your laptop connect to the cluster in a new terminal window using
sshtunnel and information about your Jupyter notebook start. For our example, for the hostname hpc3-14-00 and port 8989 from the above step and using a local laptop port 9090 a user will run command (use your UCInetID):ssh -L 9090:hpc3-14-00:8989 UCInetID@hpc3.rcic.uci.eduWhen asked for a password and DUO authentication, use your usual credentials.
Note, the first port occurrence in 9090:hpc3-14-00:8989 is the local port on your laptop, and you can pick any free port on your laptop (use your laptop documentation how to find a free port). If you pick a local port that is already in use the
sshcommand will fail, simply use another port number above 6000.The second port occurrence in 9090:hpc3-14-00:8989 is the remote port on the cluster node that was configured for use by Jupyter when you run the
jupyter notebookcommand.
On your laptop, open your browser and paste into the URL address area the URL string that was produced by starting your Jupyter instance (in step 5) and changing port for your chosen local port (use a line from your output):
http://127.0.0.1:9090/?token=ddfb32c5804b57a452e3f66d2d1572e35af845e84b138dc9Your Jupyter Notebook will be running in the browser on your laptop.
Attention
ssh -L 8989:hpc3-14-00:8989 UCInetID@hpc3.rcic.uci.edu3.7. Large memory
Some jobs may need more memory. For these jobs users will need to set
memory requirement
the number of CPUs to use
File large-memory.sub
#!/bin/bash

#SBATCH -A panteater_lab        ## account to use
#SBATCH -J test-0.50            ## job name
#SBATCH -p standard             ## partition/queue name
#SBATCH --nodes=1               ## number of nodes the job will use
#SBATCH --mem=100000            ## request 100,000 MB of memory
#SBATCH --ntasks-per-node=33    ## number of tasks to launch per node
                                ## is ceiling(100,000 MB / 3,072 MB/core) or 33 tasks
module load gcc/8.4.0
module load mkl/2019.5.281
module load julia/1.6.0
./run.sh 3 0.50 1.00
3.8. MATLAB
Note
Interactive job
Get an interactive node and start MATLAB
[user@login-x:~]$ srun -p free --pty /bin/bash -i
srun: job 2839817 queued and waiting for resources
srun: job 2839817 has been allocated resources
[user@hpc3-y-z:~]$ module load MATLAB/R2020a
[user@hpc3-y-z:~]$ matlab -r
Single core/CPU
File matlab-single-cpu.sub
#!/bin/bash

#SBATCH -p standard           ## run on the standard partition
#SBATCH -N 1                  ## run on a single node
#SBATCH -n 1                  ## request one task (one CPU)
#SBATCH -t 5-00:00:00         ## 5-day run time limit

module load MATLAB/R2020a
matlab -batch -singleCompThread mycode -logfile mycode.out
The above submit script specifies resources needed for the job with #SBATCH directives and MATLAB command to run the code from mycode.m file. Note, you don’t need to use .m extension, MATLAB automatically appends it. Because the default is one CPU per task, -n 1 can be thought of as requesting 1 CPU.
The equivalent command-line method (lines are broken for readability):
[user@login-x:~]$ module load MATLAB/R2020a
[user@login-x:~]$ sbatch -p standard -N 1 -n 1 -t 05-00:00:00 \
                  --wrap="matlab -batch -singleCompThread mycode -logfile mycode.out"
Multiple core/CPU
File matlab-multi-cpu.sub
#!/bin/bash

#SBATCH -p standard      ## run on the standard partition
#SBATCH -N 1             ## run on a single node
#SBATCH -n 12            ## request 12 tasks (12 CPUs)
#SBATCH -t 02-00:00:00   ## 2-day run time limit

module load MATLAB/R2020a
matlab -batch -singleCompThread mycode -logfile mycode.out
Similar to a single CPU job. Asking for -n 12 can be thought of as requesting 12 CPUs.
The equivalent command-line method (lines are broken for readability):
[user@login-x:~]$ module load MATLAB/R2020a
[user@login-x:~]$ sbatch -p standard -N 1 -n 12 -t 02-00:00:00 \
                  --wrap="matlab -batch -singleCompThread mycode -logfile mycode.out"
Parallel pool on a single node
MATLAB jobs can be run on multiple CPUs in a parallel pool. This requires use of parpool and parcluster commands in MATLAB code to setup the pool. The parfor loop is used to distribute iterations to multiple workers where each worker is running on a different CPU.
Note
Current UCI MATLAB license does not include MATLAB Parallel Server.This means running parallel MATLAB jobs across multiple nodes is not supported.Parallel pool jobs can be run only on a single node.File matlab-parallel.sub
#!/bin/bash

#SBATCH --job-name=matlab-example ## set job name
#SBATCH -p free                   ## partition
#SBATCH -N 1                      ## number of nodes can be only 1
#SBATCH --ntasks=10               ## set number of CPUs for parallel run
#SBATCH -t 00:30:00               ## time limit 30 min
#SBATCH --out=slurm-%A.out        ## slurm output

# load a MatLab module
module load MATLAB/R2021b

# matlab script basename
MATLAB_FILE=prime

# execute code
cd $SLURM_SUBMIT_DIR
matlab -batch $MATLAB_FILE > matlab-example.out
The above submit script specifies resources needed for parallel job to execute the MATLAB code from prime.m file and collect desired output in the output file matlab-example.out (different from SLURM output file).
Note that requested number of tasks is used in MATLAB script to setup the parallel pool size via a SLURM variable SLURM_NTASKS. Contents of prime.m:
File prime.m
% Distribute iterations to multiple workers
% in a parallel pool on a single node

% open the default local cluster profile for a single node job
p = parcluster('local');

% number of workers for the pool
nworkers = str2double(getenv('SLURM_NTASKS'));

% open the parallel pool, recording the time it takes
tic;
parpool(p, nworkers);
fprintf('Opening the parallel pool took %g seconds.\n', toc)

% here run your algorithm

% integer factorization example is from
% https://www.mathworks.com/help/parallel-computing/scale-up-from-desktop-to-cluster.html
primeNumbers = primes(uint64(2^8));
compositeNumbers = primeNumbers.*primeNumbers(randperm(numel(primeNumbers)));
factors = zeros(numel(primeNumbers),2);

% run on the pool of workers
tic;
parfor idx = 1:numel(compositeNumbers)
    factors(idx,:) = factor(compositeNumbers(idx));
end
elapsedTime = toc;

% print result matrix and time it took to calculate
factors
fprintf('Calculation took %g seconds.\n', elapsedTime)

% close the parallel pool and exit
delete(gcp);
exit
Changing the MATLAB code to hello.m in the submit script can run “Hello World” example that shows another way to use parallel workers.
File hello.m
% An example "Hello World" code for illustration how to
% parallelize MatLab processes across a single node with
% a pool of workers.

% open the default local cluster profile for a single node job
p = parcluster('local');

% number of workers for the pool
nworkers = str2double(getenv('SLURM_NTASKS'));

% open the parallel pool, recording the time it takes
tic;
parpool(p, nworkers);
fprintf('Opening the parallel pool took %g seconds.\n', toc)

% "single program multiple data"
spmd
    fprintf('Worker %d says Hello World!\n', labindex)
end

% close the parallel pool and exit
delete(gcp);
exit
3.9. MPI
MPI jobs use multiple cores across different nodes. The following submit script will use 80 cores across 2 different nodes. Each core will be allocated a default 3 GB of memory for a total of 240 GB for the job.
File mpi.sub
#!/bin/bash

#SBATCH -p standard         ## partition/queue name
#SBATCH --nodes=2           ## number of nodes the job will use
#SBATCH --ntasks=80         ## number of processes to launch
#SBATCH --cpus-per-task=1   ## number of MPI threads
                            ## total RAM request = 80 * 3 GB/core = 240 GB

# Run MPI application
module load openmpi/4.1.1/gcc.system
mpirun -np $SLURM_NTASKS your_app > output.txt
- Special case openmpi
This scenario applies ONLY to applications that are compiled using one of Open MPI modules (versions 4.0.x and 4.1.x) and have failed with the following error when run on multiple nodes:
[btl_openib_component.c:3655:handle_wc] Unhandled work completion opcode is 136
The Open MPI versions in 4.0.x and 4.1.x series use openib interface which no longer works the same way under a new operating system. The solution is to instruct Open MPI to use UCX. This is done via the following in your submit script:
#SBATCH –constraint=”mlx5_ib” run on nodes with updated InfiniBand firmware
Use 3 export commands to set the UCX parameters for Open MPI
Add -mca mpl ucx parameters to your
mpiruncommand
File mpi-special-case.sub
#!/bin/bash
#SBATCH --job-name=myjob
#SBATCH -p standard
#SBATCH -A ANTEATER_LAB
#SBATCH --ntasks=80
#SBATCH --nodes=2                ## (-N) number of nodes to use
#SBATCH --cpus-per-task=1        ## number of cores the job needs
#SBATCH --constraint="mlx5_ib"   ## run only on nodes with updated IB firmware
#SBATCH -t 01-00:00:00

# set these UCX parameters for openmpi
export OMP_NUM_THREADS=1
export UCX_TLS=rc,mm
export UCX_NET_DEVICES=mlx5_0:1

# load your application module
module load vasp/6.1.2

# original command is updated  with: -mca pml ucx
mpirun -np $SLURM_NTASKS -mca pml ucx vasp_std
3.10. MPI/OpenMP hybrid
A hybrid job uses multiple processes and multiple threads within each process. Usually, MPI is used to start the multiple processes, and then each process uses a multi-threading library to do computations with multiple threads.
Here is an example of 8 MPI processes running on 2 nodes (4 MPI tasks per node) with 5 OpenMP threads per each process, each OpenMP thread has 1 physical core and needs 3 GB memory. The job requests a total of 40 cores and 120 GB of memory.
File hybrid.sub
#!/bin/bash

#SBATCH -p standard             ## partition/queue name
#SBATCH --nodes=2               ## number of nodes the job will use
#SBATCH --ntasks-per-node=4     ## number of MPI tasks per node
#SBATCH --cpus-per-task=5       ## number of threads per task
                                ## total  RAM request = 2 x 4 x 5 x 3 GB/core = 120 GB

# You can use mpich or openmpi, per your program requirements
# only one can be active
module load openmpi/4.0.3/gcc.8.4.0

export OMP_PROC_BIND=true
export OMP_PLACES=threads
export OMP_NUM_THREADS=$SLURM_CPUS_PER_TASK  # Set num threads to num of
                                             # CPU cores per MPI task.
mpirun -np $SLURM_NTASKS app_executable > output.txt
3.11. OpenMP
OpenMP jobs use multiple cores on a single machine. Below is an example of a submission script that utilizes 6 physical cores to run OpenMP program. In a strictly OpenMP job the number of nodes is always 1.
File openmp.sub
#!/bin/bash

#SBATCH -p standard             ## partition/queue name
#SBATCH --nodes=1               ## number of nodes the job will use
#SBATCH --ntasks=1              ## number of processes to launch
#SBATCH --cpus-per-task=6       ## number of OpenMP threads. !! MUST BE DEFINED !!
                                ## total RAM request = 6 * 3 GB/core = 18 GB
module load openmpi/4.0.3/gcc.8.4.0
export OMP_NUM_THREADS=$SLURM_CPUS_PER_TASK
/path/to/openmp-program
Note, the value of OMP_NUM_THREADS is defined to be equal to the value of Slurm variable SLURM_CPUS_PER_TASK. This ensures that any change to a number of requested threads is automatically passed to OpenMP.
3.12. Python
Single core/CPU
File python-single-cpu.sub
#!/bin/bash

#SBATCH -p standard                   ## run on the standard partition
#SBATCH -N 1                          ## run on a single node
#SBATCH -n 1                          ## request 1 task (1 CPU)
#SBATCH -t 2:00:00                    ## 2 hr run time limit
#SBATCH --mail-type=end               ## send email when the job ends
#SBATCH --mail-user=UCInetID@uci.edu  ## use this email address

module load python/3.8.0
python myscript.py
The above will submit the Python3 code with specified requested resources.
The equivalent command-line method:
[user@login-x:~]$ module load python/3.8.0
[user@login-x:~]$ sbatch -p standard -N 1 -n 1 -t 2:00:00 --mail-type=end \
                         --mail-user=UCInetID@uci.edu --wrap="python3 myscript.py"
Multiple core/CPU
File python-multi-cpu.sub
#!/bin/bash

#SBATCH -p standard                   ## run on the standard partition
#SBATCH -N 1                          ## run on a single node
#SBATCH -n 1                          ## request 1 task
#SBATCH -c 12                         ## request 12 CPUs
#SBATCH -t 5-                         ## 5 day run time limit

module load python/3.8.0
python myscript.py
The above will submit the Python3 code with specified requested resources.
The equivalent command-line method:
[user@login-x:~]$ module load python/3.8.0
[user@login-x:~]$ sbatch -p standard -N 1 -n 1 -c 12 -t 5- --wrap="python myscript.py"
3.13. R
Single core/CPU
Nearly all R jobs will only use a single core.
File R-single-cpu.sub
#!/bin/bash

#SBATCH -p standard  ## run on the standard partition
#SBATCH -N 1         ## run on a single node
#SBATCH -n 1         ## request 1 task (one CPU)
#SBATCH -t 1-        ## 1-day run time limit

module load R/4.1.2
R CMD BATCH --no-save mycode.R
The above will submit the R code mycode.R with specified requested resources. Note: because the default is one CPU per task, -n 1 can be thought of as requesting 1 CPU.
The equivalent command-line method:
[user@login-x:~]$ module load R/4.1.2
[user@login-x:~]$ sbatch -p standard -N 1 -n 1 -t 1- \
                         --wrap="R CMD BATCH --no-save mycode.R"
Single node Parallelization
When working on a single compute node, one can use R parallel libraries to achieve the processor level parallelism. Your code must use library(“parallel”). When you request X CPUs your code will run on a single node (serial job) but will be using X requested CPUs in parallel.
File R-multi-cpu.sub
#!/bin/bash

#SBATCH -p standard  ## run on the standard partition
#SBATCH -N 1         ## run on a single node
#SBATCH -n 12        ## request 12 tasks (12 CPUs)
#SBATCH -t 00:20:00  ## 20 min run time limit

module load R/4.1.2
R CMD BATCH --no-save mycode.R
The above will submit the R code mycode.R with specified requested resources. Note: because the default is one CPU per task, -n 12 can be thought of as requesting 12 CPUs.
The equivalent command-line method:
[user@login-x:~]$ module load R/3.6.2*
[user@login-x:~]$ sbatch -p standard -N 1 -n 12 -t 00:20:00 \
                         --wrap="R CMD BATCH --no-save mycode.R"
Multi-Node Parallelization
There are very few jobs that need this.
One can use parallelization across multiple compute nodes. To allow for communication between R processes running on different compute nodes your job needs to meet the following requirements:
Your desired R software package must be using MPI, specifically must use library(‘Rmpi’). The desired software package and the Rmpi library must be installed by the user. Before installing load one of the MPI modules in addition to your R module. For example for R/4.3.3 use openmpi/4.1.2/gcc.11.2.0.
Your submit script must load the same R and MPI modules that were used for the library install.
Your submit script must request a number of nodes and a number of CPUs to use.
Your submit script actual execute command must use
mpirun.
3.14. RStudio
There a few ways to run RStudio.
Windows users
This method usually works for users who connect to the cluster using MobaXterm.
Once logged in, claim an interactive session, load RStudio and R modules and start
rstudio:[user@login-x:~]$ srun -p free --pty --x11 /bin/bash -i srun: job 1839817 queued and waiting for resources srun: job 1839817 has been allocated resources [user@lhpc3-y-z:~]$ module load rstudio/1.4.1106 [user@lhpc3-y-z:~]$ module load R/4.0.2 [user@hpc3-y-z:~]$ rstudio
Mac users
- Prerequisite:
Your local Mac needs to have XQuartz installed. This is a standard application that provides X Window system for macOS. Follow your Mac applications installation guide if you don’t have XQuartz installed.
Login on the cluster using X forwarding. This means using -X or -X -Y option in the ssh command. For example:
ssh -X panteater@hpc3.rcic.uci.eduOnce logged in, claim an interactive session, load RStudio and R modules. Enforce software rendering engine in the
rstudiocommand:[user@login-x:~]$ srun -p free --pty --x11 /bin/bash -i # claim an interactive session srun: job 1839817 queued and waiting for resources srun: job 1839817 has been allocated resources [user@hpc3-y-z:~]$ module load rstudio/1.4.1106 # load rstudio module [user@hpc3-y-z:~]$ module load R/4.0.2 # load R module [user@hpc3-y-z:~]$ QMLSCENE_DEVICE=softwarecontext rstudio # enforce rendering in rstudio
All users
If the above method does not work for you (common for Mac users), the alternative way is to use our Jupyterhub Portal and a container with RStudio.
3.15. SAS
File sas.sub
#!/bin/bash

#SBATCH -p standard                   ## run on the standard partition
#SBATCH -N 1                          ## run on a single node
#SBATCH -n 10                         ## request 10 tasks (10 CPU)
#SBATCH -t 00:60:00                   ## 60 min run time limit
#SBATCH --mail-type=end               ## send email when the job ends
#SBATCH --mail-user=UCInetID@uci.edu  ## use this email address

module load SAS/9.4
sas -noterminal mycode.sas
The above will submit your SAS code with specified requested resources.
3.16. SRA toolkit fasterq-dump
Danger
fastq-dump, fasterq-dump
or parallel-fastq-dump command directly in any directory
on DFS filesystem results in a deadlock and makes a server UNUSABLE
for ALL users until the server is rebooted.Important
SRA tools prior to v. 3 did not handle writing temp files to a separate directory. Do not use SRA tools prior to v.3 for
fastq-dumporfasterq-dumpcommands.It is faster to do a
prefetchfollowed byfasterq-dump(or any other dump version) compare to lettingfasterq-dumpdo the download.If you already prefetched SRA files simply use the correct full path to them in
fasterq-dumpcommand.
Follow this simple recipe that will prefetch needed SRA sequences and convert them to fastq format. All file writing is done in a scratch local disk and the final files are moved to a desired directory.
File prefetch-fasterq-dump.sub
#!/bin/bash
#SBATCH --job-name=sra3           ## job name
#SBATCH -A panteater_lab          ## account to charge
#SBATCH -p standard               ## partition name
#SBATCH -N 1                      ## run on a single node, cant run across multiple nodes
#SBATCH --ntasks=8                ## CPUs to use as threads in fasterq-dump command
#SBATCH --tmp=100G                ## requesting 100 GB local scratch
#SBATCH --constraint=fastscratch  ## requesting nodes with fast scratch in /tmp

# IMPORTANT: load the latest SRA-tools, earlier versions do not handle temporary disk
module load sra-tools/3.0.0

# TMPDIR is created automatically by SLURM
# change to your temp directory assigned by SLURM to your job
cd $TMPDIR

# here we work on just 2 sequences
for f in {447..448}
do
  # generate ID to prefetch, each ID is SRR1196 plus what is contained in $f variable
  ID=SRR1196${f}

  # prefetch SRA file
  prefetch $ID

  # convert sra format to fastq format using requested number of threads (slurm tasks)
  # temp files are written to fastscratch in $TMPDIR with a 100G limit
  fasterq-dump ./$ID/$ID.sra -e $SLURM_NTASKS --temp $TMPDIR --disk-limit-tmp 100G

  # compress resulting fastq files
  gzip $ID*fastq
done

# move all results to desired location in DFS, directory must exists
mv *fastq.gz /dfsX/panteater_lab/SRA/results/project1/
Your commands may have additional arguments, use them as needed. The
important option to avoid deadlocking is --temp $TMPDIR and do downloads in
$TMPDIR.
3.17. Stata
File stata.sub
#!/bin/bash

#SBATCH -p standard                   ## run on the standard partition
#SBATCH -N 1                          ## run on a single node
#SBATCH -t 01-00:00:00                ## 1-day run time limit
#SBATCH -n 8                          ## request 8 task (8 CPUs)

module load stata/16
stata-mp -b do mycode.do
The above will submit the Stata job (mycode.do) with specified requested resources.
3.18. TensorFlow
TensorFlow CPU
File tensorflow-cpu.sub
#!/bin/bash

#SBATCH -p free          ## run on the free partition
#SBATCH -N 1             ## run on a single node
#SBATCH -n 1             ## request 1 task
#SBATCH -t 02-00:00:00   ## 2-day run time limit

module load tensorflow/2.0.0
python mycode.py
The above will submit the Tensorflow 2.0 CPU job with specified requested resources.
The equivalent command-line method:
[user@login-x:~]$ module load tensorflow/2.0
[user@login-x:~]$ sbatch -p standard -N 1 -n 1 -t 02-00:00:00 --wrap="python mycode.py"
TensorFlow GPU
File tensorflow-gpu.sub
#!/bin/bash

#SBATCH -p gpu              ## run on the gpu partition
#SBATCH -N 1                ## run on a single node
#SBATCH -n 1                ## request 1 task
#SBATCH -t 02-00:00:00      ## 2-day run time limit
#SBATCH --gres=gpu:V100:1   ## request 1 gpu of type V100

module load tensorflow/2.0.0
python mycode.py
The above will submit the GPU Tensorflow 2.0 job. Note request for gpu partition and gres resources.
The equivalent command-line method:
[user@login-x:~]$ module load tensorflow/2.0
[user@login-x:~]$ sbatch -p gpu -N 1 -n 1 -t 02-00:00:00 \
                         --gres=gpu:V100:1 --wrap="python mycode.py"
3.19. VASP
VASP versions 5.4.4 and 6.1.2
These two versions run in a similar way, just load the desired VASP module.
Note, that 3 export statements, –constraint directive and addition of -mca pml ucx to the
mpiruncommand are required.File vasp-5.sub
#!/bin/bash
#SBATCH --job-name=vasp          ## job name
#SBATCH -p standard              ## partition to use
#SBATCH -A panteater_lab         ## account to charge
#SBATCH --ntasks=80              ## need 80 CPU cores
#SBATCH --cpus-per-task=1        ## number of cores the job needs
#SBATCH -t 12:00:00              ## set time limit to 12hrs
#SBATCH --constraint="mlx5_ib"   ## REQUIRED! run only on nodes with updated IB firmware
#SBATCH --nodes=2-4              ## run on 2-4 nodes

# These are REQUIRED parameters
export OMP_NUM_THREADS=1
export UCX_TLS=rc,mm
export UCX_NET_DEVICES=mlx5_0:1

# Load vasp module
module load vasp/5.4.4

# Run your vasp command, note added -mca pml ucx
mpirun -np $SLURM_NTASKS -mca pml ucx vasp_std
VASP version 6.3.2 CPU
The following example shows how to run VASP v 6.3.2 compiled with gcc 11. The module already has correct settings for UCX variables. Please consult VASP documentation on how to use OMP_NUM_THREADS for multiple threads.
Note, –constraint directive and addition of -mca pml ucx to the
mpiruncommand are required. The UCX environment variables are already set by this version of VASP module.File vasp-63.sub
#!/bin/bash

#SBATCH --job-name=vasp-cpu     ## job name
#SBATCH -p standard             ## use standard partition
#SBATCH -A panteater_lab        ## account to charge
#SBATCH --ntasks=40             ## number of CPUs for the job
#SBATCH --cpus-per-task=1       ## number of tasks per CPU
#SBATCH -t 12:00:00             ## time limit is 12hrs
#SBATCH --nodes=2-4             ## run on 204 nodes
#SBATCH --constraint="mlx5_ib"  ## run only on nodes with updated IB firmware

export OMP_NUM_THREADS=1
module load vasp/6.3.2/gcc.11.2.0

mpirun -np $SLURM_NTASKS -mca pml ucx vasp_std
VASP version 6.3.2 GPU
To run VASP on GPU, it is required to run on a single node. It is possible to use up to 4 GPUs on a single node. Please consult VASP documentation how to use multiple GPUs. The following example uses 1 GPU.
File vasp-63-gpu.sub
#!/bin/bash
#SBATCH --job-name=vasp-gpu  ## job name
#SBATCH -p gpu               ## run in gpu partition
#SBATCH -A panteater_lab_gpu ## charge GPU account
#SBATCH --ntasks=10          ## number of tasks provides memory, alternatively
                             ## use --mem parameter
#SBATCH --cpus-per-task=1    ## number of cores the job needs
#SBATCH -t 05:00:00          ## limit run to 5hrs
#SBATCH --nodes=1            ## REQUIRED! run on a single node
#SBATCH --gres=gpu:V100:1    ## REQUIRED! ask for 1 GPU

module load vasp/6.3.2/cudasdk.22.9

mpirun -np 1 vasp_std
3.20. NAMD
Single node multi-CPU job using MPI:
#!/bin/bash

#SBATCH --job-name namd-apoa1
#SBATCH -A panteater_lab
#SBATCH -p standard
#SBATCH --nodes=1
#SBATCH --ntasks-per-node=6

module load namd/2.14b2/gcc.8.4.0-openmpi.4.0.3

cd $SLURM_SUBMIT_DIR
mpirun -np $SLURM_NTASKS namd2 apoa1.namd > out-$SLURM_JOB_NAME-$SLURM_JOBID
Multi node multi-CPU job using MPI:
#!/bin/bash

#SBATCH --job-name namd-apoa1
#SBATCH -p standard
#SBATCH -A ppapadop_lab
#SBATCH --nodes=2
#SBATCH --ntasks-per-node=6

module load namd/2.14b2/gcc.8.4.0-openmpi.4.0.3

cd $SLURM_SUBMIT_DIR
mpirun -np $SLURM_NTASKS namd2 apoa1.namd > out-$SLURM_JOB_NAME-$SLURM_JOBID
Multi node multi-GPU job using MPI:
#!/bin/bash
#SBATCH --job-name namd-apoa1
#SBATCH --partition=gpu
#SBATCH -A hackathon_gpu
#SBATCH --nodes=2             # 2 nodes
#SBATCH -t 01:00:00
#SBATCH --ntasks-per-node=2   # 2 processes per node
#SBATCH --cpus-per-task=2     # 2 threads mapping to 2 cores per node
#SBATCH --gres=gpu:2          # 1 GPUs per node

module load namd/2.14b2/gcc.8.4.0-cuda.10.1.243
module load openmpi/4.1.2/gcc.8.4.0

# calculate total processes (P) and cpus per node
P=$(( SLURM_NTASKS_PER_NODE * SLURM_NNODES ))
PPN=$SLURM_CPUS_PER_TASK

cd $SLURM_SUBMIT_DIR
mpirun -np $P namd2 +ppn $PPN +setcpuaffinity +ignoresharing +isomalloc_sync apoa1.namd > out-$SLURM_JOB_NAME-$SLURM_JOBID